|
 |
|||||||||||||||||||||||||
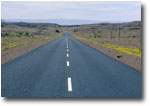
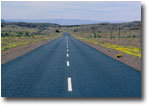
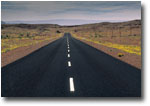
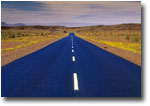
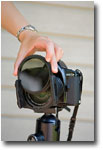
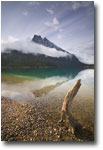
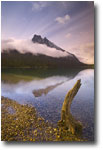
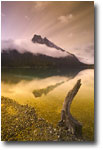
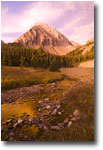
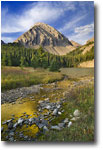
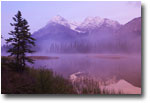
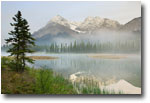
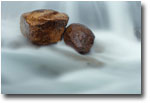
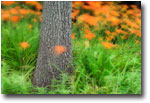
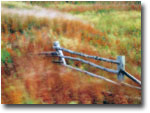
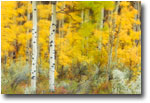
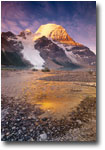
The Polarizer One filter that is still necessary even for digital photographers is the polarizing filter. The effect of a polarizer can not be replicated in photo software. There are many photo programs out there that claim to replicate the polarizer effect, but the fact is they don’t. A polarizer removes reflective highlights from a scene. Software just darkens and adds saturation to these highlights it doesn’t remove the glare. Let’s take a closer look. Photo 1 is an image of a highway in Namibia shot with no filters. Photo 2 is the same image processed with photo software using the software’s ‘polarizer filter’. Photo2 is definitely better than photo 1. But look at photo 3 - this version was photographed using a Singh-Ray warm-tone polarizer. The built in warming filter on this polarizer removed the blue cast (something we could easily do in photo 2 using photo software) but more importantly, the polarizer removed the reflective highlights from the scene altering the contrast and saturation of the highlights.. It would take a serious amount of Photoshop work to get photo 1 (the un-polarized version) to even come close to photo 3 - if it could be done at all! A polarizer should be in every nature photographer’s bag – for details on how to use a polarizer see Filters for Outdoor Photography The Gold-N-Blue Polarizer Over the last 10-15 years one filter has really caught on with nature photographers - the Cokin blue-yellow polarizer. Rather than remove reflective highlights, this filter colors highlights in intense shades of blue or yellow depending on the orientation of the filter. Spin it around on the front of your lens and the highlights change from metallic blue to sheens of shimmering gold like magic. Photo 4 is the same Namibia road shot photographed with the blue-yellow polarizer (in this case rotated so the highlights on the highway are colored blue). Once again, try and take photo 1 and turn it into photo 4 using photo software – good luck! The Cokin blue-yellow is a very cool filter but unfortunately it is not optically very sharp. Singh-Ray came to the rescue with their version of the filter called the Gold-n-Blue Polarizer (http://www.singh-ray.com/goldnblue.html) which is optically up to snuff. They sell versions mounted into filter rings to fit any size lens or as a sprocket-type polarizer made to fit the Cokin P-holder. I prefer the sprocket mount version as shown in photo 5 so I can use the Gold-n-Blue polarizer on any of my lenses and in combination with other filters. With slide film the blue-yellow or Gold-n-Blue polarizers are easy to use. They are “what you see is what you get filters”. Just spin them around till you see something you like and then snap away – what you see through the lens is what you get on film. For example, Photo 6 is a warm-toned polarized version of Emerald Lake in Yoho National Park. Photos 7 and 8 are the same scene except shot with the Singh-Ray Gold-n-Blue with one image shot to give blue highlights (photo 7) and one shot to give gold highlights (photo 8). Slide film really likes the Gold-n-Blue and blue-yellow polarizers. With digital cameras things are different. First if you try to use “auto white balance” on your camera with theses polarizers, the camera will freak out! It simply does not know how to color correct a blue and gold cast in an image simultaneously! It is best to shoot using ‘daylight’ white balance when shooting with the Gold-N-Blue or blue-yellow polarizers with digital cameras. Even then, what you see on your preview screen will not look like what you saw through the viewfinder. Usually the preview image will look very magenta or orange. Not to worry though, there is a way to get the Gold-n-Blue and blue-yellow polarizers to look like they did through the viewfinder. Here is how I do it; I shoot RAW capture and have my default white balance on my camera set to ‘daylight”. In my RAW processor (I use Adobe Camera Raw - ACR) I simply take the grey eyedropper and click on anything in the photo I want to be neutral (e.g. white snow, white clouds, black shadows, grey sky or grey rocks). I try several spots until I get colors similar to what I saw in the viewfinder. Then I let ACR do its magic. Often the colour temperature in the ACR corrected image is in the 2500 to 3200 K range and the ‘tint’ is shifted to -25 to -60. For example, Photo 9 is a RAW capture of a mountain scene shot with the Gold-N-Blue filter rotated to give gold reflections (it looks nasty – this is why digital photographers using the Gold-n-Blue polarizer often flip out!). With ACR I simply used the grey eyedropper on one of the foreground rocks to get the colors back to where they needed to be to give me a rendition similar to what I saw at the time of shooting. I also did a little local lightening (to the foreground) and darkening (to the sky and peaks) using Photoshop to give a more even exposure to the scene. The result is Photo 10. As another example, I also used the ACR grey eyedropper to take the RAW capture in photo 11 to what I had seen while looking through the viewfinder when using my Gold-N-Blue polarizer – Photo 12. The Neutral Density Filter This filter is simply one that is neutral grey and reduces the amount of light going into the camera. They come in various filter sizes to screw onto the filter threads of your lenses or as filters that can be dropped into a Cokin P-holder. They range from one stop to eight stops of density. Why would you want less light and thus longer exposures in nature photography? The simple answer is to record motion as a moving blur. A commonly used scenario for the use of an ND filter is to record flowing water as a soft veil. In photo 13, I used an 8-stop ND filter in combo with a warm-tone polarizer (2 more stops less light) for a total of 10 stops less light to give me misty looking water with a 30 second exposure at f 16 in mid-day light. Without the filters my exposure would be have been 1/30th of a second at f16 and the water would not appear so ethereal. Anytime there is a moving subject (whipping waves, flitting flowers, or rustling leaves) you can turn them into a blur of motion to visually show the effects of wind, tide, or gravity on natural objects. For example, in Photo 14, I used an 8 stop ND filter to give me a 20 second exposure to record wind-tossed tiger lilies in a forest. I used a 5 stop ND filter to show windblown fall colours in a scene from Newfoundland (photo 15) and an 8 stop ND filter to show blurred fall colors in Alberta (photo 16). Singh-Ray makes a Vari-ND filter that screws onto the front of your lens and that allows you to rotate the filter to dial in from 2 to 8 stops of neutral density (www.singh-ray.com). This filter is great for experimenting with motion effects but is only available in a 77mm filter ring. I often like to combine a polarizer and an ND filter together and with the Vari-ND this is difficult. For those times when I want to combine a polarizer with an ND filter, I use a sprocket polarizer along with a Singh-Ray 5-stop solid ND filter that both fit into my Cokin P-holder – this combo reduces the light by seven stops and allows me to capture some really interesting motion effects and benefit from the effects of either the Gold-N-Blue or warming polarizer. With a warm-tone polarizer, Gold-n-Blue polarizer and a straight ND filter, you open up a world of possibilities in terms of in-camera captures. No-one, no matter the expertise they have with photo software can come up with results that these filters give you simply by plopping them onto the front of your lenses (e.g. see photo 17 – Gold-n-Blue and 5 stop ND in combo). Happy filtering! DW-NPN 0343 About the author...
Darwin has been shooting stock since 1990, and has two recent best-selling books: How to Photograph the Canadian Rockies and Dances with Light - The Canadian Rockies. Darwin's latest books The Romance of Niagara and a book on mixed breed dogs entitled Mutts are now avialable. Darwin leads photo tours in the Canadian Rockies and writes instuctional articles for print and on-line photo magazines. You can view more of Darwin's work and get workshop information at www.darwinwiggett.com and on his online portfolio. Comments on NPN creative nature photography articles? Send them to the editor.
|
| |||||||||||||||||||||||||