For me, as a professional landscape photographer, filters are as important as the camera or lens. Without filters I have a hard time making memorable images. Why? Well, two reasons: first, filters are to photography what adjectives are to writing. Without them my images barely rise above functional prose. With filters, my images have flavor, color, and excitement. Secondly, filters allow film and digital cameras to see things more like our eyes see a scene. The range of brightness that film and digital sensors can record is far less than the human eye can see, to be able to accurately render the scene as our eye sees it, we need the help of filters.
The Most Important Filter – A Polarizer
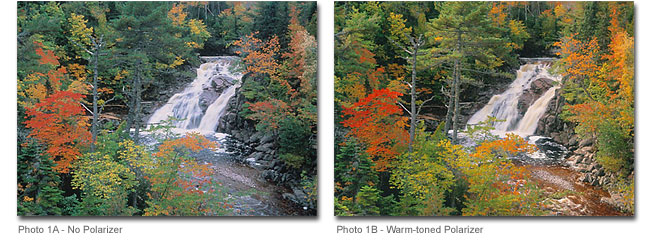
In my opinion, the polarizer is the most important filter for landscape photography. Many photographers know that a polarizer is useful for making blue skies richer and for removing reflections from glass, water, and metal but a polarizer does so much more. Even on overcast days a polarizer has strong effects. It won’t turn a gray sky blue but it will help to saturate the colors in the scene by removing glare off of reflective surfaces. For example, on overcast days every leaf, blade of grass, and wet stone reflects back some light from the overcast sky. These reflections mute the colors significantly. Add a polarizer onto your lens, spin it around and you will see the colors intensify. Try photographing such a scene with and without the polarizer and you will see an amazing difference in the final photos (see Photos 1A and 1B – note the increased saturation of color as well as the removal of glare from the rocks and water in the polarized scene from an overcast day).
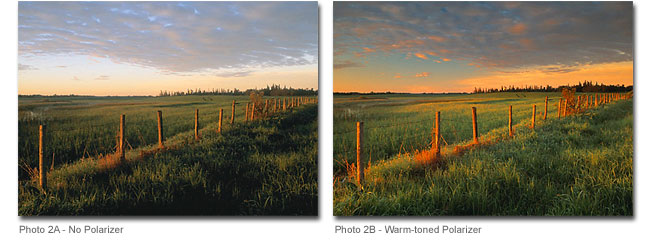
Using a polarizer is easy, just screw it on your lens, look through your viewfinder and then rotate it until you see the effect you want. Sometimes, you won’t see any change as you rotate the filter. This happens because polarizers only work when the light is orientated on a 90 degrees axis to the filter. If the light is directly behind you or if you are shooting directly into the light (a sunset), a polarizer won’t have any effect. But if the light is to your right or left side, or directly overhead (mid-day sun, or overcast light), the filter will work its magic removing reflections, darkening blue skies, cutting through haze and saturating colors. This is one filter you’ve got to have! (see Photos 2A and B for a comparison of a sidelight image shot with and without a polarizer –note how the polarizer not only reduces the brightness range but it saturates color).
Which One to Choose?
There are two types of polarizers, circular and linear. Both give essentially the same result, but use different mechanisms. Without going into an explanation of how they differ, all you really need to know is which one will work best with your camera. Older manual focus cameras generally can use linear polarizers (which are less expensive). Auto-focus and digital cameras need circular polarizers because the linear filters alter the metering and auto-focus in these cameras. Check your camera manual to see which kind your camera takes. If in doubt buy a circular polarizer, as it will work on all types of cameras.
Most polarizers have a bit of a blue color-cast to them. Although they punch up colors they often leave a noticeable bluish pall to the photo (this is especially noticeable in slide film, as opposed to print film). To avoid “the blues”, some manufacturers have made so called “warm-toned” polarizers. Essentially, this is a combination of a warm (slightly yellow/red) filter with a polarizer. These combo filters are wonderful, and my most used and favorite filter is definitely the Singh-Ray “A13 Warming Polarizer Plus” (www.Singh-Ray.com). Other companies such as Heliopan, Tiffen, and Hoya also make warm-toned polarizers.
I recommend buying a quality polarizer. Cheap polarizers are worse than no polarizer at all. Stick with well-known brand names such as Singh-Ray, Tiffen, Hoya, Heliopan, and B+W and you won’t go wrong.
Love it or Hate it - The Blue-yellow Polarizer
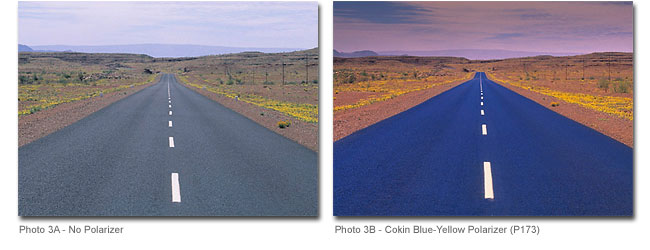
This is one special effects filter that people either love or hate. Originally developed by Cokin, this filter is a combination polarizer that colorizes reflective highlights in a scene either metallic blue or yellow/gold while adding an overall warm color cast to the whole photo (see Photos 3A and 3B, here when I rotated the filter, the colors in the road and sky changed alternatively from metallic blue to gold. I chose the blue version in the end. Notice, also, how the filter adds a warm cast to the non-reflective parts of the scene.)
When I first got the blue-yellow polarizer (Cokin 173), I was blown away by what it did to a scene. Rotate it around in front of your eyes and everything reflective transforms magically to contrasts of yellow and blue. I shot almost everything with this filter! But now, I am much more selective in its use. There are times when this filter verges on magical, producing images that are transcendent in quality. Many times, the results look ‘gimmicky’.
If you want to try this filter, the Cokin versions are available at most camera stores and it is relatively inexpensive. I recommend the P-series size (much bigger than the common A-series) because it is less likely to vignette with wide-angle lenses. Your local camera store can set you up with the filter, a filter holder, and an adapter ring for your lenses. The Cokin P-series holder is becoming something of an industry standard and other manufactures are making filters that fit into this smart “one holder for all lenses” system. The Cokin filter holder system allows you to use the same filters on all your lenses, no matter what the size of your front lens element (up to 77mm front thread diameter).
If you find you like the look of the Cokin Blue-yellow, but you want professional quality sharpness the answer is Singh-Ray’s Gold-n-Blue polarizer. Cokin’s version works well on lenses in the 20mm to 85mm range, but with longer lenses you definitely start to see a loss in image sharpness. With the Singh-Ray filter there is no sharpness loss with any lens used. However, there is a price for quality, as the Singh-Ray version is about 3 to 5 times as expensive as the Cokin version.
Grad Filters - Necessary and a bit Complicated
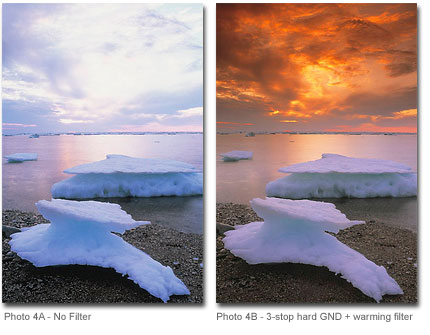
In my opinion, graduated neutral density filters (grads) have revolutionized landscape photography (now computers and digital cameras are set to take on this roll). These filters are a combination of one half clear glass (or optical resin) and one half neutral (e.g. gray) glass of varying density. The theory behind these filters is that often the sky is so much brighter than the land, that film or digital cameras have a hard time retaining details in both areas of the scene. Without a grad filter, the resulting photo may have a bald washed out sky. With a grad filter, the sky retains proper detail (see photos 4A and 4B – to my eye I saw a fiery sunrise sky over the ice but without a filter, film or digital cameras can not record that extreme range of contrast and the sky washes out. With a grad filter, the scene magically transform back to the reality of the eye.)
 The trick is in using these filters. First, you will need a Cokin holder to hold the grad in place. Now look through your viewfinder and pull the grad filter up and down in the holder until the feathered transition between gray and clear glass meets the transition between the sky and the land. You want the blended transition to blend into the horizon line (easier on the prairie than in the mountains!).
For precise placement of the grad line, you’ll need a camera that has a depth-of-field preview button. Make sure your camera is set at the aperture you desire to take the photo at (smaller apertures give a harder edge to the grad filter’s transition zone). Press your depth-of-field preview button and wiggle the grad filter in the Cokin holder until you see the grad line, then precisely place the filter line where you want it to blend (e.g. on the horizon, over a reflection, or where light and shadow meet). Deciding which type of grad filter (see below) and which density to use takes some practice, but the efforts are well worth it.
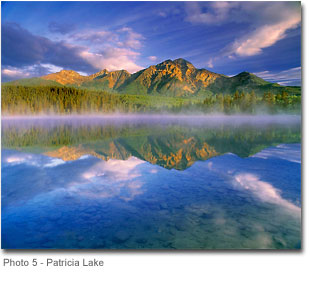
For pros, Singh-Ray makes a variety of grad filters with different types of transition zones (hard-edge, soft-edge, reverse, strip etc) for different types of scenery. For example, I use hard-edged grads where the horizon is very defined, and soft edge grads where it isn’t. A perfect place to use soft-edge grads is on reflections shots of lakes. Pull the dark part of the grad over the sky and have the feathered transition pulled down over the reflection. In this way the darker part of the grad filter is over the brighter sky while the feathered part dims the reflection a tad and leaves the foreground water rich with detail (see Photo 5 – Patricia Lake)
 Grad filters come in various strengths where the darker part is from one to five stops more dense than the clear part. I have a set of six grads that meet 90% of my needs. These are Singh-Ray’s 1, 2, and 3 stop hard-edge and the 1, 2, and 3 stop soft-edge Galen Rowell neutral density grad filters. I often combine two grads together (e.g. a 2 and a 3-stop filter) to give me more strength to dim strongly backlit landscapes at sunrise and sunset. This combination lets me have a fiery sky combined with a detailed and properly exposed foreground. Without the grad filters, the foreground would be black or the sky white on film.
To determine which strength filter to use, meter the foreground, then meter the sky, calculate the difference in f-stops between the two areas (e.g. 3 stops). Whatever the difference, use a grad filter that is 1 stop less than this difference (e.g. 2 stops) or your skies will look too dark and phony. If this sounds like higher math, it is! The alternative is to take one photo with each density of grad filter you own and then pick the best exposure at home or on the digital camera preview screen. With a little practice, you’ll soon know instinctively which strength filter is best to use.
For beginners, I recommend the Cokin series of gray (neutral density) grads. These are ‘medium-edge’, come in 1 and 2 stops of density (P121 and P122 respectively) and are good general purpose filters that will help you decide if grad filters are for you. If you shoot lots of sunrise and sunset kinds of photos, or like to shoot in mixed light where part of the landscape is in shadow and part in light, or like big skies in your photography, then grad filters will make your images much stronger. If, on the other hand, you are a sunny, blue-sky shooter, a polarizer is a better investment.
Warming Filters
Whenever you shoot in shade, at dusk, or under overcast skies, film will record tones with a slightly bluish pall. Digital cameras counteract the blue cast with an auto adjustment for white balance. Film cameras don’t have this capability, so when I shoot film, if it is overcast or I am in the shade, I stick on a warming filter to give me more neutral colors. My favorite two warming filters are Singh-Ray’s A13 warming filter and Tiffen’s 812 filter (the latter is more powerful when the blues really need correcting)
 Multiple Filters
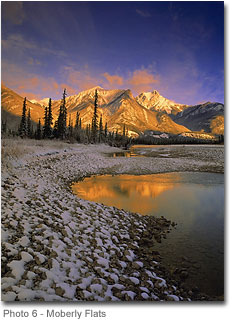
More often than not I use several filters to meet my needs. For example I often use a combination of grad filters and a polarizer, or grad filters and a warming filter to get shots that otherwise would be impossible to get without the filters (see Photo 6 – Moberly Flats where I used a warming filter to kill the blues in the shadows and used a hard-edge grad to hold back light on the sky and peaks).
Other Filters
I used to have all sorts of other filters in my camera bag, colored grads, soft-focus, cooling, color enhancing, and color correcting. I am finding that many were either ‘gimmicky’ or not that useful after all. Now in the digital arena things like, color enhancers and soft focus filters are no longer necessary. These effects can be easily achieved in software. The filters described above are still my ‘must-have’ landscape filters. The effects of polarizers, and colored polarizers, such as the blue-yellow filter, can not be replicated with software. Even grad filters often achieve better results in the field than post manipulation in the computer. I can’t imagine going shooting without these filters in my bag.
DW-NPN 0343
About the author...
Darwin Wiggett and his wife Anita Dammer are the proprietors of Natural Moments Photography. Anita has 17 years experience as staff photographer for the Glenbow Museum in Calgary and is currently doing freelance stock photography and is the editor-in-chief of Photo Life magazine. Darwin has been shooting stock since 1990, and has two books published by Whitecap in Vancouver; Darwin Wiggett Photographs Canada and Seasons in the Rockies. Together they specialize in landscape, nature, animal, humor and kid photography and are represented by various stock agencies worldwide. Their primary stock agent is First Light in Toronto, Canada. You can view more of Darwin's work in his online portfolio.
Comments on NPN nature photography instructional articles? Send them to the editor.