|
|
 Great Black-n-White Photos From Colour Film
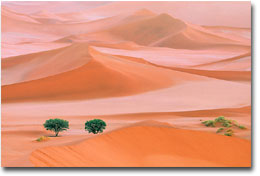
Text and photography Copyright Darwin Wiggett I tried but I was never any good. I had the film, I had the specialty filters, I even had the darkroom with a condenser enlarger and fibre based papers… it didn’t matter, I just couldn’t pull off a decent black-n-white photo. The problem was I couldn’t pre-visualize black-n-white in a colour world. So I did the easy thing, I gave up, and kept shooting with colour film. Luckily I did, because in today’s digital environment, colour film offers more flexibility in building amazing black-n-white photos than does black-n-white film itself. So, for want-to-be b&w shooters like me, there is a hidden b&w world built into colour photography that would make even the best b&w shooters envious. Let’s take a deeper look into the gray tones of colour. RGB means Flexibility Images captured in most digital cameras and scanners are recorded as different ranges of grayscale tones in each of the three colour channels (red, green, and blue or RGB). These three channels of black-n-white information when combined make up a colour image (see Photo 1). If you look at each of the grayscale channels separately, you get three very different looking black-n-white images. Herein lies the flexibility of using colour to make b&w images. You can take the best parts of the separate red, green, and blue channels and mix them together into a wonderful mélange of tones that’ll blow away the best that black-n-white film has to offer. Let’s look at a few ways we can mix things up.
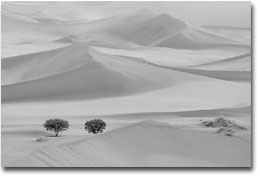
RGB to Grayscale is Easy In most photo editing software programs, there is often an easy way to convert an RGB image to a ‘grayscale’ or b&w image. Most programs have a formula where the software takes proportions of each of the three channels and mixes the tones to give a final grayscale image. In Photoshop, the conversion factor is 59% of the green, 30% of the red and 11% of the blue channel for conversion to black-n-white (Image>Mode>Grayscale). In this software conversion, we get a grayscale image from the original (see photo 2A), but usually the result is not as exciting as it could be if we took more control of the mix. Photo 2B is the simple grayscale conversion done in Photoshop. Pick Your Own Ingredients The best thing to do when first planning a strategy for b&w conversion is to take a look at the separate channels to see what you have. In Photoshop, bring up the channels palette (Windows>Show Channels) and click on each channel separately to view. Often one of the channels will stand out. If you see one channel that absolutely sings, just target that channel by clicking on it and then go to Image>Mode>Grayscale and Photoshop will discard the other two channels of the colour image and make a grayscale image using only the information from the selected channel. For landscape photos, I often find that the red channel or green channel alone will yield some amazing effects. So before doing any grayscale conversion, do a little channel surfing first to see what you have to work with. Blending Two Channels
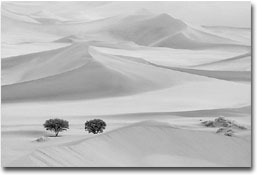
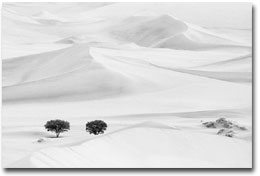
Often two channels (usually the red and the green) make interesting black and white images, but a better image would result from a combination of both. To mix both channels, I often resort to one of my favorite tools in Photoshop, the calculations command. This little image modifier lets you pick your two favorite channels and mix them in any proportion and in any manner of blending you desire. To use it go to: Image>Calculations. In the dialog box that follows, you chose which two channels you want to mix and how you want to blend them (which blending mode). I play with different percentages of opacity between the channels and use ‘normal’ blending mode until I get an effect I like (see Photo 2C, a 50-50 blend of the red and green channel). Make sure you specify Results>New Document so Photoshop will know to make a separate grayscale image from your calculations blend. The resulting image is actually a lone channel and it needs to be converted to grayscale before it can be used further (to do so just go to Image>Mode>Grayscale) Blending Three Channels If you like the information in all three channels and want to mix up things in an effective manner, try the channel Mixer command in Photoshop (Image>Adjust>Channel Mixer). Here you can mix the channels in infinite combinations of opacities using all three channels. The key here is to make sure you have the ‘monochrome’ box checked and to remember one important rule: for optimal image quality make sure the percentages chosen in all three channels adds up to 100% (e.g. red 60%, green 30% and blue 10% or even red 200%, green –70%, and blue –30%). The channel mixer takes a bit of playing with to understand how it works, but if you remember the 100% rule you can come up with some pretty amazing effects (see Photo 2D). Blending Three Channels Selectively Of the techniques described here, this is the most flexible because it allows you to take parts of channels and blend them together into one image. So, say you like the sky from the red channel, you love the flowers from the blue channel, but you like the mountains in the green channel (as in Photo 1)… with this technique you can have all of it in one, in any manner you like. No other b&w technique offers as much control and flexibility as this one. Your goal is to make a new document and make the individual channels from the original document into ‘layers’. Layers are like different copies of the image stacked one on top of the other. Think of slides stacked in a pile on a light table and you’ve got layers. In Photoshop you can turn down the opacity of each image and blend them in any combination or order you want. So, just like in the channel mixer, you could use different levels of opacity to blend the three layers to give you a variety of effects. The real power of layers is that you can selectively ‘erase’ parts of one layer and reveal what is in the layer or layers below. Using this feature (called ‘layer masks’) allows one to pick the best parts of each channel (now in the form of layers) and build the best black-n-white image possible. This is an advanced Photoshop technique, so if you are a beginner you’ll need to learn about layers and layer masks before trying the steps outlined below:
Photo 3 is a composite image of my landscape photo, converted using the channel mixer method, and a wolf shot of Tom Kitchin’s where I used only the green channel information. Using different methods of b+w conversion in the same image gave me the best photo possible. I used layers and layer masks to montage the two images and then selectively toned the image with colour.
Today’s imaging software makes conversion of colour images to black-n-white a snap, but like any simple “push a button” approach, you lose flexibility to add your own vision to the mix. By using channels or channels as layers and selectively doing your own tonal blending, you will be that much closer to producing your own black-n-white masterpieces. Darwin Wiggett - NPN 343 Editor's Note - Natural Moments Photography is comprised of the husband and wife shooting team of Anita Dammer and Darwin Wiggett. Anita has 17 years experience as staff photographer for the Glenbow Museum in Calgary and is currently doing freelance stock photography. Darwin has been shooting stock since 1990, is a contibuting editor to Canada's "Photo Life" magazine and has two books published by Whitecap in Vancouver ("Darwin Wiggett Photographs Canada" and "Seasons in the Rockies"). Together they specialize in landscape, nature, animal, humor and kid photography. Comments on NPN digital photography articles? Send them to the editor. |


|
|