|
|
 All Day Macro Photography
Text and photography Copyright Jim Erhardt The harsh, high-contrast light of a blue-sky day is the scourge of nature photography. When exposing for mid tones under these conditions, shadows are typically blocked up and rendered as black voids, and highlights are "blown out." Without a thin veil of cloud cover to diffuse the directional light of the sun, most nature photographers will simply pack up their gear and wait for better conditions, knowing that their capture medium cannot handle the high-contrast conditions.
Macro photographers have at their disposal three viable methods of modifying sunlight - diffusion, reflection and strobe. A key advantage of using diffusers and/or reflectors is that the effect is seen before the image is taken, making fine-tuning much easier and the results far more predictable. Diffusers and reflectors are easily employed tools that can be used to modify the visual brilliance between one part of the image and another. Their prime function is to modify the contrast to a point where all detail can be rendered on the capture medium. A diffuser is made of translucent material that allows light to pass through it. With a diffuser placed between the subject and the light source, a pin point source of light (like the sun) is spread over a much larger area in relation to the subject. In effect, the diffuser becomes the light source. Like photographing on a bright-overcast day, the use of a diffuser softens the light. By reducing both brightness range and contrast, it becomes possible to capture the subtlest of shadow and highlight detail on the capture medium. One aspect to be aware of when using a diffuser is that the exposure will be modified (decreased) only on the subject, or the area covered by the diffuser. Therefore, particular attention must be paid to background brightness in relation to the subject. Once the image has been composed and subject lighting adjusted, scour the viewfinder for areas in the background that are not covered by the diffuser and appear brighter than the subject. If left unmodified, these areas are likely to appear as out-of-focus hot spots in the final image - using DOF preview can prove beneficial in identifying these problem areas. Placing a bright background in shade using an additional diffuser or positioning your body to cast a shadow are viable methods of dealing with this problem. Reflectors are another means of modifying existing light. Made of reflective material, they are available in a variety of surfaces including white, silver, gold and soft gold (a combination of gold/silver). By using a reflector to add light to areas in shade, the range of contrast is reduced. By adjusting and feathering the position of the reflector, the direction and intensity of the reflected light can be controlled, and contrast and the degree of shadow on the subject can be fine-tuned for optimum modeling effect. Reflectors can also be used to modify the color balance of a macro scene and/or to redirect light onto subjects that are completely in shade. Reflectors can be used independently or in combination with diffusers, though the best results are usually obtained when using both.
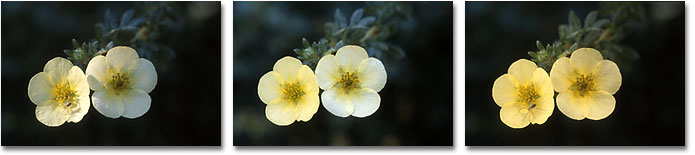
PhotoFlex of California offers a wide range of diffuser/reflector sizes and styles in their LiteDisc line. Of special interest are their smallest models, measuring 12 and 22-inches in diameter when open. These lightweight models collapse to just over 1/3 their open size for storage in a soft carrying case, making them very easy to carry into the field. Additionally, their small size makes them much easier to handle and less susceptible to the effects of the wind. The 12-inch model in particular is very practical for the macro nature photographer. We recently field tested two PhotoFlex LiteDiscs on a bright, sunny day - a 12-inch translucent model (diffuser) and a 12-inch reflector model with a gold surface on one side and a silver surface on the other. We also used two Wimberley Plamps to secure the LiteDiscs to the legs of a Bogen 3221 tripod. With this arrangement, both hands are free to operate the camera while the LiteDiscs are held securely and precisely in position. Additionally, the camera can be moved independently of the LiteDiscs, making compositional adjustments easy and straightforward. The following sequences of images show the effect of unmodified sunlight on the left, the use of a diffuser alone in the center, and the use of a diffuser and reflector in combination on the right. In each case, the diffuser was placed as close as possible to the subject, just outside of the field of view and held in position with a Plamp. The reflector was positioned to achieve the best effect and held in place with the second Plamp. All images are full frame, and each image was given the exact same post-shutter treatment to maintain an accurate comparison. Potentilla (Rosaceae) sequence -
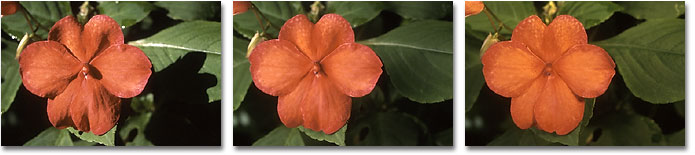
Impatiens (Balsaminaceae) sequence -
There’s no doubt that these simple products can make a tremendous difference in your macro photography, and keep you in action all day long. Small, inexpensive and easy to carry, they may very well be the best investment you’ll ever make! Note - The PhotoFlex LiteDiscs and Wimberley Plamp used in this article are available in the NPN Gift Shoppe individually, or as Macro Kit 1. A larger image from the Potentilla sequence can be viewed here. Jim Erhardt - NPN 001 Comments on NPN macro photography articles? Send them to the editor. |
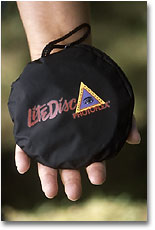 The 12-inch LiteDisc folds to just over 1/3 its open size, making it very easy to carry into the field. This image was taken in direct sunlight using a 22-inch translucent LiteDisc.
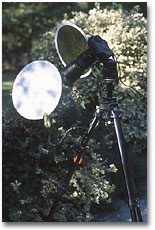 Wimberley Plamps are ideal for securing the LiteDiscs to the tripod legs and holding the discs in position.
|
|