Large Format Close-Up PhotographyText and photography copyright Guy Tal. All rights reserved.
Return to Nature Photography 101 Index
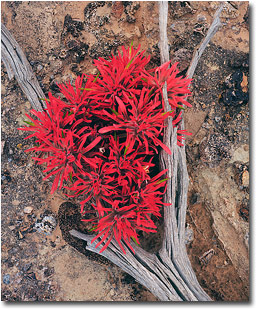
Close-Up of Desert Paintbrush, Wista VX 4x5, 150mm lens
|
Close-up work is undoubtedly one of the more fascinating branches of Nature Photography. The ability to explore minute detail in a scene is as interesting and rewarding to the photographer as it is powerful in relating a unique and unusual experience to the viewer.
Basic Terminology
Though loosely-defined, I will generally categorize “Close-Up Photography” as images of subjects that are within arm’s reach – images that require the camera to be placed physically close to the subject. Typical reproduction ratio for images of this type will range from about 1:10 to 1:1 (that is – the captures area is the same size as the film or up to ~10 times larger).
Why Large Format?
Close-Up Photography is very popular with smaller formats. Most 35mm and DSLR systems offer at least 1-2 options for “macro” lenses capable of close-focusing and sporting a flat field design, extension rings, and auxiliary close-up lenses that can be attached to other (non-macro) lenses. These are all excellent options of course, but they still fall short of view cameras in a number of areas:
- Tilt and swing movements. The rigid design of most SLR camera systems, holding the lens parallel to the film, can become a severe hindrance in applications where depth-of-focus is critical, often mandating that the camera be placed parallel to the subject. This is not always convenient. A view camera can be placed at a convenient distant and movements can be used to make sure the field of view is all in focus even if the camera itself is not parallel to the subject.
- Rise/Fall and Shift movements. Perfecting the composition on an SLR camera usually means repositioning the whole camera, which may be tricky in tight quarters or after other adjustments to focus had been made. The view camera allows much more freedom in fine-tuning a composition by moving the individual standards without having to move the camera.
- Focus accuracy. Auto-focus is only useful to the extent that the focus area fall under the sensor. Close-Up Photography often requires manual focusing which is generally easier to accomplish on a large ground-glass screen with the aid of a magnifying loupe.
- Lens selection. Since Large Format lenses do not have a built-in extension mechanism, they can be focused as close as the bellows would allow. This means that practically any lens can be used for Close-Up Photography, as long as your bellows is long enough to focus it at the desired distance.
To be fair, one area where SLRs offer a great advantage with skittish subjects that may require speed and hand-held operation. They also offer great advantage in determining exposure using TTL metering, especially if using artificial lighting.
Equipment – Just the Basics
Chances are if you have even a basic Large Format system, you already have everything you’ll need. As mentioned above, most any lens can be used as long as your bellows is long enough to focus it at the desired distance.
Lenses in the normal range (135-180mm) are often the most useful as they can be focused down to life size reproduction (1:1) with most cameras and still provide adequate working distance and depth-of-field for static subjects.
A good loupe (4x – 8x magnification) is highly recommended for critical focusing and for verifying the effects of camera movements.
A good field tripod is also required (one that allows spreading of the legs to provide a solid base even when low to the ground) as well as a sturdy head allowing tilting of the camera so it is facing down (which may be needed for some subjects).
Although most lenses are not optimized for close-up work, in the context of nature photography this rarely seems to matter. Some loss of sharpness is easily overcome by having a large film area that still captures a lot of detail.
Focus and Depth-Of-Field
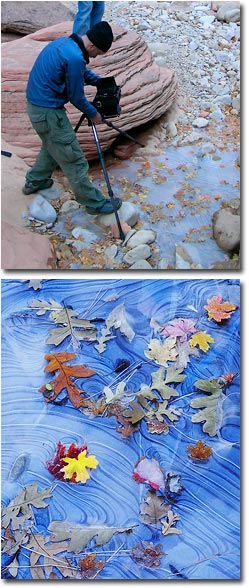
Top: Setting up to capture Close-Up image of leaves in ice. This photo by Mark Hudon illustrates my initial camera setup as I prepare to compose my image. Bottom: Autumn Leaves trapped in Ice, Wista VX 4x5, 180mm lens) is the result.
|
Depth-of-field becomes very critical for this type of work. Careful focusing with a magnifying loupe is almost unavoidable, as is a small aperture (often resulting in long exposure times). Make sure to verify critical focus in all areas of the frame.
With a standard 150mm lens you will need 300mm of bellows extension to focus the lens at life-size (1:1) reproduction ratio. Coverage is usually not a problem with this type of photography even with lenses of a limited image circle. Placing the lens so far in front of the film will result in a larger than normal (albeit dimmer) circle of illumination, allowing for generous movements.
Once your image is composed, use the loupe and a dark cloth to isolate areas where depth may be an issue and slowly stop down the lens to make sure they are adequately captured.
Lighting and Exposure Compensation
When metering for situations that require longer than normal bellow extension (as is often the case with Close-Up Photography), some compensation should be factored into the final exposure to make up for light loss. This compensation can be calculated using the following formula:
Extension Factor = (Bellows Extension /Lens Focal Length) ^2
(lengths measured in millimeters)
Once you calculated your exposure factor, use it to multiply the exposure time.
For example: At 300mm of extension and using a 150mm lens, your factor will be 4 (or 2 stops of additional exposure).
This can obviously get pretty tedious if you don’t have an accurate way to measure extension and a handy calculator. The solution: QuickDisc!
QuickDisc can be downloaded for free from Philip Salzgeber’s web site at www.salzgeber.at/disc/. The QuickDisk can be printed (and preferably laminated for protection) and easily carried around in your photo pack. Once you determine your composition and are ready to make an exposure, simply place the QuickDisc into the image area, use the accompanying ruler to measure its size on the ground glass and read the correct exposure factor.
Another useful gadget is a folding reflector, such as a Photoflex Litedisc. Even a small’ish one can be of great value in Close-Up Photography since the area requiring illumination is not very large. The reflector can be used to fill in shadows and provide additional light for focusing or when a shorter exposure is of benefit.
Subject Selection and Workflow Tips
While using a view camera provides any number of advantages in composition and flexibility in maximizing sharpness and depth in all areas of the image, there’s no doubt it is slow to operate. As such it is more suitable for static subjects where a lengthy workflow and long exposure are not detrimental. The reward of being able to capture stunning amounts of fine detail is very often worth the extra time spent capturing the image.
Depth is almost always an issue in Close-Up Photography, regardless of the system you use. As such, try to find subjects that are as flat as possible. The view camera will enable you to capture such subjects in sharp focus even if the camera is not placed parallel to them.
When approaching a Close-Up photo opportunity, I will normally try to spread the tripod legs as far as they would go for stability. I will then use a focusing hood or dark cloth to accurately frame my subject. At this point I don’t usually concern myself with focus or with being parallel. I just want to get the “right” image on the ground-glass. Once composition is achieved, I will place a loupe over the ground-glass and follow the normal focusing routine, starting at the top, identifying the movements that will be required, then applying them a little at the time, and in repeating iterations, always verifying with the loupe to make sure the desired effect had been achieved.
I generally do not attach the cable release to the lens until I am ready to make an exposure. The reason is that when the camera is facing down, the cable may swing into the frame and distract me or even knock some of the elements I’m trying to photograph.
Once focus had been achieved, I determine the appropriate aperture for the depth required, use a QuickDisc to determine exposure time, attach the cable release, and capture the image.
GT-NPN 0440
Comments on NPN large format nature photography articles? Send them to the editor.
Guy Tal resides in Utah, where most of the Colorado Plateau's breathtaking grandeur can be found, and where issues of preservation and land-use are among the most prominent on the political agenda. Guy's large format photography can be viewed on his website at http://scenicwild.com.


| 
