Safe Cloning
Copyright Tim Grey - All rights reserved.
The Clone Stamp tool in Photoshop allows us to remove rocks that were too heavy, branches that were too high, and power lines that were too “powerful” when the picture was taken. It is indeed an incredible tool, but not without potential pitfalls.
Photographers who have attended my courses at the Lepp Institute of Digital Imaging know that it is a pet peeve of mine that you should never change the original pixels in the image if you can avoid it. We’ll take a look at how to best use the Clone Stamp tool to avoid changing the pixels in your images, but first let’s review some of the basics.
The Basics
The Clone Stamp tool allows you to copy pixels from one area of your image to another, and behaves as a “brush” tool. In other words, you don’t just copy pixels, but rather paint pixels that are copied from a different area of the image.
The relationship between the source pixels and the destination area is defined when you hold the Alt key (Option on Macintosh) and click on the area you want to copy pixels from. You can set the source to an open area of sky, for example, and then paint over a branch that protrudes from the edge of the frame. You are “erasing” a branch by replacing that branch with pixels from the open sky.
Some Technique
The right brush size is important when using the Clone Stamp tool. The first relates to brush size. As a general rule the brush should be set to a size no larger than the object you’re removing. Often it should be even smaller. Keep in mind you can quickly increase or decrease the size of the brush using the square bracket keys on your keyboard. The left square bracket key reduces brush size, while the right square bracket key increases brush size.
It is also important to use an appropriate brush hardness. Many photographers only select a hard or soft edged brush, never using anything in between. When using the Clone Stamp tool, the hard edge brush causes an obvious edge between copied and surrounding pixels, and a soft edge brush can cause obvious blurring around the edges of your brush strokes.
You can use the Shift key in conjunction with the square bracket keys to adjust the hardness of the brush, but this only offers a few options. Instead, go to the Brushes palette and select “Brush Tip Shape” in the left column. This will provide additional brush options, including Hardness toward the bottom right of the palette. I generally find myself working with a brush of about 85% hardness when using the Clone Stamp tool.
The human visual system is incredibly adept at picking out repeated patterns and textures. Because you don’t want your cloning to produce obvious evidence of change, you’ll want to avoid those repeated patterns. That means frequently choosing a new area for the source of pixels is important. As a general rule, I recommend at minimum selecting a new source area for each dust, scratch, or other element you are trying to remove. Quite often you’ll need to zoom in and use a small brush, setting a new source area for every click of the mouse.
The Basic Problem
Basic technique is all well and good, but this normal use of the Clone Stamp tool violates my cardinal rule that the original pixel values should not be changed unless it absolutely can’t be avoided (even then I’d work on a duplicate image layer, preserving the original). If you use the Clone Stamp tool in the normal fashion, you’re copying pixels from one area of your image to another, replacing those existing pixels.
This may sound like a perfectly acceptable thing. After all, you wanted to get rid of that branch protruding into the frame, didn’t you? But what if you decide later that it was a mistake? If you can avoid changing the pixels, you’ll always have a way to solve any problems that arise after you’ve already saved and closed your image file.
Keeping Pixels Safe
The key to keeping the original pixel values safe is to work on a separate layer. There are some important things to keep in mind when doing this, so we’ll take it step by step.
The first step, of course, is to create a new empty layer that will be the destination for the pixels you copy with the Clone Stamp. To create a layer, simply click the “Create a new layer” button at the bottom of the Layers palette. If you hold Alt (Option on Macintosh) while clicking this button you will get the options for this layer, which will allow you to name the layer. You can then name it something like “Cloning” or “Cleanup” so you’ll know what the layer is there for when you open the image in the future.
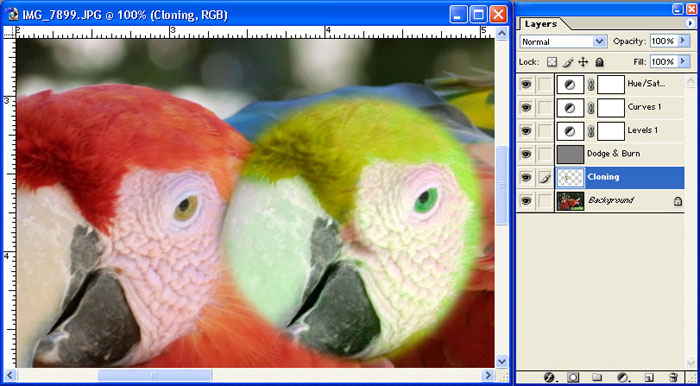
The clone stamp tool actually allows you to select a source area from one image layer (or even a different document), and then copy those pixels onto a different layer. However, selecting one layer, choosing a source area, then selecting the destination layer and painting isn’t a very efficient way to work. Fortunately there is an easier way. Simply check the box labeled “Use All Layers” on the Options bar when you have the Clone Stamp tool selected. This will cause the Clone Stamp to copy a composite of all of the layers in your image file onto the currently active layer. Just make sure the new layer you created is the active layer by clicking on it in the Layers palette, and you can clone in the normal manner, but with the cloned pixels being copied onto that new layer. But there’s a potential pitfall here.
If you have adjustment layers in your image, the adjustments will affect all image layers below the adjustment layer. If you have the Use All Layers option selected for the Clone Stamp tool, the changes applied by these adjustment layers will apply to the pixels you copy. That means it is possible the adjustment layer will affect your pixels twice – once when you copy them, and again after they are copied onto the destination layer if the adjustment layers are above that layer.
At first glance you may be tempted to simply move the new layer that will serve as the destination of cloned pixels above the adjustment layers. However, that causes a different problem. If you later change any of your adjustment layers, the copied pixels won’t match those in the original image, because the adjustments are being revised for the underlying image but not for the duplicated pixels on the cloning destination layer.
Fortunately, I wouldn’t present such a big problem if I didn’t have a solution. The trick is that Adobe didn’t label the checkbox on the Options bar very well. Instead of being called “Use All Layers”, it should have been called “Use All Visible Layers”. Therein lies the solution to our dilemma.
We want to avoid having the adjustment layers affect the pixels we copy to the destination layer using the Clone Stamp tool. By doing so, the pixels on that destination layer will perfectly match the pixels in the underlying image layer. Then the adjustment layers can be above both of those layers, so that we can change the adjustments later and the pixels will always match.
So, when using the Clone Stamp tool with the destination set to a separate layer, you need to have the “Use All Layers” option checked, but you want to turn off the visibility of all adjustment layers. To do so, simply click on the eyeball to the left of the thumbnail for all of the adjustment layers on the Layers palette. This will hide them, and cause the Clone Stamp to ignore them. Note that for our purposes, any layer that causes a change to the image would be considered an adjustment layer. This could include an image layer such as the safe dodge & burn layer I described in a previous column.
Erase Mistakes
Besides being able to simply discard the new layer you created as the destination for cloned pixels if you made a mistake, you can also be selective. If you discover later that you accidentally cloned over an area you wanted to keep, you can simply erase those cloned pixels. To do so, select the Eraser tool from the Tools Palette, and select an appropriate brush size and hardness. Be sure the image layer that is the destination for cloned pixels is selected, and simply erase away the pixels you don’t want, allowing the original underlying pixels to show through.
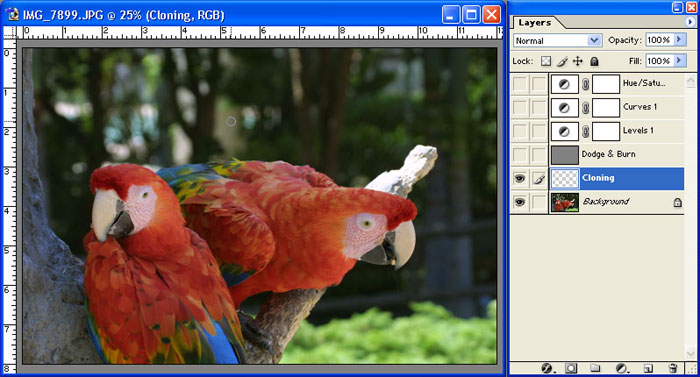
Of course, another side benefit to this technique is the ability to turn off the visibility of the cloning target layer you put all of your cloned pixels onto. This allows you to see a before and after version of your image. It can be very satisfying to see how much better the “after” version is.
Putting it Together
Putting all the pieces together, to clone safely you’ll want to start with a new image layer above your image layers but below your adjustment layers. Then select the Clone Stamp tool, set the option to “Use All Layers” on the Options bar, and turn off the visibility of all adjustment layers. You can then clone away safely, without doing any harm to the pixels in your image.
Tim Grey - NPN 019
Comments on NPN digital photography articles? Send them to the editor.
 About Tim Grey...
Tim enjoys sharing information about digital imaging as much as he enjoys learning it in the first place. Tim publishes an almost-daily Digital Darkroom Questions (DDQ) e-mail service that provides a forum for photographers to have their questions related to the digital darkroom answered. He is editor of The Digital Image, a quarterly journal published by George Lepp. He also teaches courses to help photographers master the digital darkroom at the Lepp Institute of Digital Imaging.
Tim can be contacted at tim@timgrey.com.


| 
