Beyond Orton – Exploring the Boundaries
Text and photography copyright Kent Newton. All rights reserved.
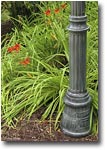
Photo 1
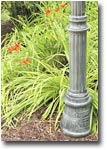
Photo 2

Photo 3
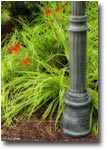
Photo 4
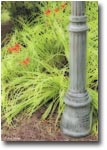
Photo 5
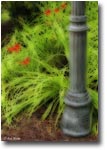
Photo 6
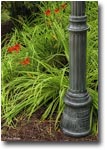
Photo 7
|
|
As a novice photographer with limited experience and equipment that, charitably, is less than top of the line, I often produce photographs that have potential but lack pizzazz. Rather than discard these photos, I look for ways to punch them up, whether that be a creative crop, a Photoshop correction, or an art technique. In the January 2006 edition of Nature Photographers Online Magazine, Darwin Wiggett introduced a great art technique: Orton Imagery.
If you haven’t read Darwin’s article, Orton Imagery – A “How To” Guide for Photographers, I highly recommend that you do so now. Not only will it provide an extra tool for your photographic repertoire, it will help you understand the rest of this article. Go ahead: read it now. I’ll wait.
Back? Good.
As you saw, both in Darwin’s article and in the dozens of posts that used the technique over the last two months, Orton Imagery transforms a photo into a dreamlike scene reminiscent of an oil painting. It provides a warm, soft glow that enriches the color of the image. All of this is accomplished by simply duplicating a layer, blurring it, and applying a Multiply blend.
Looking at the result of the Orton technique and the simplicity with which it was achieved, I began to wonder what other effects could be achieved by altering the method slightly. I started experimenting. As a result of those experiments I discovered three variations to Orton that I have since used extensively–to enthusiastic reviews, including an editor’s pick for one: Snowy Field.
I have also received several requests–both privately and in the forums–for information on how to apply these techniques. Rather than responding to all the requests individually, I thought I would share the techniques with everyone through this article.
Preparing Your Image
All three techniques begin by preparing your image using these three steps:
- Open your image and duplicate the background layer. This duplicate layer will be the base to which you apply any normal correction: curves, sharpening, levels, contrast, and so on. This keeps the original image untouched. Photo 1 is an example of the base layer.
- After adjusting the base layer, duplicate it and apply a 100% Screen to it as described in Darwin’s article. Photo 2 is an example of the screened layer.
- Duplicate the screened layer and apply a Gaussian blur, again, as described in Darwin’s article. Photo 3 is an example of the blurred layer.
If you set the Blending mode of the blurred layer to Multiply, you will have a traditional Orton image, as seen in Photo 4. But you will not be doing that. Instead, you will do one of three things, depending on which effect you want: a watercolor effect, an acrylic effect, or an enriched photo effect.
Watercolor Effect
The first variation to Orton is similar to a watercolor wash over a pencil drawing. While traditional Orton produces deep, rich colors, this effect produces light, delicate colors that emphasize the image’s lines and textures. To achieve this effect, do the following:
- Prepare your image as described above.
- Set the Blending mode of the blurred layer to Darken. Photo 5 is an example of the result.
That is all there is to it. I used this effect to produce Snowy Field.
Acrylic Effect
The second variation is a combination of the traditional Orton and the watercolor variation. It enriches the color like traditional Orton while also emphasizing the lines and textures like the watercolor variation. I liken the effect to that of an acrylic painting. To achieve this effect, do the following:
- Prepare your image as described above.
- Set the Blending mode of the blurred layer to Darken, as done with the watercolor effect.
- Duplicate the watercolor layer.
- Set the Blending mode of the duplicate layer to Multiply. Photo 6 is an example of the result.
This is the method I used to produce the image Ice Age Trail.
Enriched Photo Effect
If you think this approach can only be used to generate photo art, though, you’d be wrong. By adjusting the opacity of the two blurred layers of the Acrylic effect, you can enrich both the color and texture of the photo without sacrificing its realism. In Photo 7, I decreased the opacity of the two blurred layers to 50% each. As you can see, the color was deepened and the lines and texture were accentuated without loss to the realism of the image. Compare it to Photo 1: it is richer in tone and definition than Photo 1, but there is no loss to the realism of the image.
I’ve used this effect on several images since I discovered it. Which ones? If you can tell, I am not going to.
Try your own experiments...
Darwin Wiggett’s article on Orton Imagery inspired me to experiment with the approach. I hope you give the three results a try and find them useful. But these techniques are only a few of the possibilities that can be achieved by changing the Blending mode, combining layers, or adjusting opacity. With 19 different Blending modes, 100 different opacity levels, and an infinite combination of layers, the number of possible effects that can be achieved is infinite. Try your own experiments.
Editor's note - View more of Kent's work in his online portfolio.
KN-NPN 1957
Comments on NPN creative nature photography articles? Send them to the editor.


| 
