Orton Imagery - A “How to” guide for PhotographersText and photography copyright Darwin Wiggett. All rights reserved.
Early in my career as a professional photographer, I came across an article by Michael Orton in Popular Photography that literally stopped me in my tracks. The images included with the article were landscape and nature photos unlike anything I had seen before. The photos were painterly, ethereal, and romantic. The article went on to explain how to create these artistic images in a step-by-step process.
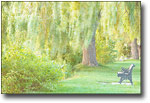
Photo 1
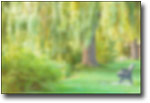
Photo 2
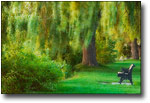
Photo 3
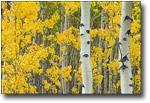
Photo 4
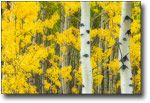
Photo 5
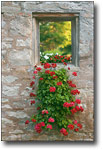
Photo 6
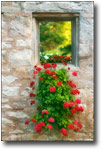
Photo 7
|
Armed with this new technique, I excitedly created ‘artistic’ images that went beyond being a pure document of nature and instead seemed to express mood and emotion. So fond was I of Michael Orton’s technique that I told everyone I knew about it and I dubbed it “Orton Imagery”. The technique is now firmly entrenched in the arsenal of creative techniques that photographers use to create expressive imagery. Orton Imagery originally was a slide-film based technique but it can be easily replicated using digital images and photo software. For those not familiar with Orton Imagery here is a summary of the methods for both slide shooters and digital photographers.
Film Technique
For Orton Imagery, you must use slide film. First photograph the scene of your choice using an aperture of f16 to f22 for maximum depth-of-field. You should purposely overexpose this scene by 2 f-stops. Now change your aperture setting to the widest aperture on your lens (e.g. f2.8 or f4), defocus the lens so you only see blobs of colour, and overexpose this blurry image by one f-stop. Once you get the slides back from the lab take the two overexposed photos out of their slide mounts and sandwich the two images one on top of the other into a new slide mount. It doesn’t matter if the blurry photo or the sharp photo is on top; just physically place the two images together into one mount. The resulting slide sandwich will now look properly exposed but with snippets of sharpness floating in a sea of blurred colour. Very cool! Photos 1, and 2 are the overexposed components, photo 3 is the final slide sandwich.
Here are a few tips to get the best results:
- You should use a tripod so the camera doesn’t move between exposing the sharp and the out-of-focus image, otherwise the two images won’t be in ‘register’ with each other.
- When making the out-of-focus image make sure to set your lens at the widest aperture or risk getting an image that is too much in focus (due to increased depth-of-field at other apertures). Beginners constantly make the error of not using a wide aperture for the out-of-focus photo.
- When you de-focus for the blurry image make sure the blobs of out-of-focus colour get slightly larger in the frame than smaller for the best effect (use manual focus and rotate the focus ring one way or the other to see which direction gives you bigger blobs). If you de-focus the lens a large amount (for a more painterly effect) be aware that the framing of the shot will change significantly, if so, it is best to use a zoom lens to return the framing closer to that in the sharp shot.
- Intimate scenes shot in overcast light and with little or no sky seem to work best for this technique. Heavy shadows go especially dark with this technique so it is best to avoid strongly lit scenes.
- You can do a similar technique with in-camera multiple exposures but the result will be very different from “Orton Imagery”. Sandwiching two slides together greatly increases colour saturation by adding density. Multiple exposures on the same piece of film result in decreased colour saturation (a more pastel effect). Orton images drip with colour, multiple exposures don’t.
- Use your camera’s exposure compensation dial to get the required amount of overexposure – and experiment with various amounts of overexposure for the blurry and sharp photos. Generally if the two amounts add to 3 stops overexposure then the slide sandwich will work well (e.g. 2 stops overexposed and sharp plus 1 stop overexposed plus blurry, or 1 1/2 stops overexposed and sharp combined with 1 ˝ overexposed and blurry).
- Buy a box of plastic snap together slide mounts (e.g. GEPE mounts) to hold your sandwiched masterpieces. Before sandwiching the two slides together be sure to use a blower brush to keep dust from being included between the two slides.
Digital Technique
Here, there are many ways to simulate an Orton slide sandwich. You can do it the same way as outlined above for slides overexposing two separate images and then in the computer stacking the images together in software and blending them. Personally, I prefer to take my existing digitized photos (either from film scans or digital camera files) and running them through the process below to see if they work as “Orton Images”.
Here is the step-by-step recipe for making Orton images in Photoshop:
- Open any image you wish to try the technique on. Make a duplicate of the image (Image>Duplicate). Close the original image.
- Lighten the image as follows: Image>Apply Image… then in the dialog box that comes up change the bending mode to “Screen” and the Opacity to 100%. This will give you an appropriately overexposed image.
- Duplicate this overexposed image (Image>Duplicate).
- Blur this second image (Filter>Blur>Gaussian Blur… and in the dialog box use a Radius setting of 15 to 50 pixels – the higher the pixel setting the blurrier the photo and the more ‘painterly’ the image… but you can go too far!). Experiment with different settings, for my tastes and for the size of my digital files (50-100 megabytes) a radius of about 25 pixels works perfect.
- Now select the move tool from the Photoshop tool bar (or just press “v” on your keyboard for quicker access to the move tool). Hold down the “shift” key and use your mouse to drag and drop the blurry image onto the sharp one (don’t let go of the shift key until after you release the mouse button or the images won’t be in perfect alignment).
- Bring up the layers palette in Photoshop (F7 is the keyboard shortcut). Under the word “Layers” in the layers palette will be a menu box of blending modes. Change the blending mode from “normal” to “multiply”.
- Now “flatten’ the two layers by pressing “CTRL+E” or by clicking on the sideways triangle in the layers palette to select ‘flatten image’.
There, you now have an Orton image - if you like your new masterpiece save the file!
Photo 4 is the original digital camera file; photo 5 is the digital Orton. Sometimes I will take the original image, move it back on top of the Orton Image and using the ‘normal’ blending mode in the layers palette and reduce the opacity to about 50% so I have a combination of a ‘standard’ and Orton image – the result is something that looks realistic yet slightly artsy (see Photos 6 and 7).
To learn more about Michael Orton and for a great book on “Photographing Creative Landscapes” go to: www.michaelortonphotography.com.
DW-NPN 0343
About the author...
Darwin has been shooting stock since 1990, and has two recent best-selling books: How to Photograph the Canadian Rockies and Dances with Light - The Canadian Rockies. Darwin's latest book The Romance of Niagara will hit the shelves in the spring of 2006. Another book on mixed breed dogs entitled Mutts will be released in the fall of 2006. Darwin leads photo tours in the Canadian Rockies and writes instuctional articles for print and on-line photo magazines. You can view more of Darwin's work and get workshop information at www.darwinwiggett.com and on his online portfolio.
Comments on NPN creative nature photography articles? Send them to the editor.


|