Underwater Wide Angle PhotographyText and photography copyright Andrew Dawson. All rights reserved.
Editor's Note - Thumbnails are links to full size images presented in slide show format.
One of the main attractions of SCUBA diving, whether the diver is an avid photographer or not, is the overwhelming sensation of visiting a beautiful and totally alien world. Weightless and immersed in water, you can feel “in touch” with nature in an incredibly unique way. As Jacques Cousteau so aptly put it, “The happiness of the bee and the dolphin is to exist. For man it is to know that and to wonder at it.” Capturing the magic and wonder of the underwater world in a photograph can be excruciatingly difficult. But like many endeavors, the journey can be as fulfilling as any end result.
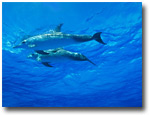
Underwater wide-angle photographs are, I think, an attempt to capture some essence of that alien world, of seeing and touching it, of what it’s like to actually be there. If this sounds a lot like what landscape photographers talk about, it should! Naturally I look at lots of u/w images, but I often study landscapes as the best model for what I’m trying to achieve. Wide-angle images can be many other things too, such as portraits of large animals, shipwrecks, or other divers. But even those subjects are often part of a larger picture, a moment in time in a place that most people will never see.
A big part of this wide-angle approach is born out of necessity. As mentioned in the first article, the optical problems that water creates require you to be as close to subjects as possible, usually within a few feet. Wide lenses allow you to get very close to large objects (reefs, whales, shipwrecks) and still sense the environment around it. In practice, we’re talking about really wide lenses. Something like a 28mm (in 35mm film terms) might be your favorite wide lens on land, but underwater, it will probably force too much water between you and the subject. For images like reef scenics or shipwrecks, where you can get as close as you want, typical choices are anything from 14mm to 20mm. With the Nikonos, the 15mm U/W Nikkor is regarded as its best all-around lens in this category. Something like a 24mm (equivalent to the Nikonos U/W 20mm) can be a good compromise for animals that may not approach close enough for good composition with a wider lens. Using a 180-degree fisheye such as a 16mm can make for very interesting shots, although it takes some getting used to its extreme coverage.
This wide-angle requirement has created something of a problem for digital shooters. With DSLR’s, most manufacturers are coming out with optics that are truly wide, i.e. Nikon’s 12-24DX zoom lens. But for compact digicams with built-in zoom lenses, it gets a bit more dicey. Very few are wide enough, so wide converters of various kinds are the accepted solution. Whatever the lens combination ends up being, it needs to have a view in the 90-100 degree range (or more) to be effective. Don’t underestimate the importance of making your optics wide enough! If your digicam or DSLR can’t be outfitted this way, you’ve shot yourself in the foot right from the start, and it will have a serious impact on your results.
So, you’re armed with wide optics and have put yourself within a few feet of your fabulous marine life subject--what’s next?
Get Low, Get Close, Shoot Up
We already know about getting close, since it helps defeat the “blue diffusion filter” of water; getting low and shooting up goes hand in hand with that. Being below the subject and shooting at an upward angle will put blue water in the background, which is almost always better. Downward angles are more difficult to expose, and usually have less aesthetic impact anyway. This might seem like it’s dictating a certain point of view for all your images, but I would say it rarely seems that way. With the unfamiliar size and geometry of many u/w subjects, most people will be unaware that this was part of your technique. Like any “rule”, there are times it can be broken, but it is a reliable place to start.
Ambient Light Exposure
Although it seems obvious enough, proper exposure of the ambient light is the technique that seems to be done wrong the most often. If your ambient exposure is correct, a lot of things fall into place. Underwater shots will have a more "natural" look, and the use of fill-flash becomes much easier. If you're making a silhouette of an animal with blue water in the background, ambient exposure is about the only thing you need to get right. If you're shooting something like a giant shipwreck, you can't possibly light the whole object, so getting the correct ambient exposure is crucial.
Needless to say, there is no convenient 18% gray object underwater that will spoon-feed you the right exposure settings. The main trick is knowing how to meter the water in the background of your shot. You can still be faced with a huge range of light values, from nearly black to a white-hot sunburst, but there is a method to the madness. In short, you learn to read which area of the background water represents 18% gray, and set aperture/shutter speed accordingly. Personally, I use a center-weighted meter to scan the water column, and make my best guesstimate. It takes some practice, but in the long run it really is the most reliable method.
”Why bother”, you say to yourself, “my matrix metering can take care of the ambient light exposure.” Ah, if only life was that simple! For whatever reasons, matrix metering and various automatic modes tend to not work very well underwater. I can attest that I used aperture-priority mode when I first started shooting u/w, and the results were inconsistent. Virtually every pro/serious amateur I’ve met uses some version of the manual approach mentioned before. If you choose to go some automatic route, it would be wise to bracket your exposures somehow, and make your final decision later. With experience, you may find the manual technique will become less intimidating.
Adding Strobe (Fill Flash)
Often times, getting the right ambient exposure is only half the battle. The ambient sunlight will be sorely lacking in any color other than blue/green, so flash is required to “paint” in the real colors. This applies even to snorkeling in shallow water; the loss of warm color will be less severe, but strobe will still help noticeably. The idea is to create a natural-looking balance between the ambient (blue-water background) and your fill-flash.
Conceptually, using fill-flash underwater is much the same as it is on dry land. One of the first decisions is whether to use your strobe in TTL/auto mode. For what it’s worth, most pro/serious amateurs do not use TTL for wide-angle, but set strobes manually using guide numbers. This can add a layer of complexity that some people would rather not deal with. In the long run however, it is more consistent, just like manual exposure of the ambient light. As a beginner you may very well go the TTL route, and leave the more subtle techniques for later.
Regardless of which mode you choose, there are a few important ideas about strobes to keep in mind. The “blue-diffusion filter” concept applies to strobe light as well. Light from the strobe has to travel to the subject and back again, losing color every inch of the way. The bottom line: if a subject is any more than about 4-5 feet away, don’t even bother trying to light it. With that round trip, your full-spectrum flash will have lost most of its punch. It isn’t just a question of getting a more powerful strobe. The sun is the biggest light source of all, and it loses its color through the water column too. The water itself is still the enemy, and one way or the other, you need to be closer to the subject.
A common point of confusion is the notion that the strobe is providing most of the exposure. It usually shows up in questions like “Well, I dive in deep/dark/low visibility environments, so I need a more powerful strobe, right?” Actually, it’s the opposite. If your ambient light is dim, you need less strobe to create the proper balance with it. There are some specific situations where you will expose with 100% strobe—at night, or the interior of caves or shipwrecks—but those are fairly rare.
So do you use one strobe or two? Or more? Many people use only one and are perfectly content. I’m a big fan of two strobes; it makes it easier to fill the whole frame, and gives you options on lighting ratios etc. The cost/hassle factor is a legitimate concern. Wide-angle strobes can be bulky, so the diving conditions and your own skills are something to consider.
Final Thoughts
It’s worth repeating that using a digital camera doesn’t really change any of these techniques. The loss of color and contrast is way beyond being fixed with some internal setting or in Photoshop. Digital underwater is still in its infancy, relatively speaking. In addition to the wide-angle optics, there are some serious compatibility issues between strobes and many newer digital cameras. These will undoubtedly be sorted out eventually, but it means doing some homework. Before investing in housings and strobes for whatever digital you have, make sure it’s actually going to work the way you’d like it to.
With that said, digital promises many exciting things for the future of u/w imaging. No one has ever been able to change film underwater, so the huge number of frames available with digital is enticing. It can also potentially reduce the learning curve with wide-angle photography quite a bit. Instead of waiting a day (or week) to check your ambient and strobe exposures, you can preview them immediately, and make adjustments. Some of the new digital housings are also incredibly small and lightweight, which can only help as you plow through the water in heavy SCUBA gear.
All that’s left is for doctors to figure out a way to outfit humans with functional gills. Then we’ll really be onto something…
AD-NPN 1288
About the author...
After SCUBA diving for the first time ten years ago, Andrew Dawson realized he had found his true passion, and has been pursuing underwater photography ever since. He travels extensively to various diving “hot-spots” around the world, including Fiji, British Columbia, the Caribbean and Bahamas, Costa Rica, the Galapagos, Mexico, and California. Andrew’s images have been featured in various SCUBA magazines, calendars and websites, and he is currently represented by SuperStock Inc. He lives in Los Angeles, California, where he makes his living doing voice-overs and sound design for the entertainment industry.
Comments on NPN underwater photography articles? Send them to the editor.


|