Getting Started in Underwater PhotographyText and photography copyright Andrew Dawson. All rights reserved.
Return to Nature Photography 101 Index
Editor's Note - Thumbnails are links to full size images presented in slide show format.
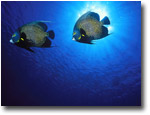
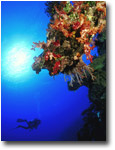
There are few places on Earth that beg to be photographed so much as the underwater world. There are breathtaking coral reefs and kelp forests, playful dolphins, awe-inspiring sharks, and countless colorful fish and invertebrates. There is the possibility of finding rare animals never photographed or even documented before. By crossing through the barrier that is the water’s surface, we find a whole new world waiting to be discovered.
Underwater photography does present some unique challenges. I don’t believe it’s any more difficult than other kinds of nature photography, but it does require specific gear and techniques to be really successful. It’s no surprise that the arrival of digital has had a huge impact on underwater imaging. With that said, the specialized nature of u/w photography only makes the film vs. digital debate even more complicated. It’s important to note that most of the issues you encounter underwater—and their solutions—are optical issues, and have little to do with film vs. digital.
Getting yourself into the ocean environment seems obvious enough, but there are some considerations. Snorkeling is an activity just about anybody can handle, and doesn’t involve a lot of gear and training. For those who don’t want to invest lots of time and money, this might be the only choice. At some point, doing nothing but snorkeling will put a major limit on what kinds of images you can make. Serious u/w photographers, by necessity, are skilled SCUBA divers. SCUBA (self contained underwater breathing apparatus) diving is a huge topic in itself and I won’t bother to explore it here, but I would encourage anyone to give it a try. Even if you don’t pursue the photography, you may discover a new and exciting hobby in SCUBA diving.
So if you’re ready to “get wet”, what’s the best way to start? My experience has been that most people who try u/w photography get poor results, quickly get frustrated, and give up. I think this usually happens for two reasons. The first is that they may be great scuba divers but not really photographers; it’s a bit like watching a Jackie Chan movie, then expecting to be a martial arts champion overnight. It isn’t brain surgery, but a little fundamental background in photography goes a long way. The other reason is that all too often, people just aren’t using the right gear. You don’t have to spend a fortune to make good images, but let’s be realistic; some disposable camera you bought at the drugstore isn’t going to cut it. Once you understand a few basic ideas about how light behaves underwater, the equipment choices will make a lot more sense.
The irony of underwater photography is that for all its beauty, your biggest enemy is the water itself. The problem that pervades every aspect of making images is that water causes a serious loss of color and contrast. The farther sunlight travels through water, the more warm colors (reds, yellows) will be absorbed. One well-known pro shooter equated u/w photography with shooting everything through a bowl of Jello. Even crystal-clear tropical water creates this effect, behaving like one giant, blue diffusion filter. Although it varies with certain conditions, any more than a few feet of water between camera and subject will degrade your results.
It’s usually about this time--or sooner--that digital shooters chime in with questions like “Can’t I just fix the colors in Photoshop?” In a word: no, you can’t. That doesn’t mean there haven’t been some serious attempts, but it really doesn’t work. Film vs. digital is not the issue; the loss of color underwater is an enormous optical problem, and is way beyond being adjusted in Photoshop. Digital has its own advantages, but it doesn’t change the physics of shooting underwater.
So what’s the solution to overcoming the “blue diffusion filter” of water? For a start, always be as close to your subjects as possible. It is this need that dictates the kind of lenses that underwater photographers use. Extreme wide-angle lenses allow close focus (often less than a foot), and are ideal for reef “landscapes” and large animals. Just how wide? In 35mm terms, a 24mm lens would be about the upper limit; more common would be something in the 18-20mm range. Macro lenses also work well, since you’re very close already, and are ideal for capturing various tiny, colorful subjects. These two modes—wide angle and macro—are virtually the only way to take photographs underwater. Telephoto lenses are completely useless, as is any lens that forces too much water between you and the subject. Browse through any collection of (good) underwater photography, and you’ll see that every image is either macro or wide-angle, without exception.
The second half of the solution is the use of flash to restore the lost color and contrast. Without using fill-flash, the vibrant colors you see in underwater shots simply won’t be there. Underwater flash units (almost always referred to as strobes) are not optional equipment-- unless you’re a fan of low-contrast, monochrome-blue images. It would be safe to say that over 90% of underwater shots were made with strobe. Even snorkeling in shallow water, strobes will improve your images noticeably.
Armed with this knowledge, what is the right equipment? There is a broad range of gear available at various price levels, but it can be broken down into three main categories.
Cheap Point & Shoot - These systems will draw you in with slick ads, bargain prices and lots of promises. Unfortunately, these cameras almost never give good results, and are the source of much frustration. The basic problem is that they don’t have appropriate optics: the lenses aren’t wide enough and/or don’t do true macro, so you’re starting off on the wrong foot. They often use a built-in flash close to the lens, which can cause trouble in itself. Digital has offerings in this area too, but the problems are the same. Examples would be the Bonica Snapper, Ikelite Aquashot, Sealife Reefmaster, and the Sea & Sea MX-5.
Mid-Price Systems - Obviously these cameras cost a bit more, but you’re into a realm where good images are now feasible. For film users, examples would be the Sea & Sea Motormarine and Nikon’s Nikonos V (with the cost depending on which lenses you buy for them).
This is where digital has made the biggest “splash”, as watertight housings for many compact digicams are now available. You may already own one of these P&S digitals, so getting a housing for it makes sense. The only stumbling block, again, is the optics being used. Many digicams use decent zoom lenses, but they are rarely wide enough or capable of true macro. The solution has been to use supplementary optics, such as wide converters and close-up lenses. It isn’t ideal, but for many people it’s good enough and fits their budget and goals. These systems are also capable of using off-camera flash, which is far superior. Be cautious before you simply go out and buy a housing; if it can’t be rigged with the right optics, then you’re wasting your time, and you’ll get results similar to the first category.
SLR and Pro Systems - The running joke among u/w shooters is “Yes, I’m an underwater photographer, and I have the 2nd mortgage to prove it.” Not surprisingly, these are the systems used by working pro’s and serious amateurs. It’s possible to spend a fortune on this type of gear, but there are some choices that won’t require you to be a lottery winner. The Nikonos outfitted with its 15mm or 20mm lens can make for outstanding images. The most power and flexibility comes from using SLR’s and DSLR’s in housings. You can utilize a wider range of lenses, and have most of the same tricks and tools as you would on land. For many years, Nikon was the only player in this arena, but that is changing quickly. For newer DSLR’s there are still bugs being worked out, so before making a big investment, some homework is in order.
Whatever system you choose, starting off with the right gear will increase your chances for success enormously. The two elements mentioned are crucial; appropriate lenses plus u/w strobe. Believe me, if there were other solutions that were easier or cheaper, u/w shooters would be happy to embrace them. But the physics of water demand it, period. Digital means lots of new choices, and that can only be a good thing. Just as on dry land, we are in an exciting transitional, pioneering phase of photography. In future articles, we’ll discuss some of the specific techniques used underwater, and go into more detail on gear selection.
AD-NPN 1288
About the author...
After SCUBA diving for the first time ten years ago, Andrew Dawson realized he had found his true passion, and has been pursuing underwater photography ever since. He travels extensively to various diving “hot-spots” around the world, including Fiji, British Columbia, the Caribbean and Bahamas, Costa Rica, the Galapagos, Mexico, and California. Andrew’s images have been featured in various SCUBA magazines, calendars and websites, and he is currently represented by SuperStock Inc. He lives in Los Angeles, California, where he makes his living doing voice-overs and sound design for the entertainment industry.
Comments on NPN underwater photography articles? Send them to the editor.


|