Demystifying Hyperfocal Focusing for Wide Angle Landscape PhotosText and photography copyright Rod Barbee. All rights reserved.
In photography, big words tend to elicit glassy-eyed stares. Hyperfocal seems to be one of those words; it gets people turning around in circles of confusion. But it’s just a word, hyper--or excessive--focus. It means a lot of focus.
I’ve been asked if I use medium or large format to achieve the depth and detail seen in large prints of my landscape photos. Folks are surprised to learn that I use only 35mm film and digital SLR cameras. By using hyperfocal techniques outlined here, and by using a sturdy tripod and quality film and lenses, I’ve been able to achieve large format results without a large format camera. You will too.
When you use hyperfocal focusing you’re taking the greatest advantage of depth of field to achieve the greatest amount of apparent focus. A couple things to remember;
- To get the greatest depth of field you need to use the smallest aperture openings, and
- depth of field extends in front of and behind the point of focus; a little bit toward the camera and more away from the camera.
Having everything in focus is especially desirable in wide-angle landscape images where the goal is to convey a sense of depth. In 35mm photography, I’ve found that using lenses that are about 28mm and wider work best to achieve this. For all but the full-frame digital sensors, a focal length of 18mm and wider works well.
With a wide-angle lens, by using a small opening like f/22 and setting the lens at the hyperfocal focus point, depth of field can extend from a close foreground object to infinity, thereby achieving that sense of depth while maintaining acceptably sharp focus throughout the image. This is actually easier done than said.
There is plenty of information to be found in books and on the internet dealing with the mathematics and theory behind hyperfocal focusing so I’m not going to go into that here, that’s not what this article is about. What I will go into is how to take the best advantage, compositionally, of hyperfocal focusing.
Setting the hyperfocal point on a fixed focal length lens.
|
|
First of all, let’s get the focusing part out of the way. Once you have a composition that excites you, then you need to set the focus. One common mistake here is to focus on the nearest foreground element; after all, that’s what you want to have in focus and that’s what will look best in the viewfinder. But remember, some depth of field will extend from that point towards the camera. This is just wasted depth of field as it will be out of the frame, and you’ll end up with your background out of focus. You need to focus slightly beyond that nearest foreground element. Just where to focus is the sticky part and it’s where most people get hung up.
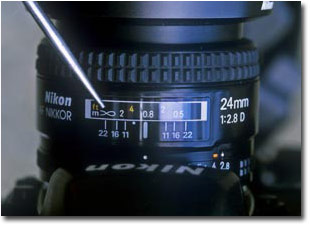
If you’re using a fixed focal length wide angle lens there will usually be hyperfocal-focusing marks on the barrel, though this is becoming rarer and rarer. These are marks on either side of the focus scale with corresponding f/stop numbers. You’ll usually see numbers like 11, 16, and 22 on each side of the focusing distance indicator mark. If your lens has these marks, simply line up the infinity symbol (that little sideways 8) on one side of the barrel with the mark for the aperture you’re using. On the other side of the barrel, the corresponding mark will point to the distance of closest focus. If that’s not the case then you have it backwards and you need to put your infinity symbol on the other side of the lens barrel.
If you’re using a wide-angle zoom, the best way to focus is to use a hyperfocal chart. These charts, or some variation, are sometimes included in the owner’s manual for your lens. When you use one of these charts, you set your focusing ring to the distance indicated for your chosen focal length and the chosen aperture. Charts can also be generated using optical formulas. There are commercially available charts as well as free charts you can find by doing an internet search.
Here are a couple of charts I’ve put together. The chart on the left is for my 35mm cameras, the chart on the right is for my Nikon D200 (1.5 crop factor):
Note - these charts were generating assuming that the photographer wants high quality prints larger than 8x12 inches.

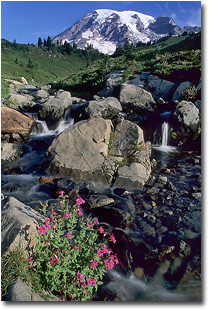
Hyperfocal point for 12mm at f/22 (1.3'/.4m). Focus point obtained from hyperfocal chart.
|
|
When you’re focused on the hyperfocal point, the image in the viewfinder may not look good; that foreground you like so much may look out of focus. Resist the temptation to refocus. Remember, when you look through your viewfinder, you’re view with the lens at its widest aperture opening and it’s shallowest depth of field. Instead, if you need some reassurance, press your depth of field preview button and watch everything pop into focus.
All this stuff about maximizing depth of field is well and good, but it does nothing for you unless you use effective composition techniques. In close up pictures, backgrounds become critical. In landscape images, it’s the foreground. The whole purpose of using hyperfocal technique is to have both foreground and background in focus. When you focus at the hyperfocal point, either by using marks on the lens or by using a chart, you’ll have apparent focus from one half the distance of the hyperfocal point to infinity. In other words, if the indicated hyperfocal point is 3 feet, you’ll have apparent focus from 18 inches on out. In this example, you should place your camera about 18 inches from the nearest foreground element in your composition. If you’re after dynamic landscape images that convey a great sense of depth, photographing in the vertical format will be more effective simply because you have more space to express that depth. A very effective way to do this is to get close and slightly above your foreground and tilt the camera slightly down to draw the foreground in. Fill the bottom of the frame with foreground and place the horizon in the upper part of the frame. This is where you achieve that sense of depth, that near/far effect. Notice that most of the image is going to be foreground.
One thing you might find when you start using this technique is that your hyperfocal point, more often than not, ends up right in the middle of the frame. If you don’t have a chart handy, use this positioning technique of getting close to and slightly above your foreground and focus right in the center of the frame. This is a trick I learned (some might say stole) from my friend David Middleton.
Something else I’ll mention here is that "rule of thumb" of focusing a third of the way into the frame. The trouble with this "rule" is that one-third may be too close or too far away. It all depends on your composition and this "rule" isn’t very reliable. Sometimes it works. Sometimes it doesn’t. I simply use the marks on my lens or the numbers from the charts. In fact, I’ve memorized the hyperfocal points for the most common focal lengths I use.
Since the foreground is where your viewer starts, choose it carefully. It’s very important to find an effective foreground. If your foreground isn’t interesting, if it doesn’t draw the viewer in, you might as well not even include it. Foregrounds can make or break a wide-angle landscape photograph; so choosing your foreground needs to be your primary consideration. If everything from 2 feet to infinity in your picture is in focus but it’s boring, then what’s the point?
Note also that using a good foreground with a boring background will also lead to less than satisfying pictures. In close up photography, it’s like finding a great background for a bug-eaten, ugly flower.
I always encourage people to strive for simplicity and to look for graphics. For wide-angle landscapes, I look for leading lines and curves to use in my foregrounds. I look for connections. I look for a way to draw my viewers in and lead them through the picture. When choosing foreground elements like flowers, look for groups or shapes that can act as leading or entry elements, a place for the viewer to begin.
Don’t try to include too much though. A single line or curve leads the viewer better than a confusing group of lines or elements. Simplifying is often the most difficult part of composition but it will improve your photography the most. It just takes practice, so just keep at it.
It bears repeating that the techniques outlined here are effective when used with wide-angle lenses (18-35 on a 35mm SLR, 12-24 mm on a non-full frame digital). You simply cannot get the depth of field needed with a medium or telephoto lens to achieve the near/far effect I describe here.
Here are some tips for dynamic wide-angle landscape images:
- Get close to your foreground. Ok, now get closer.
- Find your composition first, and then set up your tripod.
- Once you’ve found your composition (close to and slightly above your foreground), and you’ve taken all that time to get your tripod set up and your tripod head adjusted in just the right place, lock in your composition. Then use your quick release to take the camera off the tripod to determine exposure (you may need to use a graduated filter and you’ll need to spot meter around the scene to determine which filter to use)
- Set your focusing using the hyperfocal marks on your lens or a chart.
- Don’t freak out if your foreground looks out of focus. Use your DOF preview button to reassure yourself.
Comments on NPN nature photography instructional articles? Send them to the editor.
RB-NPN 0933
 Rod Barbee is a professional photographer, writer, and instructor. He is a regular contributor to Outdoor Photographer magazine and has also been published in Nature’s Best magazine, Audubon and Mead calendars, Northwest Travel and Oregon Coast magazines, Orvis clothing catalog, the National Park Service, and more. Several of his images appear in the Amphoto book “American Vision”. His first book, The Photographer's Guide to the Oregon Coast, co-written with with David Middleton, is available nationwide. Rod Barbee is a professional photographer, writer, and instructor. He is a regular contributor to Outdoor Photographer magazine and has also been published in Nature’s Best magazine, Audubon and Mead calendars, Northwest Travel and Oregon Coast magazines, Orvis clothing catalog, the National Park Service, and more. Several of his images appear in the Amphoto book “American Vision”. His first book, The Photographer's Guide to the Oregon Coast, co-written with with David Middleton, is available nationwide.
Rod has taught nature photography through Bellevue Community College in Washington state, The Mountaineers in Seattle, Olympic College in Bremerton, WA, The Great American Photography Weekend workshops, and Olympic Mountain School of Photography. He is also a contributing editor to Naturephotographers.net, an online photography magazine.
The natural beauty discovered during backpacking trips into Olympic National Park led him to nature photography. It has since become a passion in his life from which he continues to learn and grow.
Rod and his wife Tracy Rowley live in Port Ludlow on Washington’s Olympic peninsula.


|