ChromaSoftware Photoshop Plug-ins
Text and Photography Copyright Matt Hagadorn
All rights reserved.
I don’t use a lot of filters in my daily imaging workflow. A bit of Unsharp Mask and the occasional Gaussian Blur are almost all that I use for correcting my photographic images. I’m a firm believer that you shouldn’t spend money on gee-whiz filters that duplicate functionality built right into Photoshop. But I also believe that anything that’s useful, inexpensive, works well and saves time is worth using. The folks at ChromaSoftware have produced a series of Photoshop plug-ins that appear to meet that criteria.
The Plug-Ins
ChromaSoftware currently sells five add-in filters for Photoshop (and yes, Photoshop Elements is supported). For this review I tested the Shadow Control, Highlight Control and Smart Sharpen plug-ins, as these are most useful for the type of image corrections that I do. Also available is a Photographic Filters plug-in that allows you to apply graduated and solid filter effects, as well as a new IR Film plug-in for emulating the look of IR film from digital images.
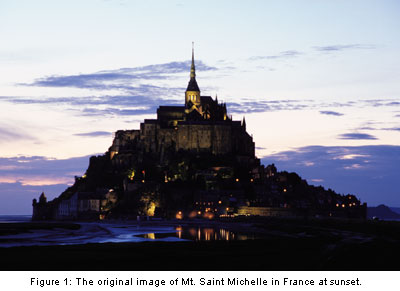
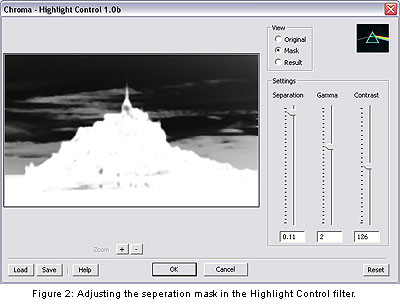
Highlight Control allows you to quickly adjust the brightness and contrast of highlight areas without affecting shadows. To test the filter I used an image of Mt. Saint Michelle at sunset that has a washed-out sky (see Figure 1). Selecting Filter > Chroma > Highlight Control brings up the filter dialog window. The window has three main slider controls; Separation, Gamma and Contrast. Separation adjusts the selection mask that separates highlight areas from shadows. This is the control you use to determine which areas of the image will be affected by the filter. Areas that will be affected are black and areas that are protected are white (see Figure 2). Gamma and Contrast adjust the lightness (or darkness) and contrast of your selected highlights. The Highlight Control window also as has three radio buttons for showing the original image (before adjustments), the selection mask and the resulting image (after adjustments). Changes are displayed in the image preview window.
The basic workflow for using the filter is to click the Mask radio button and then adjust the Separation slider up or down until you’ve selected your highlight areas. Then click the Result button to preview the effect in real-time as you adjust the Gamma and Contrast sliders until you’ve achieved the results you want. You can toggle between the Original and Result radio buttons for quick before-and-after comparisons. Clicking OK applies the filter to the image. The Highlight Control filter allowed me to quickly and easily darken the sky and improve contrast in the sunset.
Shadow Control is the exact opposite of Highlight Control. It allows you to adjust shadow areas without affecting highlights. The filter’s controls are exactly the same as Highlight Control except that you use the Separation slider to select shadow areas instead of highlights and use Gamma to lighten the shadows instead of darken the highlights. I used the filter to lighten the foreground of my image.
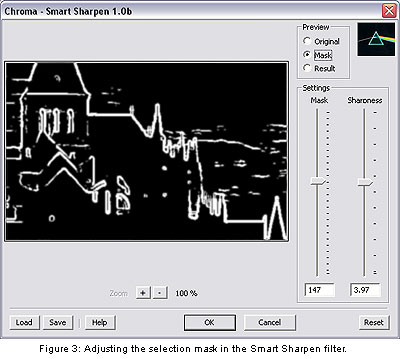
Smart Sharpen works by sharpening only the edges (areas of contrast) in your image, leaving the rest of the image untouched. This is particularly useful for noisy scans from grainy film, or for high-ISO digital camera images. The controls are similar to the Highlight and Shadow Control filters in that you first adjust the areas to be affected using the Mask slider, and then adjust the amount of sharpening applied to the selection using the Sharpness slider (see Figure 3). The Mask slider lets you fine-tune the selection to affect only the edges that you want to sharpen. The Smart Sharpen filter has the same radio buttons for selecting between the original image, the mask and the result, and a preview window that shows the effect as you adjust the sliders.
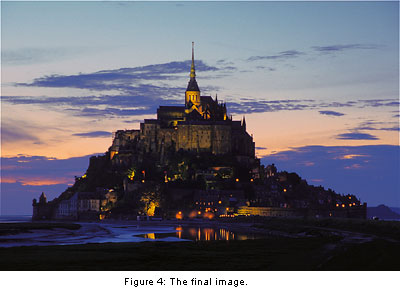
The final image after corrections using all three filters and a slight Hue/Saturation adjustment is shown in Figure 4. You’ll agree that this is a significant improvement over the original.
The Verdict
There isn’t anything these three filters do that you can’t do with some moderate-to-advanced selection techniques in Photoshop (see last month’s article, Creating Selections from Channels as an example). But they’re easy to use for the novice and might even prove to be a timesaver for more advanced users. Overall they’re useful tools and represent a good value.
Each filter is sold individually for $34.95 from www.chromasoftware.com or they can be purchased in cost-saving suites. They’re currently available only for Windows, but ChromaSoftware promises Mac OS X versions in the future. You can download free trial versions to try them out for yourself. In my opinion these filters are worth a look.
MH-NPN 112
Comments on NPN digital photography articles? Send them to the editor.


|