Creating Selections from Channels
Text and Photography Copyright Matt Hagadorn
All rights reserved.
When you’re learning Photoshop you might think the only way to create selections is with one of the three selection tools: Marquee, Lasso and Magic Wand. Sometimes these tools are adequate, but subjects in nature rarely take the simple forms for which these tools were designed. The Magic Wand helps you create irregular shaped selections, but this tool sometimes requires a lot of trial and error. When selecting subjects like trees against sky, a simpler solution is to create a selection from a channel.
Red, Green, Blue…and Gray?
Under the covers, a selection is just a grayscale channel. This is why when you save a selection in Photoshop using Select > Save Selection you’re prompted to create a new channel and give it a name. If you then click on the Channels palette, you’ll see the new selection channel listed along with the red, green and blue channels of your image. Clicking on the selection channel will reveal a black and white image, with the area you selected as white and the rest of the image as gray or black. In selection channels, white areas are fully selected, gray areas are partially selected and black areas are masked (not selected). From this you can begin to see that you can use the color channels in your image to create a selection channel.
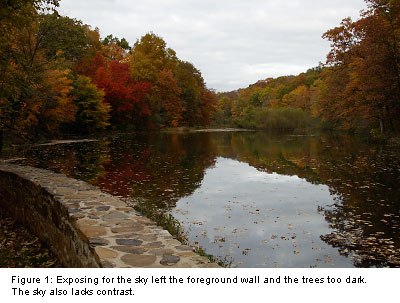
I’ll walk you through this technique using the image in Figure 1. This photo demonstrates why you should carry a graduated neutral density filter at all times. The scene was beyond the contrast range of my digital camera’s CCD, so I exposed for the sky resulting in the trees looking too dark. The overcast sky also lacks contrast, but it’s not actually blown out, so I might be able to improve the image significantly. I want to darken the midtones of the sky to increase contrast and add some detail in the clouds. The trees should be made lighter and could use more saturation to bring out the fall colors.
The problem is, I can’t do this with global levels or curves adjustments. I need to select each area of the image and perform the corrections separately, but attempting to do this with one of the selection tools would be an exercise in frustration. The solution lies inside one of my image’s color channels.
A Study in Contrast
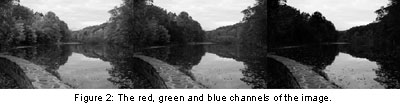
Before starting, make sure the Channels palette is open (Window > Channels) and your image is in 8-bit mode (Image > Mode > 8 Bits/channel). The first step is to examine the red, green and blue channels of your image to find the one with the most contrast. In the Channels palette, click on each channel one at a time. The image display will change to a grayscale representation of the selected channel. In my image, the blue channel contains the most contrast between the sky and the trees (see Figure 2), so that’s the channel I’ll use to create my selection.
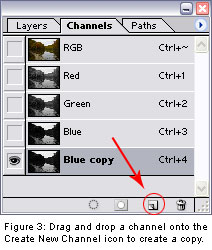
I’ll create a copy of the blue channel by clicking it in the Channels palette and dragging it onto the Create New Channel icon (see Figure 3). This creates a copy of the blue channel named “Blue copy.” Next, I want to increase contrast between the sky and trees in my new channel even further. Click on the new channel in the Channels palette and open the Levels dialog (Image > Adjustments > Levels, or Ctrl-L). I want to turn more areas of the channel to black and white, so I’ll move the black and white input sliders towards the middle. I don’t need to go too far, I just want to improve the edge contrast along the tree line (see Figure 4).
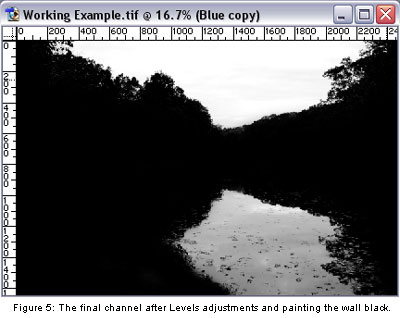
Some areas of the stone wall in the foreground are still gray or white. I don’t want these to be selected along with the sky, so I’ll use the Brush Tool from the Tools palette (or press B) with a large brush size and a foreground color of black to quickly paint over the wall. The final channel image is shown in Figure 5.
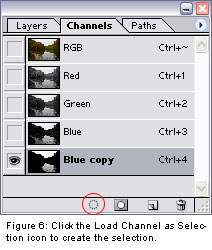
Next, turn the channel into a selection by clicking the Load Channel as Selection icon in the Channels palette (Figure 6). You will now see the “marching ants” on your image indicating the portions that are selected. Areas of the channel that are white will be selected, gray areas partially selected and black areas will be masked.
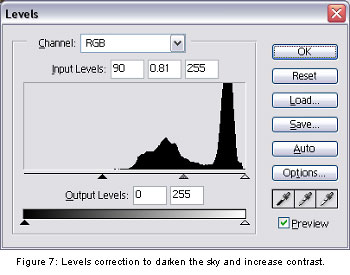
Now that I’ve got the sky and its reflection in the water selected I can work on them with Photoshop’s editing tools independently from the rest of the image. I’ll use Levels to darken the sky and increase detail by moving the black input slider inwards (Figure 7).
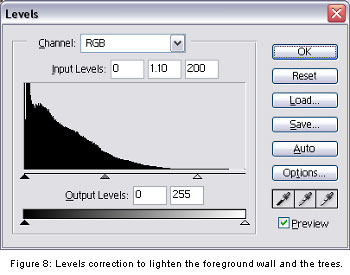
With the sky completed I want to correct the rest of the image, but I don’t have to go through the process of creating another selection to do so. All I need to do is invert the selection by clicking Inverse from the Select menu or type Ctrl-Shift-I. With a single command the trees and wall in the foreground are now selected and the sky and its reflection in the water are not. I’ll use Levels again to lighten the trees by moving the white point slider, which also has the effect of increasing saturation. The Levels correction I used is shown in Figure 8.
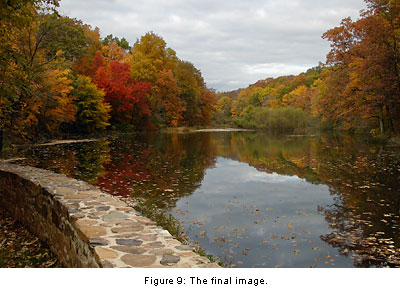
With your image corrections complete, click Select > Deselect, or type Ctrl-D to remove the selection. The completed image is shown in Figure 9.
It’s Not Magic
Using channels is a quick and easy way to create complex selections that would otherwise be impossible with Photoshop’s regular selection tools. It really isn’t very difficult, so the next time you find yourself wrestling with the Magic Wand, take a look at your image’s color channels. You just might find your selection hiding there, waiting to be discovered.
Editor's Note - Matt will be instructing an all-day digital imaging seminar on March 15, 2003 in Secaucus, New Jersey. Be sure to check out the details of this event, which includes breakfast, lunch, door prizes and a discount for members of the Nature Photographers Network. Details>>>
MH-NPN 112
Comments on NPN digital photography articles? Send them to the editor.


|