|
My favorite season for nature photography is winter. The air is
crystal-clear, trees offer stark, graphic forms against a background of
dazzling whiteness and the profound quiet and solitude of a frigid day in
the wild can be an overwhelming natural high.
When everything in nature has turned white, the photographic
challenges are considerable. Keeping your fingers functional in the
intense cold is critical, both for safety reasons and to enable you to work
the controls on the camera and tripod. Cold also affects electronics. The
batteries that power electronic cameras may malfunction when the mercury
drops too low. Another problem is that the front element of each lens must
be protected from wind-driven snow and ice particles. And compositions can
be more difficult to find because many of natures details have been covered
by snow.
The most challenging aspect of shooting in winter, however, is
exposure. The brilliant whiteness that shrouds all of nature fools light
meters into underexposing both slides and negatives. Overcoming this
problem requires careful analysis of each shot and applying some very basic
photographic principles.
How to Handle Exposure
Reflective meters, like those built-in to your 35mm or medium
format cameras, read light bouncing off the subject. Their programmed
response is designed to expose those light values as middle gray (or Zone
V). This works great if the subject is green grass, Navajo sandstone, or a
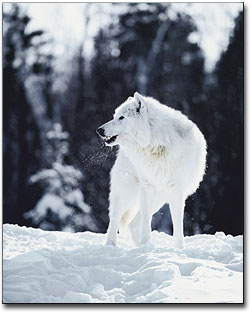
medium gray wolf. If the majority of a scene is white, however, the meter
still tries to make the exposure medium gray. Consequently, snow becomes
gray -- instead of white -- and the rest of the photograph is similarly
underexposured.
Suppose you take a light reading of the scene and open the lens
aperture (or adjust the shutter speed) by one or two f/stops to compensate.
The underexposed landscape is brightened and the snow is rendered as white.
This sounds great. But do all snowy landscapes reflect the same
amount of light? Is snow under an overcast sky as bright as snow
reflecting full sunlight in a blue sky? Is patchy snow at sunrise more or
less reflective than a complete whiteout where a blizzard is blowing snow
horizontally?
It is obvious that it's impossible to make a general exposure
compensation rule that applies to all situations. So, how do you
accurately expose for a winter landscape? There are two methods to use
that will guarantee perfect exposures every time.
Method No. 1: Use your in-camera or hand held reflective meter to
read a middle toned, or medium-gray, subject: a gray camera bag, a pair of
jeans, a tree trunk or perhaps a rock outcropping. Any middle-toned object
will work (regardless of color) as long as it's receiving the same light as
the scene before you. Once you've determined this reading, manually set
the lens aperture and shutter speed and don't use the automatic exposure
mode to make the shot.
What if there are no medium gray objects nearby? Try this: take a
Kodak gray card to a fabric store and buy a small piece of material that
approximates the tonality of the card. Sew this onto your camera bag and
now you'll always have a medium gray object from which you can take an
accurate reading.
Method No. 2: An incident meter reads the light falling onto a
scene as opposed to light reflecting off of it. The incident meter isn't
fooled by white snow because it determines the amount of light falling onto
the scene from the sky, irrespective of the reflectivity of the subject.
The technique is simple. Point the white hemispheric ball on the
meter toward the camera lens, push a button, and the correct reading is
visible on the crystal display readout. However, the light falling onto
the meter must be the same as the light falling onto the scene that you're
photographing. If you're in the shade and the landscape is lit by the sun,
the reading will be inaccurate.
Keeping Warm
When I was shooting baby harp seals in the Gulf of St. Lawrence,
the temperature dropped to minus 45 degrees F. I remember taking off my
three layers of gloves to change film and, when my skin came directly in
contact with the air and the metal of the camera, they began to hurt so
badly I couldn't focus on photography anymore. I ran back to the warmth of
the helicopter interior until the pain went away and warmth returned to my
hands.
The best solution is to carry either two hand warmers (one for each
pocket) or several chemical heat packets. The hand warmers are powered by
fuel sticks that last about three hours. They provide a tremendous amount
of heat and will keep the pockets in your parka toasty when you need to
revitalize your fingers. The chemical packets can be inserted into your
gloves (or boots) for continuous warmth. Both of these items will prevent
frostbite and will ensure you have manual dexterity for the operation of
your camera.
Protecting Your Camera's Electronics and Optics
Most 35mm and medium format cameras today are either fully
electronic or have electronic components. In extremely cold weather
conditions, batteries will stop functioning.
When I'm not shooting, I open two or three snaps on my down parka
and place the camera against my body. I shoot primarily the Mamiya RZ 67,
which is a sizable camera. Nevertheless, I hold it against me and the heat
generated by my body keeps the battery warm enough to work. If I know that
I'll be carrying the camera on a tripod for long stretches, where it would
be awkward to constantly take it on and off, I'll duct-tape a couple of the
chemical heat packets to the bottom of the camera where the battery is
located.
To protect the front lens elements from blowing snow and ice, I
habitually use lens shades. In addition, a skylight filter acts as a first
line of defense in protecting the vulnerable lens should snow or sleet
freeze on the glass.
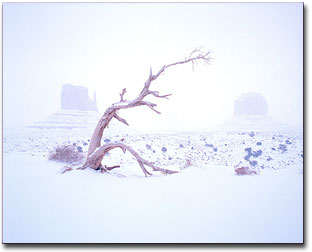
Winter Compositions
Winter compositions require a discerning eye to find. Look for
strong, graphic shapes and startling contrast. Bare branches against snow
or a weathered split-rail fence protruding from snow drifts are classic
images. A majestic snow-covered mountain range composed with a deep blue
sky always offers a dramatic shot. The same range of mountains
photographed against a white sky can also be exquisite. My favorite
subject in nature is shooting white on white.
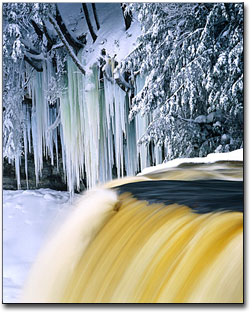
Don't forget to use low angled sunrise or sunset lighting to
enhance the rich texture of a fresh snowfall or to backlight ice on frozen
reeds in a pond. Winter landscapes are dramatized by golden light in the
early morning and late afternoon. Snowflakes often catch the light, adding
sparkle to your picture. Long shadows offer a graphic element as they
stretch out on the pristine white snow.
Enjoy winter photography this year. Use these simple guidelines,
and the challenges of shooting in white conditions and frigid temperatures
will pay off many times over.
 Jim Zuckerman left his medical studies in 1970 to turn his
love of photography into a career. He has lectured and taught
creative photography at many universities and private schools,
including UCLA, Kent State University, the Hallmark Institute of
Photography, and the Palm Beach Photographic Center. He also has led
international photo tours to destinations such as Burma, Thailand,
China, Brazil, Eastern Europe, Alaska, Greece, Papua New Guinea, and
the American Southwest.
Jim Zuckerman left his medical studies in 1970 to turn his
love of photography into a career. He has lectured and taught
creative photography at many universities and private schools,
including UCLA, Kent State University, the Hallmark Institute of
Photography, and the Palm Beach Photographic Center. He also has led
international photo tours to destinations such as Burma, Thailand,
China, Brazil, Eastern Europe, Alaska, Greece, Papua New Guinea, and
the American Southwest.
Zuckerman specializes in wildlife and nature photography,
travel photography, photo- and electron microscopy, and digital
special effects.
Zuckerman is a contributing editor to Petersen's Photographic
Magazine. His images, articles and photo features have been
published in scores of books and magazines including several
Time-Life Books, publications of the National Geographic Society,
Outdoor Photographer, Outdoor and Travel Photography, Omni Magazine,
Conde Nast Traveler, Science Fiction Age, Australia's Photo World,
and Greece's Opticon. He is the author of seven photography books:
Visual Impact; The Professional Photographer's Guide to Shooting and
Selling Nature and Wildlife Photos; Outstanding Special Effects
Photography on a Limited Budget, Techniques of Natural Light
Photography, Jim Zuckerman's Secrets of Color in Photography, Fantasy
Nudes, and Capturing Drama in Nature Photography.
His work has been used for packaging, advertising, and
editorial layouts in thirty countries around the world. Jim's images
have also appeared in calendars, posters, greeting cards, and
corporate publications. His stock photography is represented by
Corbis Images.
To learn more about Jim and to view his work, visit his web site at www.jimzuckerman.com.


|
