|
|
 Insights on Images
All rights reserved. Photographing Big Wildlife with Big Results Wildlife photography is a hot topic for many nature and outdoor photographers and enthusiasts--amateurs as well as professionals. And with a growing public awareness toward the protection of wild animals and habitat preservation, people are becoming more in tune with the natural world and how to better photograph its essence. As a result, wildlife photography is on the rise. But with the growing number of nature photographers, the advances in technology as it applies to cameras and lenses, and better accessibility to subjects through popular photo workshops, how do you make compelling wildlife images that stand out above the rest? While others may be merely documenting a species with their cameras, the question is how are you going to make yours rival or surpass the best? Images with high visual impact can be achieved by incorporating these easy-to-follow tips; and for the most part, these basic guidelines can be used when photographing animals the size of an elk to elephant or as small as a fox or fawn. 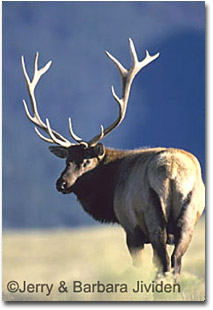
Background Control Clean, uncluttered backgrounds help emphasis your subject. Too many elements can be very distracting and can dilute the very intent of the subject in your photo. By changing your position you can usually change the background of many potential photographs. Moving to one side or the other may produce an entirely different background and dominant color. Also, by modifying vantage points (the angle or direction from which you look at your subject), you can achieve significantly different results. You might try photographing from a low angle, such as produced from kneeling, or a higher angle by standing atop something that is safe and convenient to give you an elevated perspective. Change the aperture to limit the depth of field--this controls the amount of area that will appear in focus. A shallower depth of field will cause the background area behind the subject to show less detail and appear more like blurry colors and tones than distinguishable elements. Understanding that shallower depths of field are produced more easily by using telephoto lenses (over 200mm) and by the larger aperture openings (such as f/2.8 or f/4) will help you to make a proper determination when using this technique. If time permits, you might want to experiment with aperture changes and check out the different results with your "depth-of-field preview finder" control. Creative Composition Effective image design can be learned and developed, starting with some standard guidelines for pleasing composition. To produce a noticeably stronger and more interesting photo, compose the scene with your wildlife off center to either side. For best results, leave the "extra space" in front of the subject, where it is facing or moving. Including this extra space will also more effectively create a sense of motion than the static, bulls-eye centered approach. In the case of a close-up or portrait shot, place the animal's most prominent feature (such as the eyes) off center, looking toward the center. 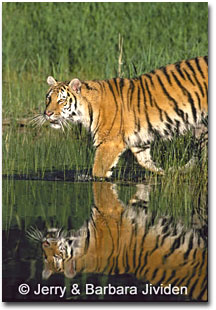
Add interesting elements when possible--like the animal's reflection if it's near water or a nearby, interesting landform. Also, by incorporating a little surrounding matter along the borders of your composition (such as tree limbs, bushes and rocks for example), you can produce a "natural frame" around your subject. This enhancement is often very successful in holding a viewer's attention, drawing his eye to your true subject. Dramatic, Natural Light Work with the light and not against it. You'll see great results when your shots feature good light and are properly exposed. Photograph your subjects during periods when the sun is positioned low in the sky--normally, in early morning and in evening. Especially around sunrise and sunset, you'll notice a warm, golden glow that highlights your subject from its broadest side (this doesn't happen with the light is overhead). This low-angled light replaces harsh shadows that are typically produced by strong, midday light. Any shadows that result will fall behind your subject, not on your subject. And it's also a good time for the sun to produce a natural "catch light" in the animal's eyes when its head is turned toward the sun. Use the drama of a stormy sky to create a moody shot. If the sky's color is rich, try to include it in the composition with your subject. When the sky is washed-out and devoid of color, a better option would be to exclude it. Also, be on the lookout for rainbows that follow light showers on sunny days in an area where you are photographing wildlife anyway. When the light filters through the drizzle at the correct angle, you'll have a good chance of photographing your subject and catching a rainbow at the same time. But since rainbows are fleeting, you need to be on the alert. Fill Flash Using fill flash in wildlife photography is an effective way to increase detail in otherwise "flat," dull lighting. Even on sunny days, flash is great for adding a catchlight to the subject's eyes--important when it is not facing toward the sun. Try using fill flash when animals are in dim, wooded areas or when photographing very dark subjects (like dark birds, black bears, and other wildlife with dense/deep coloring). Fill flash should generally be at least one stop less light than your main light source (provided you are within the limits of your flash unit). HINT: Most cameras today include Automatic Daylight Balanced Fill Flash. In bright conditions, the camera automatically reduces flash output, so the flash does not become the primary light source. This works with a built-in flash or an accessory flash unit. Because most animals will not be close to the camera, however, you'll probably want to use a large (high power) accessory flash. If the subject is too far from the camera's flash, consider one of the flash extender accessories with a Fresnel lens that concentrates the light and increases effective "reach." These devices attach to a flash unit and are intended for use with 300mm and longer lenses. 
Action/Interaction Action adds interest to a photo. A wolf howling, a coyote pouncing, or a deer jumping are typical examples of good action shots. And photographing interaction among a species or one species with another is bonus! Capture natural behavior when possible. A misconception, however, is that obtaining these shots is just as easy as photographing typical snapshots, and that photographers who record the action on film are lucky. In truth, luck has very little to do with this success. It actually takes time and patience to repeat good results. In some situations, especially where animals are habituated to the presence of people, an animal may graze or wander toward you, offering good photographic opportunities. Be careful to not provoke the animal or harass it to cause a desired movement; rather, allow it to put you in its comfort zone--not the other way around. Wait until the subject appears alert or exhibits signs of attentiveness. Watch for perked ears, a firm stance, or posture indicative of movement. Then compose the shot, and trip the shutter. But be sure that your shutter speed is fast enough to catch the action, and use a motor drive when possible. Poor technique will cause blurred shots. Conclusion In summary, controlling these factors will allow you to predict the results of your photography with more accuracy, while still maintaining a degree of spontaneity. By using these tips and including certain elements and actions at specific moments, you will produce wildlife images with greater visual impact. For us, it's definitely a formula for "big results." HOT SPOTS: It's obvious that you can't take wildlife photos without wildlife, but since most of us do not have wild animals roaming in our yards or we cannot travel extensively, we suggest that you visit nearby places where wildlife is watchable and accessible. Good destinations include places where animals are not hunted. NOTE: Many photographers enjoy photographing in: national parks, wildlife preserves, protected wetlands, sanctuaries, rehab centers, safari parks, some aviaries, privately-owned habitats, and even zoos. JJ/BJ-NPN Jerry and Barbara Jividen are members of the North American Nature Photography Association (NANPA) and the American Society of Media Photographers (ASMP). Barbara is also a member of the Outdoor Writers Association of America and serves as Assistant Editor for NANPA's Currents. Both are certified photography instructors and lead numerous photo workshops and tours throughout the year. They also write a monthly e-journal, called the "Insights on Images: E-Journal," which can be obtained via email by requesting a free copy at: www.imagesunique.com/insights/journal.html. For more information, call (800) 866-8655. |
|
|