|
|

All rights reserved. After I retired from the Navy, I was looking for an adventure. So during the summer of 1995, I came to Alaska with the intentions of staying for just one year to photograph the northern lights. By late August, the all night twilight had finally faded enough so that I could photograph my first aurora. After that initial encounter, my plans changed. Now six years and thousands of photographs later, I thought I'd share this experience. Although the northern lights are infrequency viewed over the lower 48 states, central Alaska averages well over 120 days of aurora annually. However, the rules for capturing a good photo of the aurora apply everywhere.
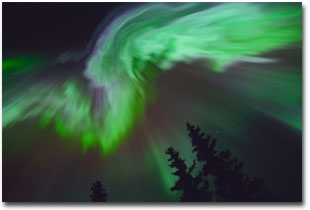
For the first-time or seasoned aurora photographer, a 35mm camera mounted on a tripod and equipped with a cable release is a must. Use a 24mm to 50mm lens set it to its widest aperture (or one stop slower) to avoid distortion of bright star images (usually f/1.4 to f/2.8). The use of an ISO from 400 to 800 negative film is ideal due to its speed and wide exposure latitude. Exposures of 5 to 15 seconds works well for bright or rapidly moving aurora unless the aurora is faint or mostly stationary; then doubling or tripling the exposure time is recommended. People tend to overexpose their photos, causing the aurora to look washed out. The best plan is to bracket your exposures by 5 or 10 seconds. Film is the cheapest cost for getting the perfect shot, so use it without hesitation. If the aurora is bright, moonlight, twilight, and city lights should not hurt and can offer an interesting foreground (Attachment 1). Never use filters because they cause internal reflections and interference rings (concentric alternative bright and dark circles) on your film. If it is very dark, a silhouette of a tree or lights inside a house will certainly add to the scene. However, good quality video or digital camera recording of the aurora will not work since these cameras are not sensitive enough. One could enhance these images in Photo Shop, but my idea of a great photo is one that closely resembles what the eye sees, not one that exaggerates it. Special Precautions
In recent years, Kodak, Fuji, and others have been changing their emulsions faster than one can keep up with. As a result, I cannot tell you the best film to use for the northern lights. However, since the major color of the aurora is green, I find that films that don't saturate that color are best. Reds and other colors accompany major aurora storms definitely add to the interest and beauty of your photo (Attachment 2). Therefore, experiment with different films and stick with the one that works best for you. While I use only a 35mm focal length lens (restricted to about 64 degrees of sky), the aurora is quite often visible across the entire sky. In order to capture this structure, a super-wide angle lens is better to use. A 16mm lens will cause the ground to curve (distortion), but with over 120 degrees of sky, the effect can be very dramatic. There is however a price to pay. With the use of wide-angle lenses, fewer stars will be recorded. I find that background stars always enhance an aurora photo. The more stars, the better. With digital technology improving everyday, I have all my best images scanned on professional quality film scanners and stored on CDs. This insures that if the negative is damaged, the image will live on forever as a data stream of 1's and 0's. The additional plus with digital images is that a CD can store over a dozen images at 60mb each (that's 4000 dpi per image). I have been successful in printing poster size aurora photos at this resolution. A final Word For those who have been luck enough to have seen the northern lights, the follow comment I receive is typical - "I have seen the Lights a few times (in early September few years back) and it is an experience that touched something inside and changed me forever. I carry the colorful visions in my head, and revisit the spaces I watched them in constantly. I've tried to describe the lights to friends, yet my words fail to convey the mystical power of the experience. I think your photos come awfully close." Every aurora display is different in appearance, some lasting only a few minutes to several hours. Because the eye sees the aurora instantaneously and the film records it as an interval over time, the two are rarely identical. However, reward awaits those who are patient in the dark cold night. Once you have captured the northern lights on film, it will have captured you. All images - Nikon FM2, Nikkor 35mm f/1.4 lens.
Editor's Note - Visit Jan's web site to view more aurora photography at http://climate.gi.alaska.edu/Curtis/curtis.html. Comments on this article? Send them to the editor. |
 The Basics
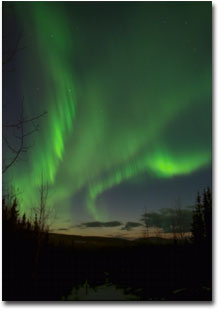
 Film and Archiving
|
|