|
|
 Photo Tip...
DIY Camera Poncho
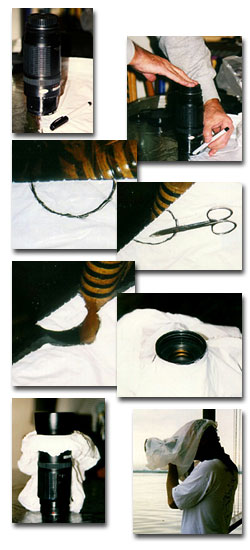
First of all, I'm not a professional photographer! I do however like to photograph the natural world, under natural conditions, and sometimes those conditions aren't particularly dry. It does rain! Now, being out in the rain is no big deal. I put on a poncho or raincoat, and I'm good to go. For the camera however, it's not quite that simple. Sure, a plastic bag keeps it dry, but, I can't take pictures through a plastic bag. To do that, I have to take the camera out. When I take the camera out, it gets wet. I can't take any more pictures until it gets dry. That was a problem! What I needed was a poncho for the camera. Something that would keep it dry, and allow me to take pictures at the same time. With that in mind, I went looking to see what I could find. Without going into the gory details, the closest thing I found to what I wanted had a price tag of $74.95 + tax. Not quite what I had in mind. That being the case, I decided that homemade was the way to go. Presenting my do-it-yourself camera poncho! Materials List 1 Lens (of the proper diameter) Step 1. Lay garbage bag, flat on table. Step 2. Remove cap and hood from lens, and remove lens from camera body. Step 3. Place the lens (vertical position, front element down) at the bottom (closed end) of the garbage bag, so that it's centered between the garbage bags sides, and only half of that front element is actually on the bag. Step 4. Using that portion of the front element as a template, trace its outline on the bag with the marker. If you've done this correctly, when you move the lens away, the trace should be a half circle of about the same diameter as the lenses front element. Step 5. Remount the lens to the camera body. Step 6. Keeping the scissors inside the line of the trace, cut that half circle out of the bag. If you've done that correctly, you'll have a hole, with a diameter that's slightly smaller than the diameter of your lenses front element, and it (the hole) will be centered at the bottom of the bag. Step 7. Place the camera (lens up) on the table (or whatever you're using as the flat surface). Step 8. Open the bag, and place it over the camera so that the hole is resting on the front element of the lens.
Step 9. Carefully (and gently) work the hole down around the front end of the lens barrel and no further back than the barrels edge. Assuming it's the kind of lens that uses a push or twist-on lenshood that actually fits into a groove around the outside of the lens barrels front end, the plastic should be covering that groove. The plastic is thin enough for the lenshood to be placed into position without any trouble. In fact, the lenshood helps hold
the poncho in place, and the poncho helps hold the lenshood in place. OK! You've made the poncho, fitted it to the camera, and all is well. What's next? When the poncho's extended back past the back of the camera, the only parts (of the camera) that're exposed to the elements are the neckstrap, lenshood, and front element of the lens. The open end of the poncho forms two flaps - one goes over the camera, the other under it. To close the poncho around the camera, bring the lower flap up through the neckstrap, over the top (hump of the viewfinder) of the camera, and under the top flap. Bring the top flap down through the neckstrap. and around the bottom of the camera.
Effectively, the camera is enclosed in a sort of envelope, and fully protected (except for the exposed parts). To use the camera, undo the envelope, but keep the flaps extended past the back of the camera. Hold the camera normally
(hands inside the poncho on the camera), and sight through the viewfinder. The top flap of the poncho should be sort of over your head, and the bottom flap should be sort of under your chin. Kind of like the blanket used with a view camera. Aim, focus and take the picture. A few things I should point out before closing - although the poncho might be useable on a point-and-shoot or medium format SLR, it's designed for use with a 35mm SLR. It is not practical for use in a heavy downpour, or windy conditions. As long as you're shooting in no more than a light rain with little or no wind, the poncho will work fine. Any more than that, and all bets are off. Also, in reading through this how-to, you might get the idea that making the camera poncho is a lot of complicated work. It isn't! It's very simple, and only takes a few minutes. Enjoy those drizzly days! |
|
|