
|

Advanced Long Lens Technique
Defeating the "Camera Shake" Enemy
Text and Photography Copyright E.J. Peiker
All rights reserved.
Using long telephoto lenses and taking sharp photographs is not easy. NPN Field Editor Bill Horn addressed this last year in his article "Mastering Big Lens Technique." This article will review the basic techniques outlined by Bill and delve into advance big lens techniques that will allow you to take sharp pictures with large lenses from atop your tripod, from cars, with teleconverters, and even with stacked teleconverters. These techniques can be used with most focal lengths but become more and more important with the longer and heavier lenses.
The Basics
Getting that first "big gun" lens can be an exciting time. You have finally arrived as a truly serious photographer and purchased a 400/f2.8, 500/f4, or 600/f4. You are pinching yourself that you went for the dedicated 1.4x or 2x teleconverter too. This is one serious investment and now you are feeling all set to mix it up with the big names in nature photography. Judgment day comes when you get your first few rolls of slide film back from the lab and look at them with your loupe. "There must be something wrong with this lens - I had it on my tripod and the image looked sharp in the viewfinder but most of these photos are fuzzy!" This is an all too common occurrence. I have read numerous tales of people selling their new large lenses after a few outings because they were unable to get sharp pictures. The big enemy of long telephoto lenses is camera/lens movement. Even the slightest movement is dramatically magnified by long telephoto lenses. To illustrate the effect of movement on a long lens, imagine pointing a pen and then moving your wrist ever so slightly, the end of the pen moves a small amount. Now take a yardstick, hold it the same way and move your wrist the same amount - notice how much more movement there is at the end of the yardstick compared to the pen. The same thing holds true for long lenses in relationship to shorter ones. This motion at the end of long lenses is the main contributor to fuzzy images. The vibration can be due to any of several reasons including wind, an unstable platform or even the camera's mirror movement. Here are some basic tips to get sharp images with long lenses:
- Hand holding any lens larger than a 300/f2.8, 300/f4 or a 400/f5.6 will most likely result in a blurred picture. Even these lenses are marginal except in bright conditions or with fast film. If you can't use a tripod, you may use a monopod but that is a compromise in stability. For nature photography, a tripod is preferable due to the relatively slow shutter speeds we often have to work with. Sports photographers use monopods regularly in order to follow fast moving sports action but they tend to use the excellent fast print films in the ISO 400 to 800 range giving them much higher shutter speeds than those achieved with the ISO 50 to 100 films nature photographers prefer.
- Get a STURDY tripod! Make sure your tripod can handle the weight of your lens, camera, tripod head and any other accessories you attach to it with plenty of margin. If your tripod doesn't have a weight capacity rating from the manufacturer, assume it isn't strong enough. Unfortunately the carbon fiber tripods that are sturdy and lightweight enough for carrying in the field can be very expensive. There are many excellent aluminum tripods that will also do a great job but they do weigh more than their carbon fiber counterparts.
- Next you need a tripod head that can handle the weight without image creep in the viewfinder. I use a Wimberley head because it makes maneuvering the large lenses for composition effortless due to its gimbal design. Other heads that are capable of handling heavy lenses include the Arca Swiss B1 and B2, and the Kirk Ballhead as well as others. The ballheads listed here can handle the weight but you have to be careful to not let the lens flop over when loosening the ballhead.
- It is best to tighten down all of your tripod, tripod head, and tripod collar knobs; however with a moving subject this is not always possible. In this case some tension is desirable but not so much that any movement results in jerkiness of the camera as it is moved.
- Use the best long lens technique you can! Contrary to
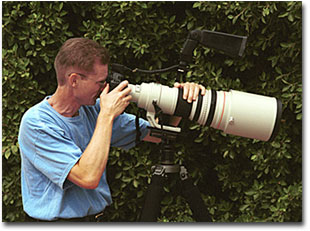 popular belief, the long heavy lenses are much steadier if you use your arms, hands and face as vibration dampening. These lenses are big and present a large surface for the wind to influence; additionally, when the mirror swings up prior to the shutter curtain opening, vibration is induced by the camera itself, which is then amplified by the large magnification of the big lens. To minimize this vibration, compose the image, and then place your left hand and arm on top of the lens at or near its center of gravity - you will immediately see the image stabilize in the viewfinder. Push your face up against the back of the camera and hold the camera the normal way with your right hand. Tweak the focus if necessary and gently depress your index finger to take the photograph. This method uses your body to dampen vibrations in your camera/lens combination. popular belief, the long heavy lenses are much steadier if you use your arms, hands and face as vibration dampening. These lenses are big and present a large surface for the wind to influence; additionally, when the mirror swings up prior to the shutter curtain opening, vibration is induced by the camera itself, which is then amplified by the large magnification of the big lens. To minimize this vibration, compose the image, and then place your left hand and arm on top of the lens at or near its center of gravity - you will immediately see the image stabilize in the viewfinder. Push your face up against the back of the camera and hold the camera the normal way with your right hand. Tweak the focus if necessary and gently depress your index finger to take the photograph. This method uses your body to dampen vibrations in your camera/lens combination.
- If your lens has Image Stabilization (IS) or Vibration Reduction (VR) that is compatible with tripods - use it! Stabilized lenses use gyro technology to move an element in the lens to counteract the effects of lens motion.
Adding Teleconverters
Teleconverters increase the focal length of your lens and reduce the effective aperture. A 1.4x converter increases focal length by 1.4 times while reducing the amount of light getting to the film plane by one full stop (50% less light). A 2x converter doubles the focal length while reducing the light to the film plane by 2 full stops (75% less light). When using these devices, not only are you increasing the risk of lens shake, the slower shutter speeds required can really put the sharpness of the image at risk.
In addition to all of the basic techniques above, the following recommendations will improve sharpness with teleconverters:
- Push the film! Pushing film is a procedure where you rate the film faster than its ISO rating. For example, if you are using ISO 100 film, you can rate the film at ISO 200 and then have your lab process the film with a "1-stop push". This amounts to the film being developed for a longer period of time to bring the final image back to the correct exposure. The advantage of this is that you gain back a stop of light. If you were using a 1.4x teleconverter, the stop of light you lost is regained through push processing reducing the chance of camera shake. Some of the modern films lose very little image quality by push processing making this very viable - there are several pros that push almost every roll of film they take.
- Making sure that all of your tripod and camera knobs are tightened is even more important with teleconverters. You might be able to get away with slightly loosened controls with a 1.4x converter and fast film in good light (fast = ISO 200 or higher) but once you use a 2x converter, it is strongly recommended to make sure all of the controls are tightened.
- If your camera has a mirror lock-up feature, you may use it to get even more camera stability. Mirror lock-up allows you to move the mirror up out of the light path prior to opening the shutter curtain, thereby, eliminating "mirror-slap" as a vibration source. Check your camera's manual for proper use of the mirror lock-up feature. On Canon cameras with Image Stabilization (IS) lenses, beware that IS becomes disabled if mirror lock-up is used. There are two basic methods of using mirror lock-up with most cameras:
- Method 1 - Turn mirror lock-up on and change the drive mode to self-timer. The camera will swing the mirror and then release the shutter after the self-timer has run its course. This is a great way to use mirror lock-up in the field when you have enough time to wait for 2 seconds but not enough time to get other gadgets out of your camera bag or vest.
- Method 2 - Turn mirror lock-up on and make sure the motor drive is in a normal shooting mode with the self-timer off. After you have focused the image, turn Auto-focus off to insure that the camera doesn't try to refocus. If your camera has an eyepiece shutter, close it so that stray light coming in through the eyepiece will not adversely affect the metering system. If it does not have this feature, make sure that the sun is blocked from entering the eyepiece. The first shutter click will raise the mirror. A second press of the shutter button will trip the shutter curtain. This is also a potential field technique and it lets the photographer time the exact instant when the shutter trips by watching the subject but it is subject to camera movement from tripping the shutter button on the camera.
- Method 3 - This is the preferred method but it only works if you have a static subject and time to set-up the equipment. Turn mirror lock-up on, attach a cable release, focus the image then turn off AF, and close the eyepiece shutter. The cable release has a button that acts exactly as the shutter button on the camera. The first click will raise the mirror; a second click of the button opens the shutter curtain to make the exposure.
Stacking Teleconverters
 With the fantastic optics found in today's prime long lenses (300/f2.8, 400/f2.8, 500/f4, 600/f4) and teleconverters made specifically for use with these pro-grade lenses, it is possible to take photographs that are of publication quality. It isn't easy! In fact it's very difficult! All of the above techniques have to be applied perfectly and you have to have a cooperative subject that is very still. As an example, lets look at the effect on a 600mm/f4 lens with stacked teleconverters. The lens becomes a 1680mm super-telephoto (600 x 1.4 x 2.0 = 1680) or more than a 30x optic. The aperture becomes f11 - three full stops slower than the 600/f4 lens we started with. Not only is the lens 3 times more susceptible to lens shake due to the longer focal length, but it is 3 stops slower as well, making it 9 times more susceptible to lens movement compared to the lens used alone.
Mirror lock-up is highly desirable if not a necessity under these conditions. Everything on your tripod and tripod head has to be tightened down. Adding a beanbag or some other item that is not subject to catching the wind to the top of the lens to dampen vibration is recommended to improve sharpness. You should push the film a stop or two to gain back shutter speed. Finally take the picture. Then take as many more as the subject or your patience, or your film budget will allow. If everything was done properly and your subject cooperated, you will get at least one, if not many, sharp images.
Long lenses and Your Car
Bird photographers know that a car makes an excellent blind. For some reason our little avian friends aren't nearly as intimidated by a 4000 pound SUV barreling toward them as they are of a human making a slow approach. There are several ways to take sharp photos from inside your car with long lenses. One given in any photograph with long lenses from your car is that the vehicle should be still. That means not moving, engine off, and not being influenced by wind or by traffic going by.
The first method is the pillow or beanbag method. This involves draping a beanbag or pillow over your window and then resting the lens on this cushion. This is a surprisingly stable platform and I have made many very sharp photos (with IS) even at 1200mm. As usual, a hand draped over the top of the lens will help dampen out any camera induce vibration.
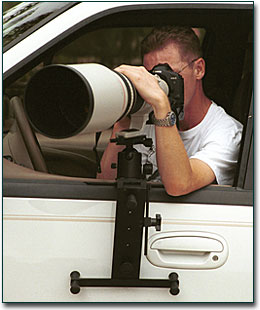 A second method is to purchase a window mount. There are several on the market that mount either onto the car window itself or the door at the base of the window. These mounts will accept any standard tripod head. You have basically turned your vehicle into a stable camera support system and again, using the basic long lens techniques above, you will be amazed by how sharp your pictures can be and by how close you can approach some wildlife.
Method number three was popularized by Arthur Morris as a bird photography technique. If you choose this method, do so very carefully. In this method, you set-up the tripod in your car by wedging the legs between the floor and the driver's door. You then extend one leg across the car to lock the tripod into position. The problem with this is that you will now be wedged into your car and will not be able to exit the vehicle until you tear down the set-up. If your vehicle suffers any kind of collision, even very minor ones, serious injury can occur.
The final method is the sunroof method. If your sunroof is large enough you can put the camera on the roof, preferably on a platform with a tripod head and the photograph using all of the long lens techniques outlined. Unfortunately, this method is much more threatening to wildlife than shooting out of a window.
Using these techniques and tips will maximize your chances of getting sharp images with those wonderful long lenses. As always, practice, practice, practice to obtain the best results.
EJP-NPN
Comments on this article? Send them to the editor.


|