Digital Tutorial
Printing with Epson Printers and Photoshop 7
Using Epson’s Media Profiles or a Custom Profile
Text Copyright Matt Hagadorn
All rights reserved.
Follow these instructions when printing with ICC profiles. These instructions would be appropriate if you have installed the media-specific profiles for the Stylus Photo 2200, for example, or you have had a custom profile made for your printer and paper. The example given is for Windows, but Macintosh users should be able to follow along.
- When you are ready to print, select File > Print with Preview or Ctrl-P
- At the bottom of the Print dialog, click the Show More Options checkbox
- Select Color Management from the drop-down box
- Source Space should be set to Document and will show your image’s color space
- Under Print Space, select your paper profile from the Profile drop-down box
- Set Intent to Relative Colorimetric (try this first, and if you don’t like the results try Perceptual)
- Check Use Blackpoint Compensation
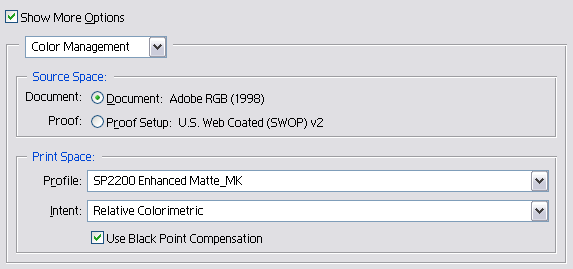
- Click Print
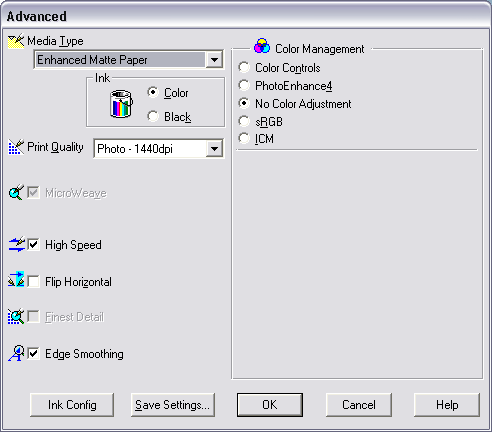
- Select your printer from the drop-down box and click Properties
- On the Main tab of the Epson Stylus properties dialog, select the Media Type that matches your profile (if using a custom profile select the media type you used when printing the profile target)
- Under Mode, select Custom and then click Advanced…
- Set Print Quality to 1440dpi
- Under Color Management, select No Color Adjustment
- Click OK in each dialog to return to the previous, then click OK to print
Using the Epson Standard Profile
Follow these instructions when printing without individual ICC profiles. These instructions are appropriate for most Epson printers such as the 820, 890, 1270 and 1280/90 which do not come with individual paper profiles (at least, not on Windows).
- When you are ready to print, select File > Print with Preview or Ctrl-P
- At the bottom of the Print dialog, click the Show More Options checkbox
- Select Color Management from the drop-down box
- Source Space should be set to Document and will show your image’s color space
- Under Print Space, select Printer Color Management
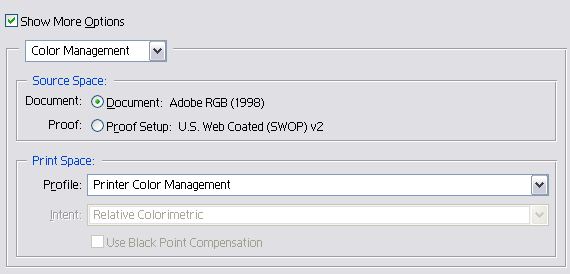
- Click Print
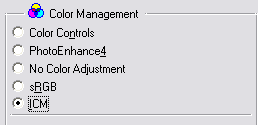
- Select your printer from the drop-down box and click Properties
- On the Main tab of the Epson Stylus properties dialog, select the Media Type that matches the paper you are using
- Under Mode, select Custom and then click Advanced…
- Set Print Quality to 1440dpi
- Under Color Management select ICM (Mac users select ColorSync)
- Click OK in each dialog to return to the previous, then click OK to print
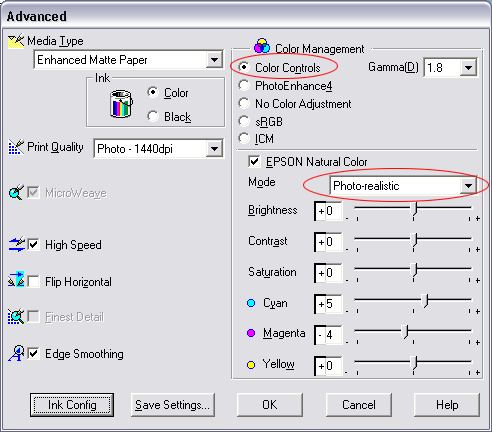
If your prints appear to have a color cast using this method you can try adjusting the printer’s color output. Instead of ICM or ColorSync in step 11 above, select Color Controls and then under Mode select Photo-realistic and adjust the color sliders.
MH-NPN 112
Comments on this tutorial? Send them to the editor.
Return to Digital Resources Index.


| 
