 Some years back I spent a fair bit of time with a Nikon Coolpix 950
digital camera connected to a small spotting scope. The effective
focal length was around 900mm and it got me closer to a lot of
subjects than I'd managed to get previously, but for a variety of
reasons I eventually went back to the world of 135-format SLRs.
These days there's a name for what I used to do: digiscoping. Most
digiscopers use much higher quality scopes than I did, and many of
them achieve amazing results: just look through NPN's image forums
for examples. Many digiscopers are birdwatchers who simply want to
take record shots of the birds they're observing, and they will
often already have a scope. For them, adding a digital camera is
often a better option than going out and spending thousands upon
thousands of dollars on traditional camera gear in an attempt to
reach similar levels of magnification (e.g. a Canon 500mm/f4 IS L
lens costs over AU$15000). But taking record shots is not the only
result: there are digiscopers who manage to achieve publishable-quality
fine-art wildlife images.
Some years back I spent a fair bit of time with a Nikon Coolpix 950
digital camera connected to a small spotting scope. The effective
focal length was around 900mm and it got me closer to a lot of
subjects than I'd managed to get previously, but for a variety of
reasons I eventually went back to the world of 135-format SLRs.
These days there's a name for what I used to do: digiscoping. Most
digiscopers use much higher quality scopes than I did, and many of
them achieve amazing results: just look through NPN's image forums
for examples. Many digiscopers are birdwatchers who simply want to
take record shots of the birds they're observing, and they will
often already have a scope. For them, adding a digital camera is
often a better option than going out and spending thousands upon
thousands of dollars on traditional camera gear in an attempt to
reach similar levels of magnification (e.g. a Canon 500mm/f4 IS L
lens costs over AU$15000). But taking record shots is not the only
result: there are digiscopers who manage to achieve publishable-quality
fine-art wildlife images.
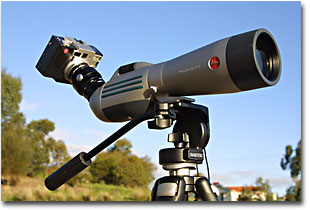
A new package from Leica offers a 4 megapixel digital camera with
an adapter to attach to their top-of-the-line scope. This is
advertised as being equivalent to a 2000mm lens on a 135-format
camera. Hmm, 4 megapixels and 2000mm for an RRP of AU$3899, and all
from a single (well-respected) manufacturer!
The Camera
The Digilux 1 is a fairly well-featured camera, and Leica has
styled it to resemble their M-series cameras. Their advertising
blurb refers to it as "the digital reportage camera", comparing it
to the Leica 1 of 1925. Indeed I've had people mistake it for a
50s/60s-vintage camera at first glance, although people familar
with the Leica M cameras tend to comment that it's "big and chunky".
The Digilux was a joint development with Panasonic, and the Panasonic
DMC-LC5 is basically the same camera - the only differences are the
shape of the outer body and some tweaks to the firmware (things
like white balance, apparently).
 In keeping with the styling, manual focus is controlled via a dial
surrounding the lens, and a chunky mode dial is on top of the body.
An LCD status display is also on top, along with the shutter button
(surrounded by the zoom control) and buttons controlling the
self-timer and flash. The back of the body has an assortment of
buttons, a 4-way "jog dial", and a HUGE 2.5" LCD screen - it's the
largest I've yet seen on a digicam. Another impressive feature is
the inclusion of a removable LCD shield: lift the flap and the sides
pop out to shade the LCD from bright reflections (although it would
be nice if the LCD wasn't quite so reflective to start with). The
shield attaches via the tripod socket and has another socket
underneath, and folds up for easy storage.
In keeping with the styling, manual focus is controlled via a dial
surrounding the lens, and a chunky mode dial is on top of the body.
An LCD status display is also on top, along with the shutter button
(surrounded by the zoom control) and buttons controlling the
self-timer and flash. The back of the body has an assortment of
buttons, a 4-way "jog dial", and a HUGE 2.5" LCD screen - it's the
largest I've yet seen on a digicam. Another impressive feature is
the inclusion of a removable LCD shield: lift the flap and the sides
pop out to shade the LCD from bright reflections (although it would
be nice if the LCD wasn't quite so reflective to start with). The
shield attaches via the tripod socket and has another socket
underneath, and folds up for easy storage.
A quick summary of the camera's features:
- 3.9-megapixel sensor
- 7-21mm/f2.0-2.5 lens (equivalent to a 33-100mm zoom). Retracts within the body when the camera is off.
- ISO 100, 200, or 400
- Shutter speed: 8s - 1/1000s
- Exposure: AUTO, P, Tv, Av, and M (the "jog dial" is used to manipulate the shutter and aperture settings)
- File formats: TIFF, JPEG Standard, JPEG Fine, Quicktime movie (no RAW format)
- USB connectivity
- Storage: SD or MultiMedia card (comes with a 64MB SD card with room for 32 high-quality JPEGs or 5 TIFFs)
- Battery: Li-Ion superficially similar to other manufacturers' batteries, but with different contacts and voltage. Charged in-camera or via an optional external charger.
It's probably just the Tenba pouch I've been using to hold the
camera, but I often find that the mode dial on top of the camera
has moved to Tv-priority or movie mode rather than the mode I'd had
it in before I put it in the pouch. It is something to watch out for.
While the AF is sometimes tricky to control and pictures with flash
are sometimes a bit washed out, it's a fairly complete compact
digital camera and behaves as I would expect in normal use. But
what I was most interested in was how it worked with a spotting
scope...
The Scope
The Televid 77 has an MFD of 3.9m and you can get some impressive
closeups of nearby objects, not just views of remote birds. A pair
of focus controls are on top of the scope, one for coarse adjustments
and one for fine. That's about it for controls: magnification is
determined by your choice of eyepiece (more on that later).
Four versions of the scope are available. You can select versions
with the eyepiece angled up or with it extending directly out the
back of the scope - the price is the same. The other variable is
the type of glass used in the scope: achromatic, or apochromatic
flouride. Not surprisingly, the APO-Televid 77 is the more expensive
option and the difference in optical performance is significant.
The Adapter
A ring surrounding the camera lens unscrews to uncover a 49mm thread
(I can see this ring being the first camera component to be lost
in the field - unless the lens cap is lost first) which the scope
adapter simply screws onto. Unlike Leica's photo adapter for scopes
that replaces the eyepiece and converts the scope to a T-mount
800mm/f10.4 lens, the Digilux adapter is a tube that fits over the
existing eyepiece of a scope and is secured by a retained screw at
the side (I could find no marks on the eyepiece after repeated use).
A variety of eyepieces are available for the scopes, but I've only
used the B20-60x eyepieces. The adapter's documentation recommends
using the eyepiece at 20x and that the non-zoom B20x and B32xWW
eyepieces can also be used. The combination of 20x magnification
and a 100mm lens on the camera is how Leica has come up with the
advertised figure of a 2000mm lens.
Field Notes
The Digilux 1 is a 4-megapixel camera, but because the scope presents
a circular image to the camera (it's even mentioned in the manual),
a lot of pixels are wasted. Depending on how much darkening in the
corners you're prepared to accept in your final image, a square
that occupies the image circle is 1.5-2 megapixels. This cropping
further extends the "effective focal length": we're left with a
3200mm lens on a 1.5 megapixel camera - not quite what I was
expecting.
 The only way to fill the frame would be to get the lens
closer to the eyepiece than the adapter does, but this is hard to
do with a lens that moves in and out as it zooms (like that of the
Digilux) and doesn't have a thread at the end of the lens - there
needs to be enough space that you're guaranteed to not have the
glass in the lens and eyepiece actually touch.
The only way to fill the frame would be to get the lens
closer to the eyepiece than the adapter does, but this is hard to
do with a lens that moves in and out as it zooms (like that of the
Digilux) and doesn't have a thread at the end of the lens - there
needs to be enough space that you're guaranteed to not have the
glass in the lens and eyepiece actually touch.
The optional LCD shield mentioned earlier is often of little use
on a scope with angled eyepiece mount, as the LCD ends up reflecting
the sky anyway. It's of more use if your scope is a "straight-through"
model.
The eyepiece of the scope has an extendable rubber "eye relief".
The adapter's documentation notes that this should be retracted
before the camera is attached: the screw on the adapter grips the
eyepiece just past the eye-relief and before the raised knurling.
I have used scopes with two versions of the B20-60x eyepiece. The
older version has an eye relief which is manipulated by simply
pulling or pushing it - the adapter simply will not fit on this
eyepiece: it cannot grip enough of the eyepiece (being blocked by
the knurled section). The other version (introduced in 2001) fits
the adapter, and it has an eye relief which extends out when rotated.
Complications arise if you try to zoom the eyepiece while the camera
is mounted. This causes the metal portion of the eyepiece that the
adapter is gripping to rotate 180 degrees: if the camera is upright
at 20x, it will be upside down at 60x (obviously this affects the
usefulness of the LCD shield). A side-effect is that the eye relief
gets rotated also, causing it to extend and push the adapter off
the eyepiece. It is possible to remove the rubber of the eye relief
(another component to lose!) but this results in the adapter's grip
sometimes ending up a little off-centre. The optical quality at 60x
is much worse than at 20x: I think the safest option is to leave
the eye relief intact and stick with 20x.
There is currently no external shutter release available for the
camera. This means that you can either take the image with your
hand on the camera (which introduces a LOT of movement at these
magnifications) or you can use the 2- or 10-second timer and hope
that the subject doesn't move in that time. Once the camera has
taken the picture, it resets to normal exposure mode - you need to
reselect self-timer mode each time. The camera has a "burst" mode
where it can take up to four images at 3.8 fps, but this is not
available in self-timer mode and is thus essentially unusable on a
scope. It may be that Leica, Panasonic or a third party will introduce
a shutter release that connects via the camera's USB port at some
time in the future, but that would probably require a firmware
upgrade.
The manual recommends that you leave the camera on AF to help
compensate for any slight focussing errors on the scope, but this
can produce unexpected behaviour when used with the self-timer. The
camera performs focussing and metering just prior to the exposure
(after the delay) and typically ends up missing the focus that
you've carefully adjusted via the scope's controls. You can crudely
select the focus area (the centre or "everything") but I had much
better success leaving the camera on manual focus at infinity.
When focusing the scope you're continually watching the image on
the camera's LCD. Often it doesn't quite seem in focus and all you
can do is get it as close as you can, but when you take the picture,
it turns out to be quite sharp. It seems the dynamic preview being
shown on the LCD is of much lower quality than the image presented
in review mode.
Using non-APO scopes I found quite a bit of chromatic abberation,
with severe colour fringing. As expected it was a lot worse with
the eyepiece zoomed to 60x, but it was still quite noticeable at
20x: I did not notice this problem with Leica's T-mount photo
adapter.
Conclusions
Only try this with an APO scope, or the optical quality will probably
disappoint you. This forces the price up (unless you already have
an APO-Televid of course, in which case you need to check that the
Digilux adapter will fit on your current eyepiece): the RRP of a
package including the Digilux 1, adapter, APO-Televid 77 scope, and
20x-60x eyepiece is AU$4899. That's AU$1000 more than the price I
mentioned at the start of this article.
I was quite excited at the opportunity to play with some Leica gear,
but I have to say I've ended up a little disappointed. There are
many nice features of the equipment, but overall the package wasn't
quite what I expected. I know from experience that scopes are
excellent for birdwatching. When paired with a digital camera you
can achieve amazing results, but it's not as integrated as a camera
with a dedicated lens and you definitely have to work harder for
each image. But you shouldn't have to work this hard. The Leica
Digilux 1 is a quite capable "compact" digital camera, but unfortunately,
I don't think it's particularly well suited to digiscoping: I won't
be giving up my SLR just yet!
About the Images...
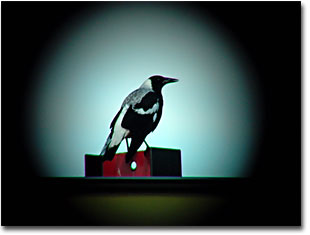
Australian Magpie - The extreme vignetting is obvious in this image.
Here the scope's eyepiece is set to 20x, and the Digilux's lens is
zoomed to its "100mm" position. Even at this size, the colour fringing
can be seen. 1/630s, f4.9, ISO 100. Lightened slightly using Curves.
Swarovski tripod.
Editor's Note - View more of David's work on his web site at http://www.burren.cx/photo/.
DB-NPN 034
Comments on this article? Send them to the editor.
