|
|
As a workshop instructor, I see a lot of practices in the field that can lead directly to poor image quality. Usually these come about because the photographer isn’t yet aware that certain problems exist.
There are a number of very simple, virtually free things you can do to ensure that every nature image you make is of the highest quality. Experienced outdoor photographers do these things as a matter of course and after awhile they simply become habit. They will for you too.
The real trick to combating image quality problems is simply being aware that they exist in the first place. Once you know these things can happen, you’re already armed and ready to stop them.
Eliminate Lens Flare
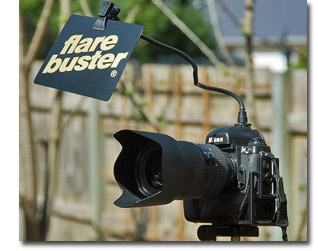
We’ll start with an easy one. Lens flare is one of the main causes of loss of contrast in a photo. Lens flare comes from a bright, direct light source hitting the front element of the lens or filter.
This source need not be a point source of light like the sun; it can be a bright overcast sky. Lens flare from a bright cloudy sky will look almost like a haze on the image.
The simplest thing to do is to always use a lens hood. The cheapest solution is to use your hand or a hat (or even a friend) to shade the lens.
One way to tell if flare will affect your picture is to simply look through the viewfinder and shade the lens with a hand. Pull your hand back and see if there’s a difference. You may need to use your depth of field preview button to detect flare. Another way to tell is to shade your eyes as if putting on a ball cap. Does the scene look better with your eyes shaded? If so, it’ll probably look better with the lens shaded as well.
Even if you’re using a lens hood, there may be times when using wide angle lenses you’ll need supplementary shading, like your hand or hat. Or a friend.
Don’t Stack Filters
When you stack filters you increase the chances of degrading image quality, especially when it comes to lens flare. Also, if you stack filters you could vignette the image, meaning you’ll cut the corners. So unless you have a real reason for stacking filters, like you want to warm a picture as well as polarize it, avoid stacking. If you use UV or protective filters, take them off before adding any other filters.
ISO
Highest image quality comes from the lowest ISO setting. However, too slow of a shutter speed makes for subject movement. So choose the best ISO for the situation. With landscapes and close ups and other non-moving things, I use the lowest ISO (200) setting on my D300. When I need to stop the action, I use whatever ISO will give me the shutter speed I need. But beware, it’s very easy to set a high ISO for fast action or low light and then forget you’ve done it. So make checking your ISO a regular part of your picture taking workflow.
Keep it Clean
Usually I’m not a huge stickler for keeping my lenses sparkling clean. However ultra wide lenses like the 10-22mm or 12-24mm zooms can achieve a lot of depth of field using hyperfocal focusing techniques. This means that you can start seeing stuff on the front element of the lens or on any filters you use. So be aware of this and use your blower bulb on the front element of the lens and any filter you’re using.
Understand the Concept of Hyperfocal Focusing for Near-far Wide Angle Landscapes
This is one technique that will improve the quality your landscape images the most, and it doesn’t cost a thing. Focusing a wide angle lens at its hyperfocal point will optimize the depth of field, giving you the most depth of field available for the given focal length and f-stop. The trick to using this technique is to actually use all that depth of field and compose pictures with foregrounds that are both close to the camera and interesting.
Understand Your Camera’s Autofocus System
It's really easy to miss some great action shots simply because you haven’t set the camera in the best AF mode for the situation. Different camera models have different options so be sure to familiarize yourself with what your camera can do.
For instance, sometimes the “closest subject priority” mode is the best to use. Or maybe it’s best to group your AF points in a certain way. Read your manual and experiment. This costs you nothing but time.
Learn to See the Light
I have way too many pictures taken in less than great light. I don’t know why I keep them since I never look at them. It’s probably because I have more amusing things to do with my time than toss old slides. Fortunately I’ve learned over the years to skip shots where the light, to put it indelicately, sucks.
Light can have a huge effect on the quality of your images. Dull, flat light makes for dull, flat images. Pretty, exciting light makes for pretty, exciting images. And the perceived quality of an image can be directly related to the quality of the light.
Eliminate Vibration
Vibrations, whether caused by you or the conditions or the camera, can happen in a number of ways and are probably the number one source of image quality degradation. Fortunately, they are easy to prevent. Here’s a list of what you can do to reduce vibration.
Use Mirror Lock-up or Shutter Delay
The vibrations caused by mirror slap at certain shutter speeds (around 1/15 to 1 second) can ruin a picture, especially when using telephoto or macro lenses. If you have a mirror lock up feature on your camera, be sure to use it. Some cameras have a shutter delay feature which, when activated, delays the shutter for a fraction of a second after the mirror flips up.
Don’t confuse this feature with sensor cleaning mirror lock-up.
If you don’t have one of these features, then try avoiding those susceptible shutter speeds when using your telephoto or macro lenses.
Use a Cable Release or Self-timer
Camera movement accounts for a high percentage of quality problems. If you’re on a tripod and using slower shutter speeds, but you’re tripping the shutter by pressing the shutter release button, you run a great risk of introducing vibrations. Use a cable release or your camera’s self timer feature.
Check VR or IS Settings
Most lenses with Vibration Reduction (VR) or Image Stabilization (IS) should have these features turned off if you’re shooting from the tripod. If you have it turned on, you can actually induce vibration and movement into your pictures.
Add Weight to Your Tripod for Stability
Recognize conditions that are less than ideal, especially windy conditions or when photographing on less than stable ground. Adding weight to your tripod will help prevent or dampen any vibrations. Some tripods have hooks on the bottom side of the head where you can add some weight, like your camera bag. Make sure the wind isn’t blowing your bag around as this can just magnify the problem.
I usually just add my own weight to the tripod by holding on to the top of the tripod and leaning in to it. I’d only recommend doing this when shooting in windy conditions, on unstable ground (like marshy areas), or when using long telephoto lenses.
Avoid Extending Tripod's Center Post
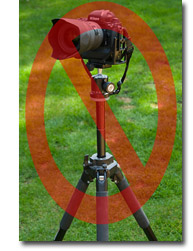
Extending your tripod’s center post is a major source of quality problems. This is especially true in breezy conditions. Since the camera is now essentially mounted on a monopod, any vibrations will be magnified.
Extend your tripod legs all the way before even thinking of raising the center post. If you find yourself extending the center post a lot of the time, then it’s time for a new tripod.
In fact, to eliminate the center post temptation all together, go ahead and cut it off just below the tripod base. If you do it quickly it won't hurt. Much.
Use a Solid Tripod and Mounting System
Lightweight tripods that are easy to travel with are nice to carry, but they're not the most stable tripods. If your gear outweighs your tripod you could not only have stability and vibration problems, you run the risk of damaging your gear. My suggestion is to buy a tripod that will safely and solidly hold your gear or any gear you plan on buying and that will also give you stable support in any terrain in which you can envision yourself photographing. Most nature photographers will end up on the sides of streams or in snow or in narrow canyons. Make sure any tripod you buy will be up to the task. Solid support will help guarantee quality images.
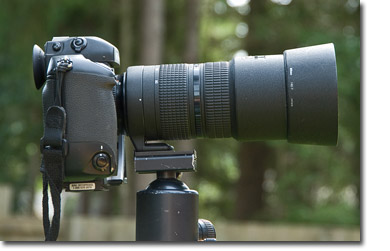
This also means a good tripod head and quick release system. Creeping tripod heads are the bane of quality images. And if you have a lens with a tripod collar, be sure to attach the lens to a quick release plate and mount the lens to the tripod head. This will help balance the load. Get a quick release plate for every camera and lens with a tripod collar that you own.
Ok, so this might not initially be a cheap fix, but in the long run, you’ll spend less money by buying good gear to begin with. Think of it as an investment in quality.
Find Solid Ground
There's no point to using a good tripod if the ground it's standing on is shifting beneath its feet. We outdoor types like to photograph in all sorts of places, like lakesides, for instance. Lakesides tend to have squishy ground or ground that is covered by thick grasses or other vegetation. Setting up on this type of ground can lead to slight movements and ruined images. Be aware of the ground and do your best to make sure your tripod legs are making solid contact. Also, when photographing streamside (or stream-middles) with one or more legs in the water, the stream itself could very well be introducing vibrations.
Make Sure Everything is Tight
Sometimes the tripod head will start to come loose from the mounting platform on the tripod. This can cause movements and vibration. Same with the panning control. Be aware of these potential problems. Also be sure your quick release clamp is tight. Not only will this help in stability, it’ll keep your camera from taking a dive. Get into a habit of running your hands over tripod leg locks and tripod head controls to ensure everything is tight.
So there you have it; a few things that will help ensure that your images are of the highest technical quality. As I mentioned before, these are things that experienced photographers look for without really thinking about it. The real trick is to simply be aware of the problems that can crop up. The solutions are usually pretty obvious from there.
Rod Barbee - NPN 0933
|
 Rod Barbee is a professional photographer, writer, and instructor. He's been a regular contributor to Outdoor Photographer magazine and has also been published in Nature’s Best magazine, Audubon and Mead calendars, Northwest Travel and Oregon Coast magazines, Orvis clothing catalog, the National Park Service, and more.
Rod's books include The Photographer's Guide to the Oregon Coast (co-written with David Middleton), The Photographer's Guide to Puget Sound and Northwest Washington and Oregon Coast Memories (Countryman Press).
Throughout the year, Rod leads and co-leads photo workshops across the country. He has taught with such well known photographers as David Middleton, David Muench, and Jack Dykinga. A gifted and enthusiastic field instructor, he likes nothing more than sharing his knowledge and ideas.
Besides teaching his own workshops, Rod has led and co-led workshops and tours for Great American Photography Workshops, The Nature Workshops, and Photographer's Alliance Workshops.
Rod and his wife Tracy Rowley (and their dog Bailey) live in Port Ludlow on Washington’s Olympic peninsula. You can view more of Rod's work on www.rodbarbee.com