|


Back in the good ‘ole film days, getting around the reciprocity problem (the degradation of the film’s sensitivity with loss of light during exposure) required more advanced knowledge of exposure calculation. With today’s digital cameras, you can “guesstimate” your exposure and adjust as needed without having to expertly calculate exposure. Although knowing more about exposure will always make you a better photographer, here is your cheat sheet for light painting made easy.
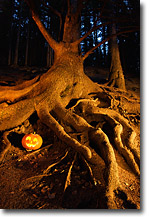
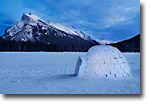
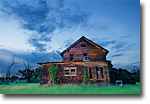
There are only a few, simple steps I follow to set up for light painting. First, determine an appropriate subject. You will have to pre-visualize how it will look lit up at dusk. It is often best to select a single, prominent subject with a clean background. The point is to highlight the lit subject, not to capture a full landscape! Old vehicles in a grassy field, a lone, skeletal tree, or a small barn work well for light painting. Often, I will only subtly paint the subject, or select certain parts of the image (old tail lights on vehicles work well for this) to bring to life with the flashlight.
Second, buy appropriate flashlights. You will need at least one, and often two is better. Click the flashlight on and evaluate the type of light it provides. Is it a hot, small white light from a compact handheld? Or is it a yellow, larger, less focused light from a big tungsten flashlight? I like to shoot with warmer toned lights with one-million candle power or more. Ensure they are fully charged! (While this may seem elemental, this is the voice of experience speaking here; never underestimate how easy it is sometimes to miss the obvious.)
Third, head out to your subject in the evening before it becomes dusk. You want plenty of light so that you can walk around your subject and determine the most interesting composition. Usually, depending on how early you start and on how light the sky stays during the shoot, only one or two compositions will be taken. It is very difficult to compose and focus as it gets darker, so determine the best composition and set your camera up before it is dusk. Once focus is achieved, switch to manual focus so your camera will not hunt to focus in the dark. Use a polarizer to help darken the sky. A polarizer will also allow you to start shooting a bit earlier as less light will be entering the camera. Your camera must be on a tripod for such long exposures, and using a cable release will help prevent any camera movement. If you want to blend parts of several exposures of the light painted image into a final image, then do not move the camera or tripod during the session.
How do you know when to start taking pictures? Ideally, you will want to take pictures when the ambient light is the same intensity as the sky. But what does this look like? First, determine which direction you are shooting. If your camera is pointing away from the sunset, you may notice that the sky in that direction is darker than the sky just above where the sun went down. This means that you will be able to start shooting sooner if your camera is pointing in that direction than if your camera was pointing toward the sunset. If you have no sky in your picture, then you will need to evaluate the ambient light compared to the sky in general. One trick is to look at your subject and squint your eyes a bit. If the light on your subject seems as bright as the sky, then it is time to take your first exposure. If the light around your subject still seems a bit brighter than your subject, it may still be too early for a light painting.
When the ambient light and the sky seem about equal in intensity, set your camera to bulb function so that you can have exposures longer than 30 seconds (the longest the shutter will stay open on a camera on shutter or aperture priority setting). Leave your aperture at f16 or f11 to start, although you may have to select a wider aperture like f8 later as it gets darker. Take an exposure at 30 seconds, and press playback to check your histogram (if you don’t know how to view the histogram of the image, refer to your camera’s manual). A histogram is a graph that shows the tonal values of a photograph. Knowing how to read the histogram is the most important part of light painting! You want the image to be properly exposed so that you have enough data when you process the image to avoid noise that results from an underexposed file. A ‘good’ histogram should have most of the data in the centre or centre-right of the graph without any data jamming up against either end of the graph. This is because digital cameras record more information in the brighter tones of the spectrum (represented by the right hand side of the graph) and are less able to record data when exposure is low. If your histogram shows data jammed at one or both ends, then data is being lost through clipping: the tonal range of the exposure is too great for the camera to record. If all the data is in the graph, but appears to be concentrated on the left side of the graph, the image is likely slightly underexposed. The actual shape of the graphed data does not matter for our purposes, and it also does not matter if data spikes through the top of the histogram.
The biggest mistake most photographers make when light painting is to take the image, look at the back of their LCD and determine that the exposure is fine because the LCD display looks good. But don’t be fooled! The display you are seeing is not the actual photograph you just took; it is your camera’s best guess, represented in a small jpeg image, of what your final image will look like. This is why it is critical to look at the histogram to determine if you have not underexposed your dusk image. On the LCD, the image may look too bright, but ignore this. When you process the image, it will come out looking as your eye saw it at the time.
If at 30 seconds, the data is jammed to the right on the histogram, wait until it gets darker and take another test shot. If the data is contained within the histogram and centre or centre-right, then you are ready to start light painting. Take another exposure of 30 seconds but this time aim your flashlight on your subject. You will want to pass the beam of the flashlight in an even manner over the areas you wish lit up in the 30 second time frame. (If 30 seconds is not enough time for you to pass the flashlight over the areas you wish to cover, wait until it gets darker for a longer exposure time). To avoid hot spots where the flashlight was held too long in one spot, twist your wrist in small circles as you paint and wiggle the beam over the entire surface to be painted. When your 30 seconds is up, check your histogram to ensure all the data is in and slightly balanced to the center or center right without going off either end of the graph. If the subject is too brightly lit by the flashlight, then paint for less than the full exposure time. Continue a few exposures at 30 seconds to get a variety of images to work with back home. The beauty of a light painted image is that no two are the same!
As the light dims, you will quickly find that 30 seconds is not enough time to expose your subject properly. Since you are on the bulb setting, you can keep the shutter open as long as you like (either on timer or with a locking mechanism on a cable release). As soon as 30 seconds produces a histogram that is becoming biased to the left (that is, underexposed), you will need to let in more light. A handy rule of thumb is to double your exposure time. Try a 60-second exposure and check your histogram. As the light continues to dim, double your exposure time if needed for the next photograph. There is no hard and fast rule; the trick is to interpret the histogram and adjust your exposure time as the histogram shows the image is becoming underexposed. When you are up to 4 minutes exposure time, you may wish to dial your aperture to f11 or f8 (if depth of field is not critical) to let even more light into the camera. You can keep shooting as long as you like, but keep in mind at some point the ambient light will not be strong enough to record behind your subject and separate it from the background. This is why light painting works best at dusk or dawn and not when it is dark out. For long-exposure effects, look for wind-blown grasses or moving clouds. With this easy method, I get consistent results without having to bother with calculations or lugging around extra gear.
Comments on NPN landscape photography articles? Send them to the editor. NPN members may also log in and leave their comments below.
Samantha Chrysanthou was born in Lethbridge, Alberta. After moving for a period of time to northern Alberta, she returned in 2000 to southern Alberta to pursue a law degree in Calgary. After becoming a lawyer, Samantha began to realize her heart was more engaged in capturing the beauty of the landscape around her than debating the nuances of legal arguments in court. She has since left law to pursue writing and photography full-time. She particularly enjoys shooting the prairies, foothills and Rocky Mountains within an hour or so of her home in Cochrane, Alberta. Visit Samantha’s website to view more of her work at www.chrysalizz.smugmug.com.