Mastering Digital Projection
Text and photography copyright © Niall Benvie. All rights reserved.
Speaking at the World Wilderness Congress in Anchorage in October 2005, I was one of the few photography delegates who clung to the old technology and projected slides. It looked a little clunky, but the colours were accurate and the images sharp. The hues in the digital presentations of my colleagues, in contrast, ranged from recognisable to extra-terrestrial. Perhaps my caution was, to some extent, vindicated.
After Alaska, I spoke at other conferences in Belgium, Scotland, England, and Germany and, without fail, the same issues arose every time. It became apparent that only by taking my own laptop and beamer would I have any chance of getting the quality of image on screen that I wanted. But finding out exactly what equipment I needed proved to be a whole new challenge.
The Beam Team
In the old days, the choice of slide projectors came down to Leitz or Kodak. Things are more complicated now with lots of apparently similar beamers performing quite differently. Make no mistake though; the majority are designed for business presentations rather than high-resolution image projection and most will disappoint critical photographers familiar with the quality of a projected slide. But be assured that the hardware and software is now available to rival the projected slide - with the massive presentational advantages of the digital medium. There are five main topics to consider in the pursuit of the best on-screen image quality: the laptop; the software used for the slide show; the beamer itself; how it is calibrated; and how image files are prepared. Each has a bearing on the other.
The Laptop
Whether you use a Mac or PC, an important consideration is whether your laptop’s video card is capable of supporting the native resolution of the beamer you plan to use with it. 1024 x 768 (XGA resolution) was 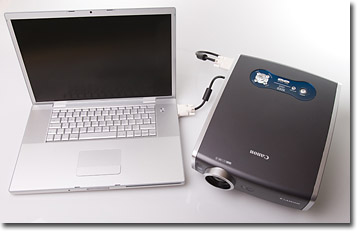 standard until quite recently, but newer high-resolution (SXGA+) projectors such as the Canon XEED SX6/60 have a native resolution of 1400 x 1050 pixels. Connect a 1024 x 768 laptop with an underpowered video card to one of these and the projector will under-perform. In reality, many modern laptops can support devices whose native resolution is somewhat greater than their own: my 17" Mac Book Pro (1680 x 1050) is normally connected to a 1920 x 1200 LCD display. standard until quite recently, but newer high-resolution (SXGA+) projectors such as the Canon XEED SX6/60 have a native resolution of 1400 x 1050 pixels. Connect a 1024 x 768 laptop with an underpowered video card to one of these and the projector will under-perform. In reality, many modern laptops can support devices whose native resolution is somewhat greater than their own: my 17" Mac Book Pro (1680 x 1050) is normally connected to a 1920 x 1200 LCD display.
Your laptop should connect to the beamer by a DVI, rather a VGA, cable. The latter requires a conversion of data from digital to analogue, degrading the image in the process. You may need to buy a DVI cable separately. Even Canon didn’t see fit to supply one with the SX60.
Software
Amongst Mac users, Keynote is the natural first choice when it comes to assembling a slide show. This was the application Al Gore famously used for his presentation at the heart of the Oscar-winning documentary, “An Inconvenient Truth”. Keynote is easy to use, has great transitions and effects and, on a laptop screen, looks fabulous. But when it comes to projecting the images, my tests proved Keynote to be wanting. Only the most in-gamut colours displayed well and, more disturbingly, severe image compression seemed to be happening “under the bonnet”, manifest as loss of tonal variation and mosaic patterns in dark areas. Thinking back to some psychedelic shows I had witnessed, Keynote was a common factor. The much-maligned MS PowerPoint, in contrast, does none of these things and produces accurate colours. The comparison between the two applications, then, is a bit like that between a broken-down Porsche and a Mazda that runs. It is possible to save a Keynote presentation in the PowerPoint format to get round the colour issues, but the latter does not mirror Keynote’s smooth, highly controllable transitions. PowerPoint, frankly, is pretty crude in this respect so I looked around for another application that would combine the merits of these two. I’d been impressed by the potential of an inexpensive application called FotoMagico by Boinx and my tests showed that colours were spot on, with no strange artefacts. FotoMagico is much more sophisticated than either Keynote or PowerPoint, allowing the producer, amongst other things, to pan across images (you need higher resolution files in the first place, of course) and zoom into particular parts of them. This is now my application of choice for projected shows.
The Beamer
Do you really need to go to the additional expense of an SXGA+ machine? Is the difference really visible in a darkened auditorium ?
To test the manufacturer’s claims, I took the Canon SX60 to the Scottish Natural 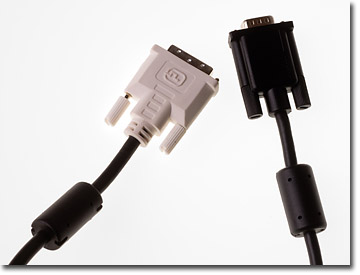 Heritage’s conference centre near Perth where, with staff photographer Lorne Gill, I could compare its output with that of the agency’s own professional 1024 x 768 model. In darkness, we started by projecting a 4-meter wide image onto a white wall. Pixels were clearly visible from 6 meters away when we used the Scottish Natural Heritage’s machine. The Canon, however, allowed a 2-meter approach before they could be discerned. In fairness, this may be the result, not only of superior resolution, but Canon’s unique AISYS /LCOS technology which minimises gaps between the pixels, giving a much smoother rendering than other beamers. Heritage’s conference centre near Perth where, with staff photographer Lorne Gill, I could compare its output with that of the agency’s own professional 1024 x 768 model. In darkness, we started by projecting a 4-meter wide image onto a white wall. Pixels were clearly visible from 6 meters away when we used the Scottish Natural Heritage’s machine. The Canon, however, allowed a 2-meter approach before they could be discerned. In fairness, this may be the result, not only of superior resolution, but Canon’s unique AISYS /LCOS technology which minimises gaps between the pixels, giving a much smoother rendering than other beamers.
The SX60 has brightness rating of 2500 lumens (the more expensive SX6 boasts 3500) What this meant in practice was a bright 4-meter wide image, one almost as good at 5-meters wide, and a somewhat dim image at 6 meters. Perceptions of brightness, however, vary with the venue and the SX60 was used in Germany to beam images about 8 metres wide in a huge auditorium, to good effect. One downside of the Canon is its inability to accept interchangeable lenses (though this helps to restrain the cost) meaning that in large venues, the machine has to be set up in the middle of the audience. In fact, this is only a minor concern with the SX60 as its fan is scarcely inaudible from more than a meter or so away.
Calibrating The Beamer
Most digital photographers now appreciate the importance of editing their image files on a calibrated screen. The calibration process compares the way the monitor represents known colour and tonal values with how they should display and generates a profile that effectively compensates for the difference. Once you have done this you can be confident that the image you’ve created on your monitor will display just the same way on any other calibrated display. The sample principles apply to beamer calibration. The budget priced Spyder Pro 2 can be used to generate a profile based on the values beamed on to it (a method that takes no account of the particular characteristics of the projection surface) whereas the considerably more expensive Gretag Macbeth Eye One analyses the colours and tones reflected from the screen, for a more accurate profile. When the projector and beamer are connected, this profile can then be loaded in the Mac via Apple>System Preferences>Displays>Color, or on the PC via C Drive>Windows>System32>Spool>Drivers>Color.
The audience is the final user of the projected image and my feeling is that if it looks good on screen, that is actually what matters – whether that is achieved with a preloaded profile or one generated specifically for the combination of screen, laptop, application and beamer. I have found that, with my own set up, the high degree of accuracy achieved with either the preloaded Canon PJ profile (or, for a slightly brighter image, an sRGB profile) doesn’t merit the additional expense and hassle of calibrating at every venue, though opinions vary between users.
File Preparation
The colour gamut of the majority of digital beamers falls within the sRGB space (although the Canon SX6 can display most of the colours in the Adobe 1998 space – at a price.) Files therefore need to be converted from Adobe 1998 to sRGB, the sRGB profile selected for the beamer, and the machine set to sRGB image mode to get the most accurate
colours on screen. Different slide show applications, as we have seen, handle files differently, but these basic Photoshop steps are a safe option:
- If the original high-resolution file is in 16 bit, go to Image>Mode>8 bit. This halves the file size straight away.
- Next go to Edit>Convert to Profile and select sRGB.
- Size the image (Image>Image Size). Enter the dimensions you need (in the case of the Canon SX60, 1050 pixels is the short axis for horizontal images, the long one for verticals) in the Pixel Dimensions box. Don’t reset anything in the Document Size box.
- Apply Unsharp Masking (Filter>Sharpen>Unsharp Mask) to suit the image (it’s wise to do some tests and project them to see which levels look best). The benefits of other, more sophisticated, ways of sharpening are not really visible in a projected image.
- Conclude with a Save As command.
These operations can easily be written into two Photoshop actions (one for verticals, one for horizontals) to speed up image preparation.
The equipment for digital projection remains expensive compared to a second hand Leitz Pradovit slide projector but the digital medium holds vastly more scope for creativity and effective communication. The slide show is back.
Comments on NPN nature photography articles? Send them to the editor.
Niall Benvie who runs Images from the Edge, is the UK’s most prolific writer on natural history photography, publishing almost 70 articles and a book (amounting to over 135,000 words) between 2000-2002 alone. But the scope of his writing extends much wider into issues of land management and the polarisation of nature and culture as well as travelogues and commentaries on subjects as diverse as species re-establishment programmes and eco-tourism.


| 
