Getting The Sharpness You Paid For
Text and photography copyright © Bill Chambers. All rights reserved.
Your brand new lens just arrived, and you can't wait to try it out. You rush out to capture a few images, expectations high and visions of sugarplums dancing in your head. With an afternoon of shooting captured in the camera, you rush home, download your images, and your head drops low. What happened? You used a tripod, your exposures were right on, composition looks good, but the images lack the sharpness you were expecting. Has this ever happened to you? You just paid out several weeks of take-home pay for this optical marvel only to come away depressed after it's first use. You curse the lens, or lament the fact that somehow you must have gotten a lemon. Well, before you write that letter to the manufacturer or return the lens, you owe it to yourself to check it out first. Actually, checking a new lens for sharpness should be the first thing we do when we purchase it, but all too often we just want to run out and shoot a few images first.
Today's lenses are so blooming good it's amazing. With the aid of sophisticated computers and state of the art design and manufacturing, consumers today enjoy unprecedented quality at reasonable prices. While top quality lenses aren't cheap, the bang for the buck has never been better. Whether you choose to purchase "consumer" lenses or "pro" lenses, the optics in both are normally excellent. Many times the main difference in consumer and pro lenses is in the "build quality" and aperture range, not the actual optical quality. Factors such as materials used, shock resistance, and weather sealing can run prices up dramatically without having any effect on optical quality. But all lenses, regardless of price, have certain strengths and weaknesses when it comes to sharpness. Each lens has its optimal aperture range where the images produced will be the sharpest and offer the best contrast. It's our job as the end user to discover that optimal range for each lens we own and use. I'm not talking about some fancy optical testing done in the labs, just good old "John Q. Public" testing. It's easy, cheap, and can reveal some real surprises sometimes.
Getting Started
First, collect your equipment to be tested and check each lens for it's minimum focusing distance. The last thing you want to do is to set up your camera too close to the target and have everything shot slightly out of focus because of operator error. Don't ask how I know this! Set your camera on a sturdy tripod, move it past the minimum focusing distance, and then tape your "target", a crispy dollar bill, on the wall at "eye level" with the lens. Set the target in a location where the light will remain constant throughout the test. Depending on the number of lenses you have, this test can require quite a few images to be taken, so it's a good idea to have some method of keeping up with what you've shot and what you still need to shoot.
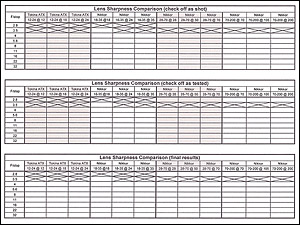
Below is a blank lens sheet that can be printed out to make this task a little easier, as well as a sample sheet to give you an idea of how you may want to prioritize your test.
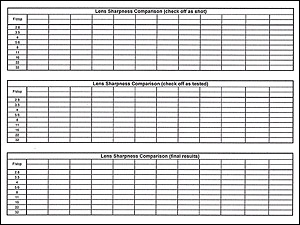 
Double click on an above image to download a pdf for printing. Adobe Acrobat Reader is required.
Keep in mind, there is no right or wrong way to do this - simply do what works best for you. The test sheet has three sections. I simply place a check mark in the top section as I take the initial test image so I can keep track of what I've shot, and what remains to be shot. (Hey, I'm old, and my memory isn't what it used to be!) The second section is used to keep track of the images as I examine and compare them in Photoshop, while the third section is used to scribble down the final results of my comparisons using a simple number grading system (1 for best, etc.).
Next, let's move on to the test itself. Set your camera settings to allow yourself to have control of the aperture, using either manual or aperture priority mode. Shoot the images in RAW format if that format is available to you. Set your white balance setting to daylight or any other setting you desire, as long as it's not on auto white balance. You can always change the white balance setting during the RAW conversion. We're not checking white balance, so the setting isn't very important for our purposes. If you're using a film camera, just choose the appropriate film for the conditions in which you're shooting. If you apply any sharpening to the image, be sure to apply it consistently throughout the range of images you're testing. It's very important to use good shooting techniques during the test so that no camera shake or unnecessary vibrations occur. Use a sturdy tripod and the mirror lock-up feature if it is available on your camera. Shoot each aperture on the lens before moving on to the next focal length. Continue until all lenses are tested. This is tedious and boring, but don't allow yourself to become impatient. Everything down the line is based on the quality of these initial images.
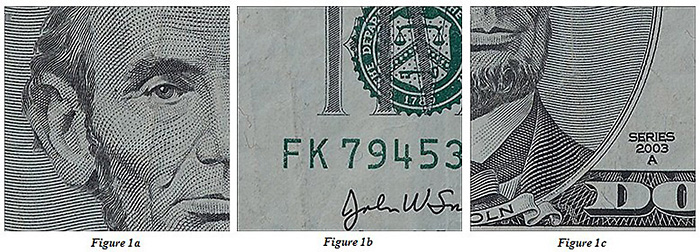
After the shooting is completed, simply download or scan your images into your computer and let the comparisons begin. I like to pull an entire aperture range up at one time in Photoshop (example: the entire range from 2.8 to 22 for my 28-70 @ 28), having perhaps seven or eight windows open so I can directly compare one to another. I enlarge the images and choose several specific target areas that have different features to look at (Figure 1a,1b,1c).
From here, I like to work backwards, selecting and deleting the worst images first until I'm down to the best three images.
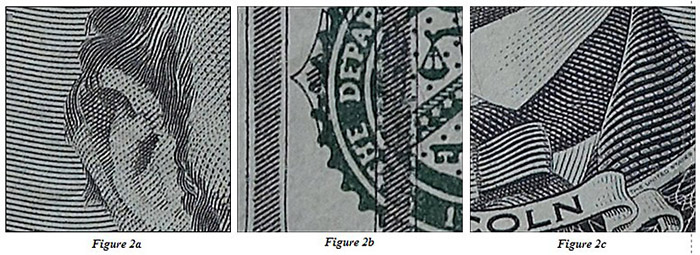
Then I really get picky, enlarging the images even more (Figure 2a,2b,2c) then selecting and comparing several different target areas within the images. Sometimes the choice is obvious, while other times the selections are quite close. In the end, I select the top three images for each aperture range and each focal length range. The comparisons of each aperture and focal length can be time consuming, but the rewards will be obvious upon completion.
It's a common belief that the sharpest aperture range is always in area the f/8 to f/11, and many times this is true. You may be surprised, however, to discover your lenses don't always fall into that generalization. In fact, you may be astounded at the differences at different focal lengths within the same zoom lens. For example, my Nikkor 28-70mm f/2.8 lens is sharpest at f/4 at 28mm, but at 70mm, f/4 is the least sharp aperture. The only way to be sure is by testing the lens. To illustrate further, let's look at the difference between the sharpest and least sharp apertures within my Nikkor 70-200mm VR lens. This lens is renowned for it's sharpness and contrast, but even it has areas of weakness. At 105mm, the sharpest aperture is f/5.6, and the least sharp is f/22. How much difference is there? Significant! See the examples below for the sharpest, mid range, and least sharp.
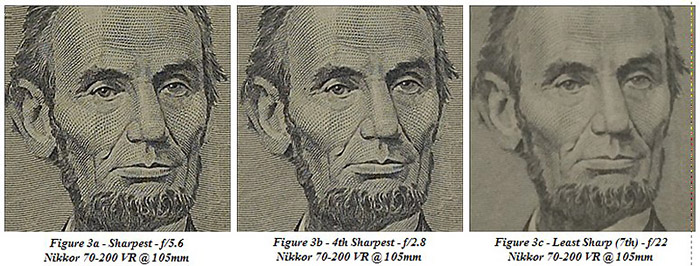
As you can see, Figure 3a is tack sharp, and even Figure 3b, the 4th sharpest aperture, is very usable. Figure 3c, however, the 7th in line and least sharp image is extremely soft. The results illustrated above are neither unusual nor are they the most extreme examples. These results are very typical, and with all of my lenses, there is a dramatic range of sharpness and contrast throughout the aperture range.
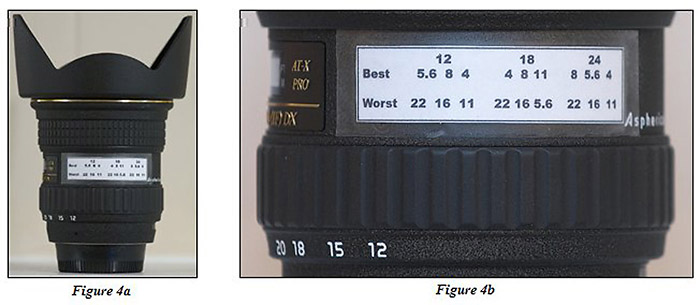
To make it easier to remember which settings are best for which lens, I simply print the three best and three worst settings for each lens and tape them to the lens barrel (Figure 4a,4b), thereby relieving my ancient brain from having to keep up with such trivia.
As mentioned earlier, testing is time consuming and about as much fun as having your gums scraped, but I feel it is essential if you want to consistently produce superior images. Through this testing procedure you will know for sure which is sharpest, and perhaps more importantly, which is not!
Good luck, and good shooting.
Comments on NPN nature photography articles? Send them to the editor.
Bill Chambers is primarily a landscape photographer based in Gulf Breeze, Florida. He enjoys shooting the swamps and marshes of northwest and north central Florida, as well the beaches where he lives. His work is exhibited in local galleries and establishments in Florida and Alabama. To see more of his images please visit www.enchantedlightphotography.com.


| 
