Mirrored ImagesText and photography copyright Darwin Wiggett. All rights reserved.
Editor’s Note - Thumbnails are links to larger images, presented in slide show format.
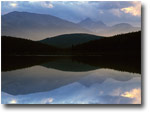
Photo 1
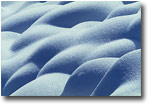
Photo 2a
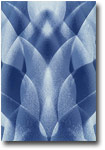
Photo 2b
Photo 3a
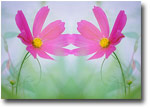
Photo 3b
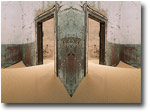
Photo 4
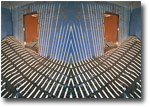
Photo 5
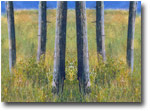
Photo 6
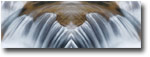
Photo 7
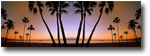
Photo 8
|
|
One of the Holy Grails of nature photography is the classic reflection shot. Mountains, sunsets, or fall colours reflected in the glass-like surface of a calm lake create an image that although clichéd has tremendous visual appeal. I believe the power of such images lies in the symmetry of the subject matter presented. Humans and most other animals are symmetrically divided creatures with one half of the body mirroring the other half. Given the powerful allure of symmetry it is no wonder that photographers are so driven to make mirrored images – we can’t help it - the appeal of symmetry is hard-wired into our DNA.
Photographers have long recognized the power of symmetry and our images often reflect (pun intended) our pursuit of this natural attribute. Symmetry is one of photography’s most evocative tools of composition. You’d be surprised just how much our eyes seek out the mirrored comforts of symmetry. Given this innate desire I could write an article about finding and photographing symmetry in nature, but that would be like writing an article on how to breathe – it’s so easy it comes naturally. Instead let me show you how to make your existing asymmetrical images into mirrored masterpieces.
Reflections
I am sure many of us have gone out in pursuit of the classic mirrored reflection shot of a lake only to be foiled by wind whipping up waves. Aargh! What to do? Well make the image anyway. Back in the digital darkroom you can whip up a perfect mirrored reflection in minutes. Simply select the upper part of the image, make a copy of it, flip it over vertically and line it up to the bottom of the upper image to make a perfect reflection. To make it look more realistic be sure to blur the lower half slightly (a 2-5 pixel blur usually works well) and also darken it a bit. In nature, reflections are generally darker than the object reflected. If you don’t darken the reflection then your image will look faked to most viewers. Photo 1 shows an image I created in the digital darkroom. Notice that the reflection is both blurred and darkened slightly from the upper part of the image to make it more believable. Also I left in a tiny bit of the wave action on the horizon line to help separate the two halves of the photo.
Sandwiches
A technique I learned from my days in a camera club was the slide sandwich. Put two separate slides together in the same mount and voila, you have a slide sandwich. To create interesting symmetrical effects, I used to photograph two slides of the same scene, both slides overexposed by one stop. Two overexposed slides mounted together gives proper exposure. Then I would place the two slides together in one slide mount, one flipped the mirror reverse of the other. The result was often a wonderfully complex but visually appealing mirror image. Photo 2a is an abstract of snow covering small rocks. Photo 2b is a sandwich of two overexposed and duplicate slides of this same scene flipped in opposition and then rotated vertically.
You can do the same technique in the digital darkroom using a single photo. In Photoshop make a duplicate of the image (Image>Duplicate). Close your original image. Now go to the menu bar and select Image>Apply Image. Set the dialog boxes as follows: Source: the name of your image, Layer: background, Channel: RGB, Blending: Screen, Opacity: 50%. Click OK. The result will be an overexposed image. Now make a duplicate of this overexposed image (Image>Duplicate). If your image is horizontal go to Image>Rotate Canvas>Flip Canvas Horizontal and flip the second copy of the image. If your image is vertical choose: Image>Rotate Canvas>Flip Canvas Vertical. Some images will work in different orientations than these recommendations so just use my suggestions as a starting point. Now press the letter ‘v’ on your keyboard (this selects the move tool from the tool palette). While holding down the shift key, use your mouse and drag the second image onto the first image. This will create a perfectly centered and layered image with two versions of the photo sandwiched together. At this point all you will see is the top overexposed image. Now press F7 on your keyboard to bring up the layers palette (or go to the menu bar and choose: Window>Layers). Below the word Layers you will see the word Normal. Click on the triangle to the right of Normal and change this to Multiply. Leave Opacity and Fill at 100%. You should now see an image that merges the two versions into a mirrored abstract. If you like the image, click on the triangle directly above the 100% Opacity setting and choose Flatten Image from the drop down menu (or use the keyboard shortcut CTRL E to achieve the same end). Now save your image and you are done. Photos 3a and 3b show the results of a digital mirror sandwich.
Vertical Flips
Making images that look like mirrored water reflections is obvious (Photo 1) but what about mirrored vertical images? The resulting images can be wonderfully appealing and a bit surreal. Take any vertical photo with strong lines or patterns, make a duplicate image, flip it horizontally, and then abut the two images together into one larger image. Here are three examples of Vertical Flips from images in my file. Photos 4 and 5 are from Namibia, and Photo 6 is a vertical flip of trees at a local lake. I then took Photo 6 and digitally sandwiched it with a close up photo of frost on a window to give the image a painterly texture.
Mirrored Panoramics
Another favorite mirror image technique I use is to take a horizontal landscape that has a strong compositional sense of movement across then frame, create a copy of that image, flip the copy horizontally, and then abut the two images side-by-side horizontally to give a long panoramic shot. The results lead your eye across the frame but at the same time you feel comfort in the symmetry and balance in the scene (see Photos 7 and 8 for examples). I have created huge panoramic images up to five images long, all using the same image alternating between the original and flipped views.
There are many more possibilities in creating mirrored images in the digital darkroom than I have outlined here, but these four techniques should be a good starting point for those interested in further pursuing mirrored imagery. Some of your mirrored images will be experimental duds, but others will be pleasant surprises. For example, I am really pleased and excited with Photo 4. The results will be highly personal and one person’s masterpiece will be another person’s trash. In the end the photos that move you will be more than just a mirrored image but a true ‘reflection’ of your inner vision.
DW-NPN 0343
About the author...
Darwin Wiggett and his wife Anita Dammer are the proprietors of Natural Moments Photography. Anita has 17 years experience as staff photographer for the Glenbow Museum in Calgary and is currently the editor-in-chief of Photo Life magazine. Darwin has been shooting stock since 1990, and has two books published by Whitecap in Vancouver; Darwin Wiggett Photographs Canada and Seasons in the Rockies. Darwin's newest book, How to Photograph the Canadian Rockies will hit the shelves in the spring of 2005. Together they specialize in landscape, nature, animal, humor and kid photography and are represented by various stock agencies worldwide. Their primary stock agent is First Light in Toronto, Canada. You can view more of Darwin's work at www.darwinwiggett.com and on his online portfolio.
Comments on NPN creative nature photography articles? Send them to the editor.


| 
