Digital Photo Filters
Copyright Tim Grey - All rights reserved.
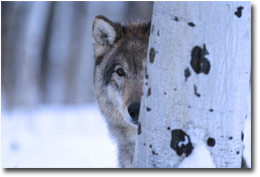
Photographers have long used filters to add a creative touch to their images. Many of these take the form of colored filters, allowing the photographer to add a wash of color to the scene, or compensate for a strong color element. The most popular of these options are warming and cooling filters.
Filters Go Digital
When you work with your images in the digital darkroom, you gain tremendous flexibility and control over the application of photographic filters to your images. You can control the degree of the effect with precision, while seeing the results in real time. You no longer have to guess about which filter is best, or settle for the limited range of options provided by filters used during capture. In fact, you can even produce a wide variety of interpretations for the same scene.
Photoshop CS Simplicity
One of the new features in Photoshop CS is the addition of a “Photo Filter” adjustment layer. If you haven’t yet upgraded to Photoshop CS, don’t fret (though I recommend that you do upgrade). I’ll address earlier versions in a moment. The Photo Filter adjustment layer is a convenient way to apply the effect of a color filter to your images, with excellent control over the strength of the effect.
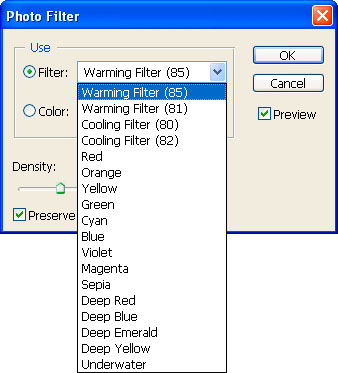
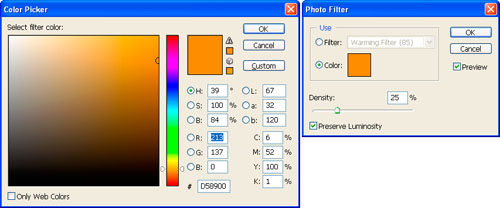
To apply a Photo Filter to your image, simply click the New Layer button at the bottom of the Layers palette and select Photo Filter from the popup list. This will add an adjustment layer to the Layers palette and open the Photo Filter dialog box (Figure 1). A convenient list of standard filters is available for you to select from, including 85 and 81 Warming Filters, 80 and 82 Cooling Filters, an Underwater filter, and a variety of colored filters. Select the type of filter you’d like to apply to the image from the dropdown, and you can see the effect on the image (provided you have the Preview checkbox checked). You can also select a specific color to use by selecting the Color option and then clicking on the colored box to bring up the Color Picker (Figure 2). Choose a color and click OK to return to the Photo Filter dialog box.
Adding a color Photo Filter allows you to produce a similar effect to using the same filter in front of the lens when you actually take the picture. But when using such a filter during capture it is an all-or-nothing proposition. Adding the filter effect digitally allows you to change your mind at any time, and also adjust the intensity of the effect. In the Photo Filter dialog box, you can adjust the Density of the filter. A lower Density setting is like using a filter that is closer to being totally clear, while a higher Density setting produces the effect of a more opaque filter. With the Preview checkbox checked, you can simply slide the slider left and right to find just the right result.
When you have found the desired settings, click OK to close the Photo Filter dialog box. Then click on the eyeball icon to the left of the Photo Filter adjustment layer on the Layers palette to turn off the effect. This allows you to click between a “before” and “after” version of the image. If you want to modify the effect, double-click on the thumbnail for the adjustment layer to open the Photo Filter dialog box and change the settings.
Do-It-Yourself Photo Filter
The new Photo Filter adjustment layer in Photoshop CS is certainly a convenient way to apply a colored filter effect to your images. But there is another method that provides virtually identical results, and can be used in earlier versions of Photoshop as well. For this approach, we’ll use the Solid Color adjustment layer.
Start with an image that you’d like to add a color cast to. It may be a shady image that is a bit too cool, a warm image that needs to be toned down, or any other image you’d like to apply a slight color cast to. Then click the New Adjustment Layer button at the bottom of the Layers palette, and select Solid Color. This will add a Solid Color adjustment layer to the Layers palette and open the Color Picker dialog box (Figure 3). Expecting a “Solid Color” dialog box? No, this adjustment layer is much simpler than that. All it needs is a color to do its job. So, select the color you’d like to apply to the image and click OK.
At this point you’re probably wondering where your image went, because now it is covered with the color you selected, and it is completely opaque. You’ve certainly applied a color cast! The key is to change the settings for the adjustment layer so that it interacts differently with the image layer below. You may have already guessed that you’ll want to reduce the opacity of the Solid Color adjustment layer, so it allows the image to show through. We’ll do that, but if that was all you did you’d end up with an image that has too much of the selected color, making it look as though you were viewing the image through a sheet of colored cellophane.
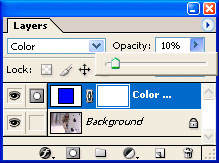
Instead, we want the Solid Color adjustment layer to only change the actual color of the underlying image. Therefore, the first step is to change the blending mode of the adjustment layer to Color. The dropdown for blending mode isn’t actually labeled, so just look for the dropdown that says “Normal” directly under the “Layers” tab. By selecting Color from this dropdown, the Solid Color adjustment layer will only cause a change to the underlying color, not the tonal values. This will change the image into what looks like a black & white print that uses a single color ink rather than black, but it gets us closer to the desired result.
The next step is to reduce the opacity of the Solid Color adjustment layer, so that the effect isn’t as strong. In fact, you’ll probably need to reduce the opacity of the layer quite significantly. I usually end up dropping it down to less then 10% with most images. The Opacity slider is found to the right of the blending mode dropdown at the top of the Layers palette. Simply click the dropdown and adjust the slider to the desired value (Figure 4).
Because you have created an adjustment layer to produce this change, you can always refine your adjustments later. Simply double-click on the thumbnail for the Solid Color adjustment layer to bring up the Color Picker dialog box and select a new color. You can quickly change the overall appearance of the image by simply choosing a different color.
In fact, this technique of using the Solid Color adjustment layer allows you to do much more than apply a color cast to the image. Want to intensify the colors in the image? Change the blending mode of the Solid Color adjustment layer to Saturation instead of Color, and be sure to select a highly-saturated color. This will cause the layer to only affect the saturation of the underlying image, not the tone or hue. The result is similar to simply increasing the saturation with a Hue/Saturation adjustment, but the point is that you have tremendous control over the adjustments you are able to apply to your images.
Tim Grey - NPN 019
Comments on NPN digital photography articles? Send them to the editor.
 About Tim Grey...
Tim Grey enjoys sharing information about digital imaging as much as he enjoys learning it in the first place. Tim publishes an almost-daily question and answer e-mail service called Digital Darkroom Questions (DDQ). The DDQ e-mail service (www.timgrey.com/ddq/) provides a forum for photographers to have their questions related to the digital darkroom answered. He is editor of The Digital Image, a quarterly journal published by George Lepp. He also teaches courses to help photographers master the digital darkroom at the Lepp Institute of Digital Imaging. Tim is also co-author of Real World Digital Photography, 2nd Edition, from Peachpit Press, and the author of the soon-to-be-released book Color Confidence from Sybex. Tim can be contacted at tim@timgrey.com.


| 

