|
|
 Photographing Hawaii’s Lava Fields
Text and photography Copyright Gloria Hopkins and E.J. Peiker
She can destroy entire towns on a whim! When angered she will rise from the belly of her mountain home and hurl liquid fire at those who dare to cross her. She is powerful and passionate; jealous and loving; beautiful and ugly. To the people of Hawaii she is Pele, Goddess of the Volcanoes. To geologists she is known as the volcano Kilauea, Hawaii’s most active land-making machine. In 1982, Kilauea awakened from three years of slumber and belched forth molten lava with a fury befitting a God. Photographers from around the world were treated to spectacular displays of fiery lava fountains, violent steam blasts and rivers of fire. As of this writing, the fountains of red-hot lava that erupted hundreds of feet into the air have subsided, but lava continues on its trek to the Pacific Ocean on the eastern shores of the Big Island of Hawaii. One of the best places to view flowing lava is at the end of the Chain of Craters Road in Hawaii Volcanoes National Park. As a result of the eruption, the Hawaii Volcanoes National Park is enjoying a record number of visitors who have come to see the lava in action. It should be noted, however, that seeing actively flowing lava is not guaranteed. As new vents are being formed to allow lava to flow freely, old ones close and just where a new one will form is unpredictable. One of the recent lava flows from the Pu`u `O`o vent, flowed through the Chain of Craters Road. It literally rolled over the road and that is where you park to walk to the actively flowing lava. As of August 2002, it is little more than a half-mile walk to see the lava, but it is an unforgettable walk that every nature enthusiast should experience if possible.
Although the walk is short, a little preparation can make a big difference in your comfort and enjoyment of the experience. Proper shoes are a requirement. High-top boots are best, but walking shoes that support the ankle are fine. Those with weak knees or ankles may want to reconsider the walk, or make sure that your joints are properly braced. The hardened lava that you will be traversing is uneven, slippery when wet and razor sharp. Sandals are strongly discouraged as the slightest brush of bare skin against the rock can cause deep cuts and there is no medical facility on the lava field. The National Park Service recommends carrying three quarts of water per person to avoid dehydration and heat exhaustion. And they are not kidding. The hardened lava is dark and generates heat like that of a heating element on an electric stove. Sunblock is also a necessity as there are no trees to provide shade. Even on an overcast day, sunscreen is imperative. Despite these dangers, which are easily mitigated as described above, Hawaii Volcanoes National Park is not to be missed. The Living Lava Field
As you cross the lava field to the active flows you will see many incredible rock formations that you will want to photograph. The field is made mostly of beautiful Pahoehoe lava. This type of lava is quite fluid in its liquid form and as gravity pulls it downward toward the ocean, it piles onto itself as cake batter poured into a pan. When it hardens, beautiful abstract formations that resemble flowing metallic braids and twisted ropes remain. Many Hawaiian artists’ renditions of Pele portray her with long braided hair resembling dried and cooled Pahoehoe lava. Make sure you don’t burn up all of your film on the hike to the active flows because you will want a lot of it once you get to the active lava. Unless you are carrying 10 rolls of film or more, we recommend passing up photo opportunities at this stage and getting them on the way out to make sure you have enough film. If you visit on a day when there aren’t many people, you may walk along and feel a sudden increase in temperature, or hear a popping sound like rice cereal submerged in milk. If this happens, immediately scan the entire area around you as you may have gotten into an active flow area. If you are standing on a rock that is making a crackling sound, immediately move away as 2000 degree lava could come pouring out at any second. This will also be a great photo opportunity from a safe distance. On most days, you will be able to tell where the active flows are by a concentration of people. You will be able to get as close as you dare but watch out for yourself and your equipment. The ground changes constantly in an active flow area and you can’t always hear the lava moving toward you. While we were in an area of active flows, we watched the landscape completely transform itself in the span of 30 minutes.
Hazards of Photographing Lava At first glance, the lava field appears as nothing more than a large mass of dark, lumpy mounds that require a bit of agility to cross. But in reality it can be dangerously unstable and should be approached with a bit of knowledge. We recommend reading the literature that Hawaii Volcanoes National Park provides before visiting an active lava field. Not only does it give you a good understanding of what you’re about to see, it could save your life. It is wise to stay on the marked trail. Small orange flags that guide the way to the active lava were placed there by Park personnel to keep you away from dangerous parts of the field. There are areas of lava that seem hardened and dried but can be teeming with red-hot lava beneath and could collapse without notice. Near the edge of the shoreline, there exist large flat areas where new lava has come to rest. These are called “lava benches.” A bench may appear stable and permanent but it can house flowing lava beneath the surface. They can collapse at any time and fall into the ocean where the water is scalding. Another danger are steam blasts, which can occur near the shore where sea water enters the hollow space where lava is flowing into the ocean. This water shoots up through holes in the hardened lava above and can throw scalding water and rocks the size of basketballs hundreds of feet into the air. Acidic fumes from steam can burn eyes, lungs and skin and ruin photographic equipment. Getting the Most Out of Your Photographic Experience
The equipment needed for photographing lava flows is basic and lenses in the 28mm to 200mm regime will be all you need to bring back spectacular images. Even point and shoot digital and film cameras are capable of recording this unbelievable landscape well. Try various compositions including the surrounding landscape and zeroing in on the details of a specific flow. Be careful not to get too close as both you and your equipment can quickly become overheated and burnt. In addition to heat, also watch out for vents – many spew sulfurous gasses that when mixed with moisture form Sulfuric acid, a corrosive that can damage your equipment. Standard nature photography films such as Fujichrome Velvia, Provia 100F, and Kodachrome 100SW and 100VS are good choices. If you plan on shooting at night or twilight, faster film choices such as Provia 400F may be a better choice. Photographing the volcano flows can be challenging. As the lava cools and hardens, it can become highly reflective and almost glass-like resulting in many specular highlights. Because some of this reflection can be metallic in nature, a polarizer may not be able to remove the highlights and the result is a less-saturated photo than may be desirable. Some of the reflections are glass-like compounds, so you may still want to try a polarizer to blacken the blacks of the rock and saturate the film more. We have found that matrix/evaluative meters do a good job of metering lava flows. If the majority of the frame is black lava rock, however, some negative exposure compensation should be used. Waiting until there is some cloud cover can really punch up the contrast and reduce those highlights as well as saturate the red lava – this will lead to higher impact photographs. Use your depth of field preview button or hyperfocal scale/tables to insure that you have the proper depth of field for the effect that you are trying to achieve. After a day of shooting lava, we recommend strongly that you wipe down all of your equipment with a lightly moistened towel to remove corrosive residues.
Lava by Air A helicopter tour of Hawaii Volcanoes National Park is one of the highlights of any Big Island vacation. Weather permitting, the pilots will fly you right up to the current source of volcanic activity – Pu’U O’O. This is a large vent crater that spews gasses and lava on a regular basis. Looking down into the crater is an awesome experience and can provide great photo opportunities. Your pilot will probably look for areas where lava is spilling into the ocean. While much of this occurs through underground vents, you should still see areas where a steam cloud is visible on the shore. An aerial tour is a great way to see how the lava flows have staked their claim on the beautiful Hawaiian landscape. You will see luscious green foliage interrupted by streams of black lava flows, large sections of roads that have been buried beneath lava flows, homes that are completely isolated and surrounded by lava flows, as well as the rest of Hawaii’s spectacular scenery. A helicopter tour, while expensive, is an opportunity that can’t be missed by the nature photographer. Photographing from helicopters presents some unique challenges. First, you have to be lucky enough to get a window seat. Weight and balance is critical in the safe operation of a helicopter so you will be assigned seats that you are required to remain in. A party of two is typically guaranteed at least one window seat. It is possible to get good photos from a non-window seat as well but the opportunities will be fewer. Wearing a long sleeved black shirt is imperative to minimize reflections on the inside of the helicopter’s plexiglass windows. Bring a small glass cleaner wipe to clean the area that you will be shooting through prior to takeoff to maximize contrast and clarity.
Ideal lenses are fast lenses in the 28-200mm range. We recommend shooting with the lens wide open and using a film that can be rated at ISO 200 to minimize vibrations. At no time while shooting should you allow your camera to come into contact with any part of the helicopter as the vibrations will transfer to your images. If you have a fast image stabilized/vibration reduction lens, use it. We recommend shooting all images at f/2.8 or faster. If your lens has a focus limit switch, set it to its longest minimum focus distance setting to prevent the lens from searching for focus on interior reflections. Shooting in aperture priority mode at the largest aperture in evaluative/matrix mode with no exposure compensation results in perfectly exposed shots almost every time. A final note on photographing from inside any aircraft – do not use a polarizer! Not only does it slow your shutter speeds significantly, but it will ruin most aerial photos. Aircraft windows are typically made of plexiglass. Polarizers “see” stress areas in the plexiglass that manifest themselves as rainbow colored striations on the film. Witness to Creation Seeing lava that has traveled from the center of the earth to the ground at your feet is something that speaks to the soul. It is the most basic of things. The creation of earth unfolding before your eyes. Each person has their own reason for wanting to see this awesome power of nature. For some, it is the scientific aspect that fascinates and confirms. For others, it is simply creation unfolding before their very eyes. And let’s not forget, it is the excitement of feeling the heat and experiencing first-hand how the beautiful islands of Hawaii were formed. Whatever your reason, photographing the lava fields of the Big Island of Hawaii is a unique experience and promises to leave a lasting impression that will be remembered for a lifetime. For more online information please visit:
About the images... Pu’u O’o Crater ©Gloria Hopkins, EOS3, 28-70 f/2.8, Sensia100 Gloria Hopkins - NPN 089 Comments on NPN landscape photography articles? Send them to the editor. |
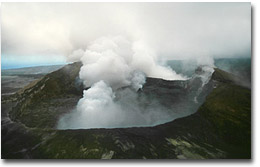 Pu'u 'O'o crater emits steam and noxious gasses from various vents
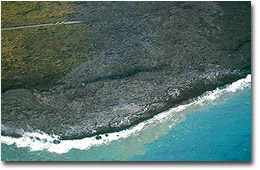 An aerial view of the lava field and the end of the Chain of Craters Road in Hawaii Volcanoes NP
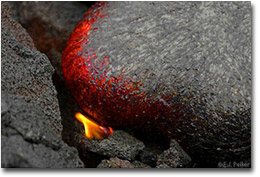
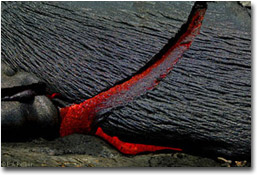 Pahoehoe lava breaks through its hardened outer crust
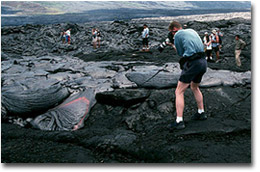 You can get as close to the lava as you dare, but the intense heat will keep you back about five or six feet
 Try various compositions including the surrounding landscape and zeroing in on the details of a specific flow
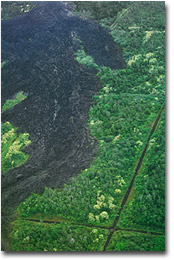 A cooled lava flow leaves its mark on the lush Hawaiian landscape
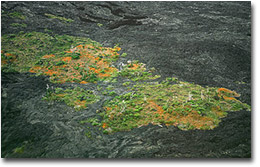 A patch of lush vegetation has been spared by a recent lava flow on the slopes of the Big Island of Hawaii
|
|