|
|
 How to Photograph Mountains
Text and photography Copyright Darwin Wiggett Okay, so you ære off to the mountains for a little photo trip. You have your camera, and a bag of lenses û all you need is to get to the mountains. ôHey, theyÆre so stunning, theyÆll practically photograph themselvesö. Or so you thinkà. Of all the landscapes I have photographed, mountains remain one of the most difficult to capture well. Being immersed in mountains evokes huge emotional and physical responses; capturing these same feelings in camera using light as your only tool is a definite challenge. I have often been totally inspired by eye-popping mountain views, only to be hugely disappointed by the photos I attempted. What happened? Well, I didnÆt understand the basic tool of photography û light.
Understanding Light Here are the three main categories of light on any landscape.
Keep these three categories in mind as we explore how to make great mountain photos. Sunny Days The fastest way to kill a wonderful mountain scene is to photograph it at mid-day, in bright sun, with the mountain front-lit (see photo 1 û this is how the majority of tourists photograph mountains). If you understand light, youÆll immediately know why this combination ækills the imageÆ. First of all, mid-day light has no æmoodÆ. The colour of the light at mid-day is neutral (think boring), and second, frontal light kills the texture of the mountains (rocky pinnacles, plunging crevasses, and hanging glaciers loose their form and shape in front lighting). Now compare photo 1 with photo 2. Why does this second shot work better? First, I used strong side-lighting to bring out all the texture in the rock faces of the mountains (especially noticeable on the left side of the image). Second, I shot the scene at sunrise when the colour of the light is warm and appealing. And lastly, the contrast between the lit peaks and the dark sky adds drama to the scene and focuses the viewerÆs attention to the mountains. Photo 2 better communicates my emotional æmoodÆ at the time the image was taken. Front-lighting Generally I avoid photographing a mountain that is evenly lit from the front. A mountain is all about texture and frontal lighting kills texture (remember photo 1?). What is front light good for then? Well, front-light is appropriate if you are interested in showing the tonal or colour relationships in a subject. For example, a wall in the city coloured with graffiti would look well photographed under front-light because the image relies more on colour than on texture. But most mountains are blocks of gray rock with little colour (there are exceptions of course), so why use frontal light? At sunrise and sunset you do get coloured light. The peaks generally light up first, turning pink at dawn, then red, then orange, and then yellow as the sun rises higher in the sky. If you photograph just the peaks, youÆll get orange (less texture) peaks against a blue sky. Not that exciting, but better than the average ætourist snapshotÆ. But take those same coloured peaks and compose them with an interesting foreground, like a lake, or a river, or some flowers and then you will have a recipe of tones and colours that work well with front-lighting (photo 3). Side-lighting This is the kind of light you should consistently search for when in the mountains. Wherever the sun is, turn 90 degrees away from it, and look at the scene in front of you. Chances are the mountains you see will look pretty nice if you photograph them from this angle. To reduce haze in the scene, darken the blue sky, and saturate the colours try using a polarizing filter. Polarizers work best when the light source is at a 90-degree angle to the subjectà perfect for side-lit mountains (photo 4). My favourite polarizers are Singh-RayÆs ôWarming Polarizer Plusö and Singh-RayÆs blue-gold polarizer (www.singh-ray.com or 1-800 486-5501). Both filters add a nice warm colour to the scene (especially important at mid-day) and make blue skies more vivid (see Photo 4). Back-lighting Back-lighting emphasizes shape and form. The most extreme form of back-lighting is a silhouette in which the subject shows no colour, detail, or texture but just shape. To get a successful back-lit mountain shot under clear skies generally means waiting until the sun is directly behind the mountain, or shooting just before sunrise or after sunset to get some colour in the sky to add interest to the shot (photo 5). Overcast Days If you plan to shoot in the mountains, youÆll see a lot of overcast light - guaranteed. Learn how to shoot in this light. Almost every article and book I have read on landscape photography recommends that when it is overcast, ôeliminate the sky and shoot tightö. If you know anything about the limited contrast range of film or digital capture, you know that you canÆt get detail in the overcast sky and the ædarkÆ landscape at the same time. So rather than having washed out skies, most photographers crop it out of the frame and concentrate on just the landscape when it is cloudy (e.g. shooting close-ups of flowers, forests, and waterfalls). But wait! When I go to the mountains I want the mountains in my composition. If I eliminate the sky, I eliminate the peaks! Is there a solution? Sure, it is called a graduated neutral density filter (or ægrad filterÆ for short). These filters are half clear and half neutral-density (see photo 6) and combined with a special filter holder, allow you to hold back exposure in the sky while maintaining proper exposure in the mountains. Grad filters come in two general forms, soft-edge and hard-edge. These names describe the abruptness of the transition zone between the neutral density area and the clear area of the filter (photo 6). A fast transition produces a æhardÆ line on the filter while a slow transition produces a æsoftÆ line. In general, soft-edge grads work best in mountain photography because the line between sky and land is not abrupt like it is in the prairie, for example. Both Cokin and Singh-Ray make grad filters useful for mountain photography, but my two favorites are Singh-RayÆs Galen Rowell 2-stop and 3-stop soft-edge grads. The number designation indicates how much light (in f-stops) the neutral density part of the filter holds back. On overcast days, I use one of the Singh-Ray soft-edge grads to bring back detail in the sky. The transitional or æfeatheredÆ part of the grad is placed between the foreground part of the composition and the upper peaks (see photo 7). The filters can be moved up and down in the filter holder to exactly place the transition zone. I often use the cameraÆs depth-of-field preview button to help me æfine-tuneÆ the transition line of the filter for the aperture I am shooting at. Proper exposure is based on the foreground. First, tilt your camera down to eliminate the sky, take a meter reading, and then set your camera at that reading. Now recompose and add the grad filter. Try the two-stop filter first, and then, the three-stop filter. You can decide which filter gave you the effect you like best. After some practice, youÆll know by experience which filter to use. Grad filters also work in direct light, especially when you are photographing a foreground in the shade and the background peaks in the sun (see photo 3). Here again, film canÆt record the dark foreground and brightly lit peaks at the same time so we need to reduce the range of contrast with a grad filter. Another filter that works on overcast days is the polarizer. Under overcast skies, polarizers do not darken the sky, but instead, add saturation of coluors to any surface (e.g. leaves, water, and wet rocks) that is reflective (photo 7 is a good example). The best way to tell if a polarizer will have an effect on an overcast scene is to try it. Put it up to your eye, spin it around and see if it removes unwanted reflections and boosts colour saturation. Here again Singh-RayÆs ôWarming Polarizer Plusö works well because it removes glare and adds a warm-tone to counteract the blue coloured light of an overcast day. The Blue-Gold filter doesnÆt remove reflections but instead colours them either blue or yellow. Sometimes the effect this filter produces is amazing, sometimes it is awful, and the only way to tell is to give the filter a twirl. Mixed Light Often, in the mountains, it is neither totally sunny, nor totally overcast but rather a mix of sun and cloud. All the rules of good lighting still apply. On these days, I will find myself a nice composition and then wait for the sun to pop out. When it does there will be cloud shadows on the mountain, or if the sun is low in the sky, the clouds will often light up along with the mountain. The key here is to position yourself and wait, and wait, and waità until the light happens (photo 8). Often I use a polarizer or grad filter to help me improve the colours or the contrast in such scenes, but in the end, it will be the light that makes the image work or not. At sunrise and sunset if there is mixed light, it is often most productive to position yourself so your subject is back-lit. If the clouds are going to light up, they are more likely to do so in this direction. If you can find a lake to reflect all the great cloud colours in, then even better (photo 9). Planning Shots By now you should have gotten the message that getting great mountain shots is all about lighting. Since you canÆt move mountains around to get better lighting angles, youÆre the one who has to move. I always plan to be in the right place at the right time with the camera ready before the light happens. For example at sunrise, I will be in position, camera on tripod, image composed, just waiting for the sun to peak over the horizon. To help me figure out where the sun will be at a given time of day, I use a compass. Once I figure out where the light will come from, I plan how I will compose the scene and portray the mountain. Rarely do I just drive around searching for a photo opportunity. Ninety percent of my best shots occur when I have pre-visualized the scene before hand, and then set up and waited for the light to happen. So next time you are in the mountains, think about the language of light. Stop looking at the mountains as subjects but rather as æcatchers of lightÆ. Your job is to photograph the mountains when they make their best catches. Happy clicking! Darwin Wiggett - NPN 343 Comments on NPN landscape photography articles? Send them to the editor. |

 Photo 2 - Herbert Lake, Banff National Park, Alberta û Mamiya 645 Pro TTL, 55mm Lens, Singh-Ray Warming Polarizer Plus and Singh-Ray 2-stop soft-edge grad filter, Velvia film

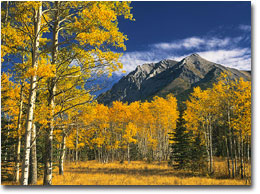 Photo 4 - Kananaskis Country, Alberta û Mamiya 645 Pro TTL, 55mm lens, Singh-Ray Warming Polarizer Plus, Velvia film
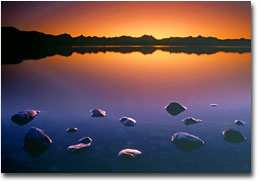 Photo 5 - Paine Lake, Alberta û Canon EOS-1n, Canon EF 20mm, Singh-Ray 3-stop soft-edge grad filter, Velvia film
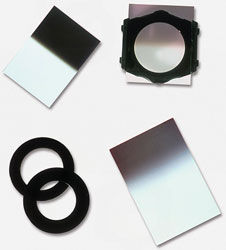 Photo 6 - Graduated filters
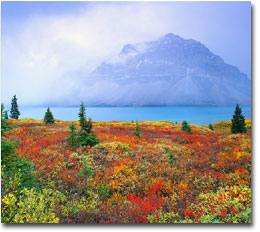 Photo 7 - Fall Colors, Bow Summit, Banff, Alberta û Mamiya 645 Pro TTL, 55mm lens, Singh-Ray Polarizer Plus, Singh-Ray 2-stop soft-edge grad filter, Velvia film
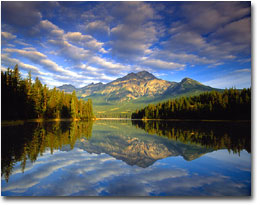 Photo 8 - Pyramid Lake, Jasper, Alberta û Mamiya 645 Pro TTL, 45mm lens, Singh-Ray Polarizer Plus, Velvia film
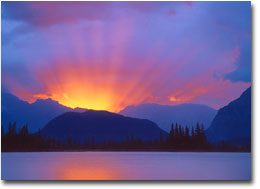 Photo 9 - Vermilion Lakes, Banff, Alberta û Mamiya 645 Pro TTL, 80mm lens, Singh-Ray Color Intensifier filter, Velvia film
|
|