|
|
With the completion of our first Why Nature Photography audio slideshow it was no surprise that the photos submitted were excellent. However, it quickly became evident that few of us knew the best way to create the voice-over file to accompany the photos! In this regard, I was in the same boat as those who contributed to the first volume: my first attempt produced mediocre results.
The purpose of this tutorial is to guide you through the process of creating a quality voice over. It turns out to be very much like creating a good photo - it all starts with a good "capture." We all know that capturing the scene in-camera as perfectly as possible will make our post-shutter work in Photoshop easier and produce a superior final product. So it is the same with creating a voice-over for an audio slideshow, Powerpoint presentation, etc. Just like "good light" can make or break a photo, so can the acoustical environment in which a sound is recorded.
The analogy between creating a great photo and a great audio is a strong one. Luckily, where the investment in time and money in photography is huge, it’s quite modest for audio. In fact, my guess is that for most NPN members, a $40 investment in a decent microphone is the most that will be needed!
The Acoustical Environment
As any audiophile knows, room acoustics are critical to accurate sound reproduction. Generally speaking, any sound wave reflected off a hard surface will reach our ears after the original sound wave from the speaker, creating an echo or a hollow sound to the music. For this reason, acoustically "soft" rooms are far better for music listening and recording just like soft light is beneficial for photography. A soft room is one with carpet on the floor, curtains over the windows and plenty of soft furniture filling the room, all of which absorb sound waves instead of reflecting them. This is the kind of "acoustically soft" room you will want to record in!
Additionally, you need the room to be as quiet as possible when recording: turn off the TV or any appliance that is making noise, and keep the microphone well away from the PC to avoid picking up noise from its cooling fan.
Capturing the Sound - the Easy Way
I experimented with capturing my voice in two ways: using the Voice Memo application on my iPhone and later, using a microphone connected to a PC with Audacity software installed.
Creating a voice memo on the iPhone (or any other smartphone) is easy and straight forward, but positioning the phone for optimum results took a bit of experimentation. The microphone in most smartphones is omnidirectional, meaning it captures sounds coming from all directions. This can create a challenge in avoiding unwanted background noise and/or creating a hollow-sounding recording, which is caused by sound waves bouncing off hard surfaces and reaching the microphone as a secondary wave.
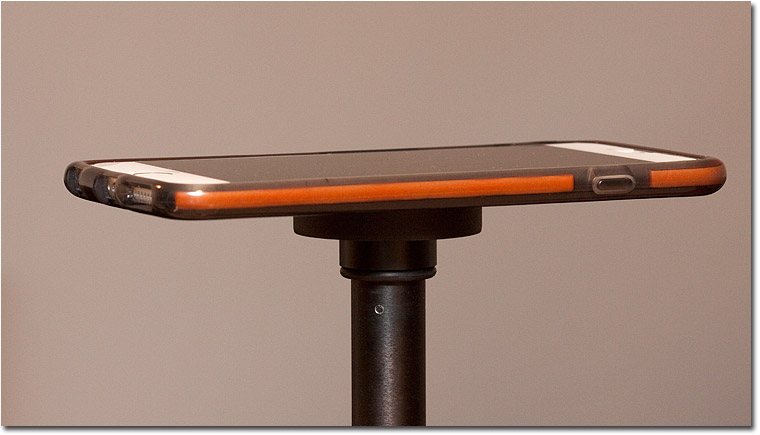
When I first tried recording with the iPhone, I simply placed it on the desk in front of me, which was not optimal: the recording sounded hollow with low frequency resonance. I also tried recording by holding the phone to the side of my head as if I was on a phone call, which was somewhat better. The best way to get a clean recording was to position the iPhone on top of a tripod, so the phone was at head height while I was standing. With the iPhone resting on top of the tripod and the bottom edge of the phone (where the microphone is located) facing towards me, I got the best results with the microphone about six inches away. Speaking directly, on-axis into the microphone ensured the full frequency range of my voice was captured. While recording, I stood motionless with my hands at my side to avoid making any unwanted sounds that might end up in the recording.
The best (and perhaps only) way to evaluate your recordings is with a set of headphones or a set of quality ear buds plugged into the phone. Your voice should be clear and sound natural with no background noise. There should be no echo or hollowness to the sound. Finally, there should be no excessive low frequency resonance that typically occurs when the microphone is positioned too close.
Once you are satisfied with the recording, export the file to your PC. Here is a link on how to do so with an iPhone: www.imore.com/how-get-voice-memos-your-iphone
Capturing the Sound - the Better Way
Even though (after some experimentation) I managed to get reasonable results with the iPhone, I decided to purchase a quality microphone designed for use with a PC. When used with audio-editing software such as Audacity, I figured the results should an improvement over using the iPhone.
After some research and finding many microphones suitable for recording a voice-over, I settled on the Samson GoMic USB microphone which can be purchased online for under $40. I found the following YouTube video useful: www.youtube.com/watch?v=InhS6xOoPwc
Overall, I have found this microphone to be an ideal blend of cost vs. quality/capability for voice over use. You can spend more but this is really all that is needed. As expected, it provided superior results compared to the iPhone.
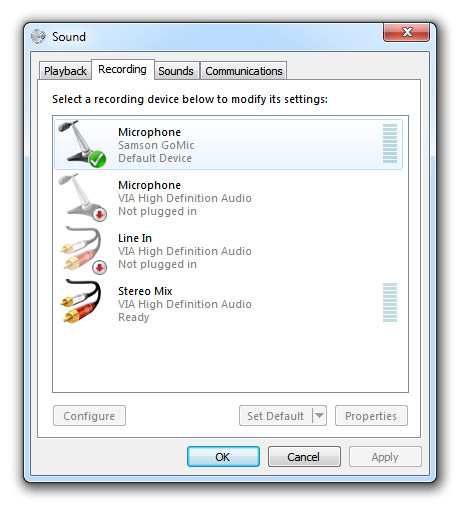
The first time you plug the GoMic into your PC, the device will be installed. To verify that the mic is installed, go to Control Panel > Hardware and Sound > Sound > Recording and you should see the GoMic listed;
Software
While we usually have to budget hundreds of dollars for photo editing software, we don’t have to spend a penny to download the excellent Audacity, an-open source software. Like Photoshop, this software is extremely capable but yet easy to use. For the purposes of this tutorial, we will only cover what is needed to capture your voice in a way that sounds natural, without any background noise, echo, etc.
Audacity can be downloaded for free from here: http://audacityteam.org/
The Set Up
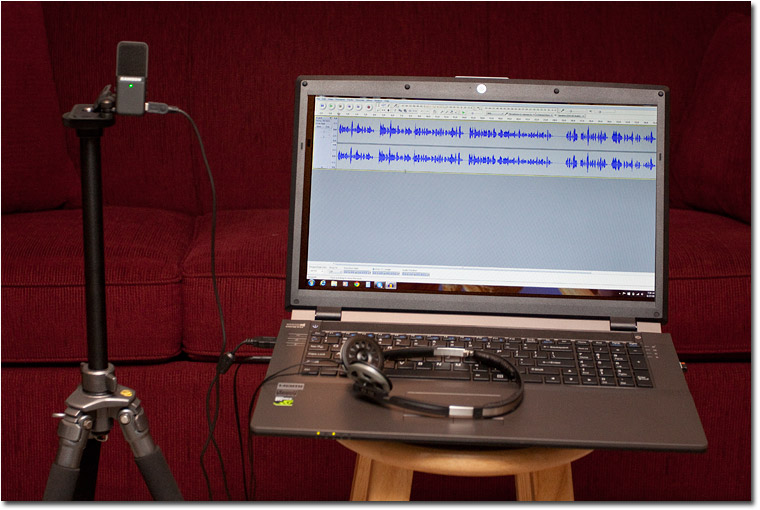
I set up my laptop and microphone (mounted on a tripod) in a quiet, acoustically soft room as previously described. The Samson GoMic has a threaded hole in its base so it can be secured directly to a tripod. Here is a photo of my set up (tripod lowered for the purpose of this photo);
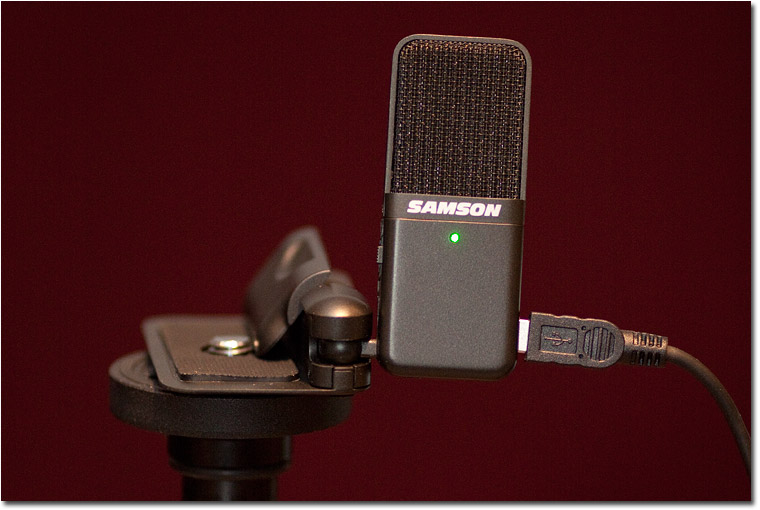
Here is the Samson Go Mic attached directly to a small Giotto tripod, extended so that the microphone is at head level;
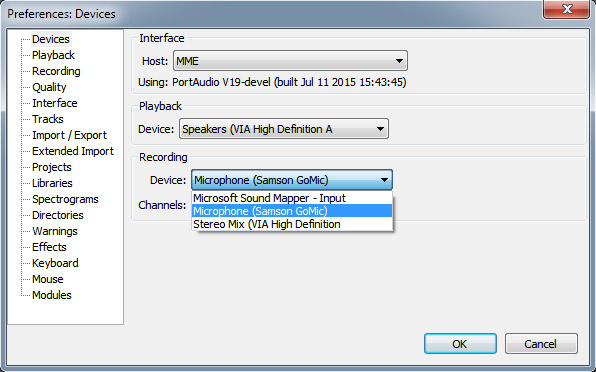
With the Audacity open, check the following: Edit > Preferences > Devices, select the GoMic;
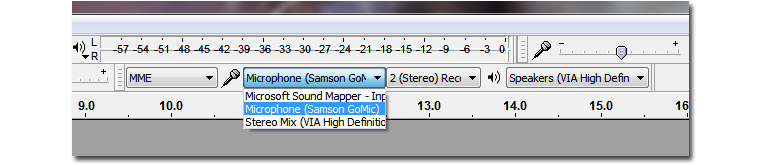
Once you have selected the GoMic on the Preferences screen, it should appear in the toolbar as below. Also notice that I have the recording volume set about midway;
On the GoMic, select the -10db setting to minimize background noise.
Extend the tripod so the microphone is at head level so you can comfortably stand about a foot away.
It is recommended you print out your narration and secure it so you do not have to hold it (the microphone will pick up noise if you crinkle the paper). In my case, I simply taped it to the top of the tripod to hold it in position.
To start the recording, simply click the Record button in Audacity.
A few recording tips;
- Speak at a normal volume, as if you were conversing with someone face-to-face in a quiet setting
- Test and adjust the recording level by speaking a single sentence (see Review the Recording section below)
- Remain motionless while you speak, keeping your hands at your side. Do not touch anything!
- Once you hit the record button in Audacity, do not rush to start speaking. Feel free to take extra time between sentences to breathe - all gaps can be edited in Audacity!
Review the Recording
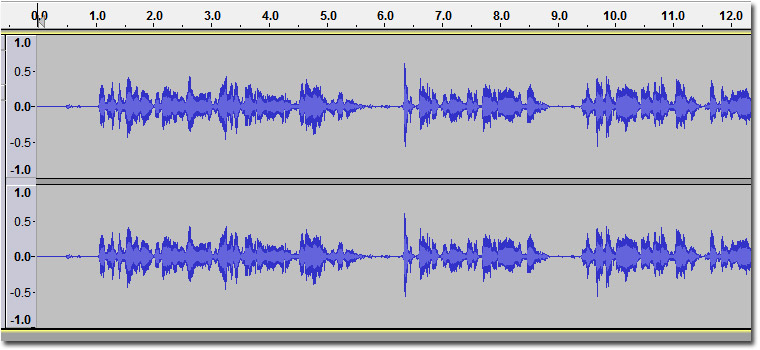
Ideally, the microphone (recording) level should be set in Audacity so the amplitude of the sound wave appears as follows (neither "under-exposed" indicated by a narrow line with low peaks or "over-exposed" with spikes reaching -1.0/1.0). Notice how the sound wave amplitude stays between +.5 and -.5 with a nice pattern of peaks;
While listening to your recording with a set of headphones, if your recording sounds like it has too much bass, or if you hear a "pop" from words that start with a P (such as "potato"), you are too close to the microphone. Conversely, if you cannot get the sound wave amplitude wide enough as shown above regardless of recording level setting and/or if there is noise in the recording when you’re not speaking, you are too far away from the microphone. With the Samson GoMic set to -10db, I found the optimum distance to the microphone to be 8 - 12 inches.
Note - if you are using a non-USB microphone with a 3.5mm jack, you will also need to set the recording level in the Control Panel: Hardware and Sound > Sound/Manage Audio Devices > Recording > double-click the microphone being used to set level.
Editing the File
Like Photoshop, Audacity offers the means to clean up recordings: remove noise, remove unwanted sections, etc. For the purposes of NPN audio slideshow submissions, there is no need to do any editing - just send us your "raw" file and we can take care of the editing here. But if you’re so inclined, you can learn to do the clean up using the tools Audacity provides - this is a good skill set to learn if you plan on producing your own audio slideshows.
Exporting the File
Once you are satisfied with your recording, use File > Export Audio and select the WAV (uncompressed) option for your NPN audio slideshow submission. The uncompressed file will be reviewed here and then saved as a MP3 for use in the audio slideshow.
Conclusion
Learning to create good audio to accompany visual presentations requires only a minimum investment in time and money, and opens many new possibilities for showing and/or promoting your photography.
Jim Erhardt - NPN 1
|
 Jim Erhardt is the founder of the Nature Photographers Network™ and the publisher of Nature Photographers Online Magazine. To this day he remains in awe of the incredible nature photography posted on the NPN website and is humbled to be your host. Jim and his wife Donna will continue to strive to provide the best online experience possible to all nature photography enthusiasts - this is why NPN was created and will always remain it's mission!