(Note: The 3D images included with this article require red/blue 3D glasses in order to see the three-dimensional effect).
The world is three-dimensional. We perceive depth in part because of perspective information we are able to observe. For example, when a known object appears smaller than another known object, we know it is farther away. If one object appears hazier than another, we also know it is farther away. However, the fact that the human visual system has two input sources -- namely two eyes -- the brain is able to construct a composite image that looks truly three-dimensional to us.
When we photograph a scene, we are transforming that three-dimensional world into two dimensions that will be displayed on a flat print. We can maintain some sense of depth by manipulating depth-of-field, but the image still does not match our normal vision when it comes to perceiving the true depth and relationships between foreground and background objects in a scene.
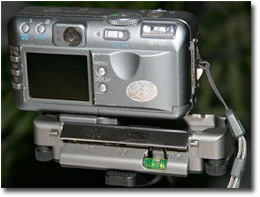
Photo 1
|
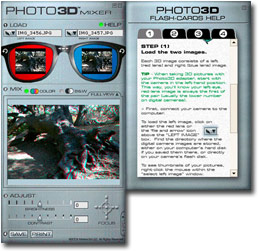
Photo 2
|
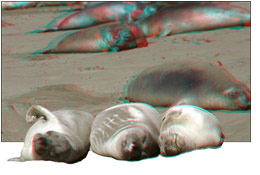
Photo 3 - Copyright Jeff Greene / ImageWest
|

Photo 4 - Copyright Jeff Greene / ImageWest
|
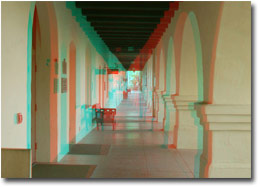
Photo 5 - Copyright Jeff Greene / ImageWest
|
|
For many years, it has been possible to produce three-dimensional (3D) images with stereoscopic cameras and other tricks. Producing 3D images has been possible with digital, but there haven’t been any particularly great tools for assembling 3D images easily. Fortunately, a new product has just been released that has made it fast and easy to produce 3D images from your digital camera.
A 3D image is assembled from two different images, each taken from a slightly different perspective. This allows the final image to be a composite from these two images, in much the same way that what you see is assembled from the scene gathered by two eyes.
Photo 3-D Kit
Mission3-D (www.photo3d.us) recently released their Photo 3-D kit (see Photo 1), which includes all the tools you need to create incredible three-dimensional images with your digital camera. The most important component in the kit (besides the software to put your images together) is the attachment that makes it fast and easy to create the two images needed to create the final 3D image.
This attachment has a plate that screws into a standard tripod mount on your camera, and then that plate slips into the base unit. The base itself, which includes a bubble level to help ensure you are capturing a perfectly level scene, also includes a standard mount that can be screwed onto a tripod where the ball head would otherwise attach. The rubber feet on this base can also be adjusted if you want to set it down on a flat surface, such as a railing or bench. This allows you to fine-tune the angle of the base to get the shot you are looking for. As if all of these options weren’t enough, a small table-top tripod is also included.
The base allows the plate attached to your camera to be slide left or right. The full-left position is for capturing the left image in your 3D composite. For the right image, there are three markings to help you achieve the right distance between shots, based on how close the primary subject matter is from the front of the camera.
Capturing both images is a simple matter of moving the plate to the full-left position in the base, taking a picture, and then sliding the camera to the right to capture the right image. A lever is provided to lock the camera in place after you have positioned it properly.
Photo 3D Mixer
The Photo 3D Mixer software included with the Photo 3-D kit provides the tools needed to assemble your left and right images into a 3D image (see Photo 2). It is incredibly easy to use, and allows you to fine-tune the positioning of the two images to get the best results.
To create a 3D image, all you need to do is click the button to load the left image, locate the image, and click Open. Repeat this for the right image. When you have loaded both a left and right image, you will automatically get a preview of the final 3D image. Put on your red/blue 3D glasses on (which are also included with the kit) and review the results. I recommend clicking the Full View tab so that you can see the 3D image full screen, with a small control panel that allows you to fine-tune the alignment of the images.
It may take you some time to adjust to the 3D image, in which case I would recommend that you concentrate on trying to force your eyes to focus on an object within the image. If you have focused your eyes but the image still doesn’t look quite right, you probably need to adjust the alignment of the two images. The Focus buttons allow you to shift the position of the images. You’ll want to adjust them while wearing the 3D glasses so you can see the effect of your changes. It is sometimes helpful to cause a bad alignment, and then slowly bring the alignment back in the other direction, so that it is more obvious when you have it adjusted properly.
It is usually best to fine-tune the Focus adjustment by observing the most important object in the scene, or the foreground object. Also note that the controls include an option to select a black & white or color image. While you would generally prefer a color image, a black & white image can be a good choice in many situations, because the red and blue colors fringing can detract from the color, and since you’re viewing the image through colored glasses you really aren’t going to see full color anyway.
Compositional Considerations
While assembling 3D images with the new Photo 3-D kit is incredibly easy, creating an excellent 3D composition is not. Fortunately, my good friend and associate Jeff Greene, who operates a wedding and commercial photography business called ImageWest (www.imagewestphoto.com), is an excellent photographer who has played around with 3D imaging for many years. He was able to offer some excellent tips for producing the best 3D photos (see Photos 3, 4 and 5).
Jeff credits the time he has spent producing 3D images as one of the things that has made him a better photographer. That is because it forced him to consider foreground, middle-ground, and background portions of the scene. The best 3D images include distinct objects in the foreground and background, and preferably in the middle-ground as well, to produce the strongest effect and best composition.
3D Images the Fast and Easy Way
Granted, producing 3D images is certainly a niche hobby, and doesn’t have much commercial viability. However, it can be a great deal of fun. The new Photo 3-D kit from Mission3-D provides a great set of tools that make it easy to create 3D images quickly. After opening the box and installing the software, I had my first 3D image photographed and assembled in just a few minutes. If you’re interested in producing some unique images with great depth, the Photo 3-D kit ($129) is an excellent solution that I highly recommend.
Tim Grey - NPN 019
Comments on NPN digital photography articles? Send them to the editor.
 About Tim Grey...
Tim Grey enjoys sharing information about digital imaging as much as he enjoys learning it in the first place. Tim publishes an almost-daily question and answer e-mail service called Digital Darkroom Questions (DDQ). The DDQ e-mail service (www.timgrey.com/ddq/) provides a forum for photographers to have their questions related to the digital darkroom answered. He is editor of The Digital Image, a quarterly journal published by George Lepp. He also teaches courses to help photographers master the digital darkroom at the Lepp Institute of Digital Imaging. Tim can be contacted at tim@timgrey.com.

