Creating Photo Galleries
Copyright Jan Allinder. All rights reserved.
The main reason any nature photographer has a web site is to display his or her images. The best way to do that is with a photo gallery. The easiest and “cleanest” way to implement a photo gallery on your web site is through the use of tables.
Tables can be a web designer’s best friend when it comes to a photo gallery. By placing small “thumbnail” sized representations of your larger images into the cells of a table, you can control the arrangement of your images on your web page. On the programming side of things, there are several key things you need to do within your web pages to make sure your web site is not only browser friendly, but search engine friendly as well. Whether you use Dreamweaver, FrontPage, GoLive or a text editor, there are several important things you need to remember when working with images.
- Never rely on the browser to resize images for you. Always use your image editing program or thumbnail program to create the smaller “thumbnail” images for each larger images in you plan to display in your gallery.
- When naming your thumbnails, use a suffix like “_tn”. I also find placing the thumbnails in a sub-directory off the images directory simplifies image management. image1_tn.jpg
- Use the image ALT, WIDTH & HEIGHT tags - <img src="images/thumbs/photo1_tn.jpg" ALT="Descriptive title of photo © Jan A. Allinder" WIDTH="60" HEIGHT="150">
- Make sure you place an “index.html” file in your images directories. This page should contain your copyright & contact information. Otherwise, if someone goes to your images directory and you have nothing but images there – they will get a directory listing of your images. Note: If your web host offers cPanel, Ensim or Plesk, you can turn off indexing in your image directories.
Separate Image Directories
If you plan to have more than one gallery, be sure to place the images for each gallery in separate sub-directories off of your main image directory. You’ll find separate image directories to be a real time-saver.
Setting Up the Table
For the vast majority of nature photo galleries I design, I use center-aligned tables set to 760 pixels in width. This is based on the knowledge that many people still use monitors with a resolution of 800x600 and most photographers do not want to upload images any larger than 800 pixels on the Internet.
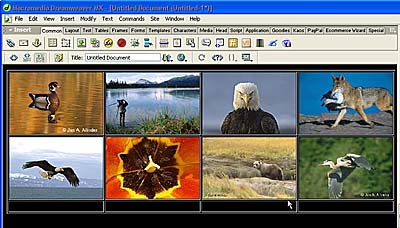 Once the table is set up, I select all of the cells and set the vertical alignment to “Middle” and horizontal alignment to “Center”. Depending upon the web site, and the design, I use cellpadding to control the spacing and the look of the thumbnails within the table. Note: I use Cascading Style Sheets to control things like background color, fonts, cellpadding, and image borders. It is much easier to edit settings for an entire site this way.
Adding the Images
I have found the easiest way to add images to the table is to open up the thumbnail image directory of the gallery and insert the images one at a time; from the first through the last. Not until I’ve added all of the images do I begin to arrange the images the way I want them. That way, I won’t leave out any images.
The placement of your thumbnail images on your web page is just as important as the placement of the image in your viewfinder. For instance, you wouldn’t want to place a bird flying from left to right on the right side of the table. That image should be on the left side “flying into” the table.
Linking to Larger Images
There are a couple of different ways to link to the larger image when you click on the thumbnail image. One is to open up a new web page that allows you to navigate from image to image and back again to the thumbnail. If you only have a few
 images in your gallery, it’s really easy to create several pages and reference the “Previous Image”, “Next Image” and Return to Gallery”. This is exactly what I did when I created Moose Peterson’s Gallery.
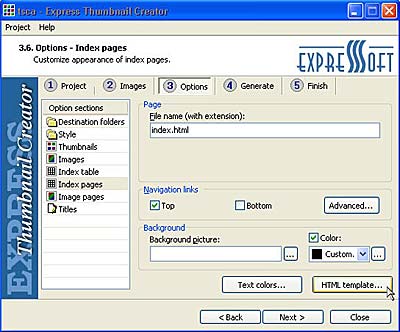
However, if you have several galleries and several images, you might find it easier to use a program like Express Thumbnail Creator. With a little work, you can customize the HTML template for both the thumbnail page and the individual image pages so they match the rest of your site. I used Express Thumbnail to develop the Excell Nature Photography galleries. Open up the HTML template within Express Thumbnail Creator and copy and paste portions of your HTML code from your existing web page. If you’re using style sheets, be sure to insert your style sheet into the template as well. It might take a little trial and error, but it certainly can save you a lot of time if you have numerous images.
Another option is to use JavaScript and bring up each image in a pop-up window. If you use Macromedia Dreamweaver, there is a free behavior called Just-So Picture Window that creates a pop-up window for you. What I really like about this particular JavaScript is the window automatically closes with any mouse click on the pop-up window. This discourages image theft. Note – It does not actually prevent image theft. The image is still in the browser cache and there are other ways to access the image. To see this method in action, visit NatureLight Photography.
Note: Do not link directly to the image itself. The image should always be contained within a web page or script.
Remember, the way you present your images in your gallery is every bit as important as your images. The look and feel and navigation should be consistent throughout your web site. Take your time and do it right. Web design is not that different from nature photography as it also requires patience and perseverance.
Jan Allinder - NPN 015
Lucid Images Wildlife Photography
Comments on NPN photo gallery articles? Send them to the editor.
Jan Allinder is not only an avid nature photographer, but a talented webmaster as well. A member of the HTML Writers Guild, Jan thoroughly enjoys designing and creating web pages, including those for Moose Peterson, and Jerry and Barbara Jividen. Jan has been working with
computers for over ten years, and believes that the Internet is a fantastic place to learn, meet new
people and have a good time. Her primary goal when designing any web site is to help educate the public. Jan's e-book, A Photographer's Guide to Web Site Design is a resource of useful information for any nature photographer with an interest in building their own web site.
To view Jan's work, be sure to pay her Lucid Images Wildlife Photography web site a visit!


| 
