Understanding Resolution
Copyright Tim Grey
All rights reserved.
If you’ve been confused by the issue of resolution in digital imaging, you’re not alone. It can be a confusing topic, and it seems that manufacturers and software makers are conspiring to keep you confused. It all comes down to pixels, the individual points of a particular color that combine to form a complete photographic image. To understand resolution, we need to understand how those pixels are used, and how information about them is presented. So, let’s cut through the hype and confusion and gain a better understanding of resolution.
Count versus Density
One of the immediate sources of confusion related to resolution is that it refers to two different aspects of an image: the number of pixels in the image versus the density of those pixels. While both are related to some degree, there are important differences.
The pixel count tells us how many pixels are in a given digital image file. That count gives us an idea of the potential output size, but it doesn’t give us any information about the quality of the image.
Pixel density, on the other hand, tells us something about the quality of the image. It tells us how closely the dots are all packed together, which is directly related to the amount of detail in the final image. However, density alone doesn’t provide any information about the total output size of the image.
When we combine pixel count with pixel density, we can get a better idea of the overall quality and dimensions of a particular image file. Then we just need to understand how the various descriptions of resolution are used, what they mean to photographers, and how to ensure we are getting the best results from our digital images.
Digital Capture
Digital cameras are an example where resolution is provided as a pixel count rather than pixel density. Resolution is described in megapixels, with each equaling one million pixels.
With megapixel resolution, you are being told how many pixels your digital camera can “see”, but you aren’t being told how clear its vision is. You can get an idea of how big a print you can make, but you really can’t make a judgment on image quality based on the camera’s resolution number alone.
Translating the megapixel count into potential print size can be a bit tricky. For many photographers it might make sense to provide, along with the megapixel number, an indication of what the comparable scan resolution would be. I don’t think too many digital photographers realize that a six megapixel digital capture is the equivalent in terms of pixel count to a 35mm slide scanned at about a 2000 dpi film scan. However, this isn’t a fair comparison. Digital images can be interpolated to a much higher degree than film scans, and film scans do lose some quality in the scanning process.
So, trying to use existing benchmarks to determine output size proves to be very challenging. Instead, I find it helpful to use a rule of thumb with each megapixel size available. For example, I consider three megapixel digital SLR cameras capable of output of excellent quality up to about 11”x17”. For the six megapixel cameras you can essentially match the quality of film up to about 16”x24”, with very good prints up to 20”x30” or larger possible.
Of course, we’re talking here about pixel count versus pixel density. Just because you have a three megapixel sensor doesn’t mean you can produce excellent 11”x17” prints. Especially for the “point-and-shoot” digital cameras, there are a variety of factors beyond resolution that affect image quality. Sensor quality, pixel size, lens quality, in-camera processing and other factors have a big influence on final image quality. Remember, the megapixel resolution value tells you about potential output size, not image quality. You’ll need to test that for yourself (or take someone’s word for it) to determine if a particular camera can provide the quality you need.
Scanning
For photographers who are either still capturing images on film, or who have file drawers full of slides, a film scanner provides a bridge to the digital world. Unfortunately, film scanning offers its own sources of confusion related to resolution. Scanning straddles the fence of pixel count versus pixel density. A scanner operates at a particular pixel density (scan resolution) to produce a file with a particular pixel count (pixel dimensions).
Most of the confusion over film scanning tends to come from the options provided in the scanner software. I generally recommend that all film scans be done at the highest optical resolution supported by the scanner. This provides a simple solution to the confusion over scan resolution, and also ensures that the digital image you perfect can be printed as large as possible later.
To set the scanner software to the highest resolution, set the resolution to the maximum optical resolution supported by the scanner, and set the scale to 100%. Output resolution and size will be set later in your image-editing software.
Preparing to Print
So, you’ve brought an image into the computer via film scan or digital capture, optimized it to perfection, and now you’re ready to print. This is where resolution really starts to become a problem for many photographers.
It seems to be a common misconception that resolution that describes pixel density is permanent. It isn’t. Think of pixels as individual units that can be squeezed close together or spread far apart, depending on your needs. When you are working on an image file in the computer, you are working with the pixels, and it doesn’t make any difference what the output resolution is. Pixels are pixels.
When it comes time to print, you need to specify how closely you want the pixels packed together. There are, of course, standards for this. For most photo inkjet printers, the optimal quality will be achieved by using a file set to 360 dpi output quality. The normal standard is 300 dpi, and you can still get very good results even down to 240 dpi.
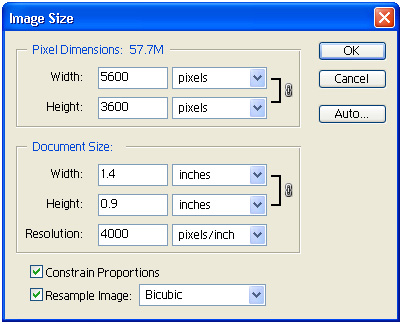
To set output resolution in Photoshop, I recommend a two-step approach. To access the image size option, select Image > Image Size from the menu. The first step is to uncheck the Resample checkbox and set the document resolution to the desired setting. I recommend 360 dpi for the best quality. By setting the output resolution with the resample option disabled, the output size will automatically change to show you the largest possible output size at the resolution you’ve set, without any interpolation.
The second step is to set the actual output size you want. You may have a 4000 dpi scan of a 35mm slide that will allow you to produce about an 11”x14” print without interpolation. If you only want a print to fit on an 8.5”x11” sheet, you’ll need to reduce the size of the image, throwing away pixels. To do this, simply check the Resample checkbox again, and set the desired height or width. Be sure the Constrain Proportions checkbox is checked so that the image won’t be distorted. Then, when you adjust either the height or width, the other will be adjusted automatically to fit.
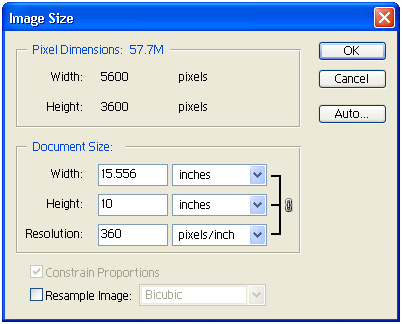
Once you have the document resolution and output size, simply click OK and the image will be resampled. Keep in mind that if you changed the size of the image, pixels will be added or removed by Photoshop. While this can be done to a reasonably large degree without losing too much quality, the quality will suffer to at least some degree. For that reason, I strongly recommend that you save the original image before resizing it. If you want to save the resized image, select File > Save As, and save it as a separate file.
Resolution Requirements
Printer manufacturers seem intent on confusing you for the sole purpose of trying to convince you that their printer is the best choice. They tout very high resolution numbers such as 2880 dpi or even 5760 dpi in an effort to convince you that their printer produces the highest quality output. This confuses many photographers who have learned that output is generally done at 300 dpi.
It is important to understand that when we talk about resolution in a photo inkjet printer we are talking about different dots. The image will produce the optimal output when set to 360 dpi. These dots are the pixels in the image itself. The “other” dots are the tiny droplets of ink that the printer lays down to produce the image. It takes more than one droplet of ink to produce each pixel of your image. The smaller those dots, the better the color fidelity and quality of the final print – in theory.
Based on repeated testing under a variety of situations, I have come to the conclusion that there is no benefit to printing on a photo inkjet printer at an output quality setting higher than 1440 dpi. While there are many features that determine which printer is right for you, I would take any claims of resolution over 1440 dpi for any printer with the proverbial grain of salt.
The answer is to size your image file to 360 dpi for optimal output quality, and then set the quality setting of your printer to 1440 dpi. Lower values will likely result in banding, and higher values won’t provide any visible improvement in quality.
Understanding the Dots
Understanding resolution is a matter of realizing that each digital image file is comprised of a set number of dots. Understanding how those dots are spread out at the time of creation and final output makes the concept of resolution easier to understand, and easier to use to your advantage.
Tim Grey - NPN 019
Comments on NPN digital photography articles? Send them to the editor.
 About Tim Grey...
Tim enjoys sharing information about digital imaging as much as he enjoys learning it in the first place. Tim publishes an almost-daily Digital Darkroom Questions (DDQ) e-mail service that provides a forum for photographers to have their questions related to the digital darkroom answered. He is editor of The Digital Image, a quarterly journal published by George Lepp. He also teaches courses to help photographers master the digital darkroom at the Lepp Institute of Digital Imaging.
Tim can be contacted at tim@timgrey.com.


|