Image Output for the Web
Text and Photography Copyright Matt Hagadorn
All rights reserved.
While most of the discussion on digital imaging centers around scanning, correcting and printing, preparing images for display on the Web presents its own unique challenges. Accurate color reproduction is nearly impossible, while JPEG compression conspires to turn areas of important detail into pixilated blobs. Itĺs not as bad as it sounds, though, and with some simple guidelines youĺll be able to produce the best possible images for Web display.
After Iĺve scanned (or captured) and color corrected an image, my normal workflow for preparing images for the Web can be summed up as follows:
- Convert to sRGB
- Resize
- Sharpen
- Save as JPEG
Iĺll go into each step in more detail below.
Convert to sRGB
Did you ever wonder why images that look perfect in Photoshop appear much less saturated when viewed in a web browser? If youĺre using Adobe RGB, Ekta Space, ProPhoto RGB or one of the other large-gamut working spaces the reason is simple; the majority of Web browsers do not implement color management (the exception is Internet Explorer on the Mac). They display images directly to the screen without any adjustment for the imageĺs color space or your monitor. Since your monitorĺs color gamut is smaller than these color spaces, image colors will get compressed to fit within the gamut of your monitor, causing them to appear less saturated (see Figure 1 below).
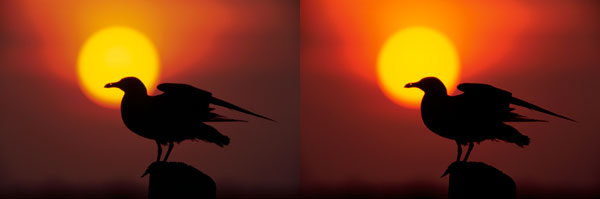 Figure 1: The image on the left was saved in Adobe RGB. The image on the right was converted to sRGB before saving. The colors on the left are being compressed to fit within your monitorĺs gamut, producing a desaturated image.
|
Until more browsers support ICM or ColorSync, there is a way to achieve reasonable color fidelity on the Web. The trick is to convert your images to sRGB before saving them as JPEGs. The sRGB color space was developed by Microsoft and Hewlett Packard to represent the color gamut of an average PC monitor. No oneĺs monitor truly matches sRGB, but the vast majority of displays are close enough.
Before preparing an image for the Web, I always make a duplicate (Image > Duplicate) and then close the master image so that I donĺt accidentally save over it. To convert an image to sRGB in Photoshop, select Image > Mode > Convert to Profile (see Figure 2). Your imageĺs current color space will be displayed as the Source Space. Under Destination Space, select sRGB in the drop-down box. Under Conversion Options, Adobe (ACE) should be selected as the default color engine. The Intent you choose doesnĺt matter because conversions between working spaces are always done with the Relative Colorimetric intent. Use Black Point Compensation and Use Dither options should also be checked. Click OK and your image will be converted from the original color space to sRGB.
Sizing
The next step is to size the image for the Web. Sizing images for different output mediums can be one of the more confusing aspects of digital imaging. People new to scanning or printing see numbers like 4,000 DPI, 1,440 DPI , 240 DPI and 72 DPI and wonder what they all mean. For images on the Web these numbers donĺt matter, except when adding text.
DPI, or dots per inch, simply tells a printer how large an imageĺs physical dimensions should be. For example, a 240 DPI image that is 3,000 pixels wide by 2,000 pixels high will print 12.5 by 8.3 inches on paper (3,000 / 240 = 12.5). You can make the image smaller or larger simply by increasing or decreasing the DPI. For example, doubling it to 480 DPI will result in a print that is half the size. You havenĺt done anything to change the number of pixels in the image or its size on disk. This is called scaling the image.
Web browsers, on the other hand, measure image size only by the number of pixels. When an image is loaded in a browser, DPI has no meaning. There is a one-to-one correlation between a pixel (or dot) in the image and a pixel on screen. The physical size in inches depends on the size and resolution of the viewerĺs monitor. A 600x400 pixel image will display larger on a 17ö monitor set to 800x600 than one that is set to 1024x768.
The one instance when DPI matters is when placing text -- such as your name and copyright -- within your image. Photoshop will display the font size based on DPI. So if you want your font sizes to appear in Photoshop as they do in your word processor or browser, scale the image to 72 DPI before adding text. This way, selecting a 12 point font wonĺt produce microscopic letters.
To resize your image and scale it to 72 DPI at the same time, select Image > Image Size. The Image Size dialog will appear (see Figure 3). Make sure Resample Image is checked, then enter 72 in the Resolution box (itĺs important to enter the resolution before the pixel dimensions). You will see your pixel dimensions change at the same time, but thatĺs okay. Next enter the new dimension for width or height under Pixel Dimensions. This will change the actual number of pixels in the image. Click OK and your image will be resampled smaller.
Sharpening
The final step before saving the image is sharpening with the Unsharp Mask filter, or USM. USM can be difficult to learn. However, with small images typically used on the Web itĺs relatively easy. This is the one instance in which a single set of parameters will work well almost all the time. This is because the noise present in scans or high-ISO digital images is what makes sharpening difficult, and most of that noise is averaged out when a large image is resampled smaller for the Web.
Before using the USM filter, make sure your image is zoomed to 100%. Select the Zoom tool (Z), then right-click the image and select Actual Pixels. Next, select Filter > Sharpen > Unsharp Mask. The USM dialog will appear, with a small preview box showing a section of your image and three sliders. Enter the following values:
- Amount: 150%
- Radius: .4
- Threshold: 1
The numbers above should be used as a guideline, not a rule, but they will work well for most images 400 to 600 pixels in length. If necessary, vary the Amount setting depending on the image and your tastes.
Saving as a JPEG
The JPEG file format is the undisputed king for saving photographic images for use on the Web. JPEG can reduce a file size by as much as 10:1 or more without visual loss. We say visual loss because the JPEG format is lossy, meaning it gets rid of image detail in order to produce a smaller file size.
JPEG compression works on the premise that the human eye is less sensitive to changes in color than changes in brightness (luminosity). The compression algorithm splits an imageĺs color and brightness information into separate channels, then works on each in 8x8 pixel blocks. JPEG works very well for smooth color transitions but it stumbles on areas of sharp color contrast, producing visible defects known as artifacts. The trick is to use a high enough quality setting so that the artifacts are not visible, but low enough to produce a reasonable file size for downloading over a modem.
Photoshop offers two methods for saving JPEG images. The first is through the standard File > Save (or Save Asů) dialog. Simply select JPEG in the Format drop-down box, type in a file name, and click Save. Next youĺll be presented with the JPEG Options dialog (Figure 4), where you can select the amount of compression and see the resulting file size and estimated download time. Check the Preview box to see the effects of compression on your image as you drag the Quality slider to the desired setting. A higher setting produces less artifacts but larger file sizes. For typical images on the web, itĺs not likely youĺll be able to see the difference between a setting of 5 or 6 and 8 or higher, so opt for the smaller setting. Under the Format options, select Baseline Optimized (this uses a slightly more efficient encoding method than ôStandardö but might not be compatible with old browsers). Finally, click OK to save your image.
Extreme JPEG
The second method for saving JPEGs in Photoshop is the Save for Web command (File > Save for Webů). You may have thought that Save for Web was just a fancy version of the Save As command, but thereĺs a bit more to it. For starters, Save for Web does a better job of compression, even at the same relative quality setting (Save for Web uses a scale of 0-100% whereas Save As uses 0-12). For example, Figure 5a was saved with the Save As command at a quality setting of 6 (equivalent to 50%) resulting in a file size of 26K. Figure 5b was saved with Save for Web at a setting of 50% producing a file size of only 14K. There is no perceptible difference between the two images.
Save for Web also allows you to perform weighted optimizations by using an alpha channel to vary the compression amounts in an image. (Itĺs not as difficult as it sounds.) First, make a rough selection using the Lasso (L) or Quick Mask (Q) around the areas of your image containing important detail. The selection should not be exact (see Figure 6a). Next, save the selection to an alpha channel by selecting Select > Save Selection. The Save Selection dialog appears (Figure 6b). Choose New in the Channel box and type a name for the channel in the Name box (I called it ôJPEG Maskö, but it can be anything). Click OK and the selection will be saved as an alpha channel. You can remove the active selection by pressing Ctrl-D.
Now open Save for Web (File > Save for Web). Select the 2-Up view in the upper left to compare your original document in the left pane to the JPEG preview on the right. Under the Settings box in the upper right, select JPEG High and click the mask button next to the Quality box (see Figure 6c). The Modify Quality Setting dialog now appears (Figure 6d). In the Channel drop-down box, select the name of the channel mask you created previously. Under Quality, slide the white slider to 70 and the black slider to 40 and click OK. This means that the masked area will have a quality of 70% and the rest of the image will be 40%. Click Save to name your new image and save it to disk. The final image is seen in Figure 7.
Although itĺs a neat trick, weighted optimization can be a lot of work for a little gain. In my tests with typical photos at 400 to 600 pixels in length, I was only able to save a few Kbytes. In some cases I managed to increase the file size over standard optimization. It seems to work best with higher quality settings and, of course, varies from image to image. Whether or not the extra effort is worth a few saved bytes is up to you.
Note - Illustrations open as separate windows. To view all illustrations on a single page in a printable format (PDF file), click here.
MH-NPN 112
Comments on NPN digital photography articles? Send them to the editor.


| 
