|
|
|
Introduction
|
It took a few moments for me to remember what I was waiting for as the sound of the Border Patrol truck faded. With camera gear in tow I stood facing east in the evening light, looking towards a set of limestone cliffs a few miles from the Mexican border in Arizona’s Parijita Mountains. The edge of the moon, as it began to rise on the horizon, quickly reminded me why I was there: I was “field testing” The Photographer’s Ephemeris - and I only had a short time to get the shot.
The Photographer’s Ephemeris, or TPE for short, is a software application that allows you to plot, plan, and previsualize the variables of both the sun and moon for a given location at a specific point in time. Available in both desktop (free) and tablet/smartphone (paid) versions, TPE runs on Windows, MAC/iOS, and Android platforms.
It helps to have a general composition in mind before you begin using TPE. Have you identified a particular mountain range that would be enhanced by a crescent moon? A lone tree which would look great with a rising sun rising behind it? These are examples of previsualization, a concept described by Ansel Adams as "the ability to anticipate a finished image before making the exposure."
Where do you want to go today?
I’m going to share how I recently used TPE to plan a moonrise photography shoot in the aforementioned Parijita Mountains. For the purposes of this article, I'll be covering TPE for the iPad.
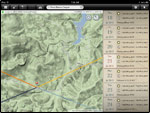
To start, I opened up TPE and searched for "Pena Blanca Canyon." Although close by, the location TPE chose for me was not exactly where I wanted to be so I had to relocate the pin from my initial location. Using the iPad’s pinch gestures, I zoomed out and then dropped the primary (red) pin to my desired spot, a dirt road directly across from the cliffs.
Since I was already using the iPad in landscape orientation, I scrolled thru the coming days to determine when the next full moon occurred, which was July 22nd (see Figure I). However, instead of concentrating on July 22nd, I actually choose the day before - the reasoning being that the day prior to a full moon gives you roughly one hour of a rising moon before the sun sets.
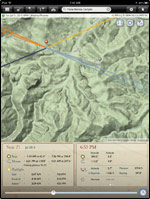
Since I had narrowed down my date to July 21st, I wanted more detailed information. A turn of the iPad to a portrait orientation gave me what I was looking for: instead of having 7 days of information on the right, I now had expanded details for one day at the bottom of the screen. I also had a slider below the 2 panels, allowing me to view the changing horizon lines (sunset, sunrise, moonset, and moonrise) over a 24-hour period. Tapping the '24' button will change it to '1' giving you data for a 1 hour period and more precision with the horizon lines.
Another thing you’ll notice when in portrait orientation is the addition of a second, grey pin. Called the Geodetics function, this powerful tool provides you with data on the relationship between the primary (red) and secondary (grey) pins in terms of altitude, distance, elevation, bearing, and horizon – and how they affect your shot. You can also swap the two pins, by tapping the geodetics button. Now, instead of imagining a shot with the moonrise above the cliffs, you can see how the light will appear as if you were standing on the cliffs, looking back towards the dirt road - light from sunset will be seen in the northwest; sunrise will be to the northeast; moonset to the southwest.
In my instance, I could see that on the 21st the moon would be rising at 6:31 pm and that sunset was at 7:26 pm, giving me roughly one hour of the moon in the sky before it turned dark. However, just because the moon was rising at 6:31pm did not mean that it would actually be visible from where I was standing. Take a look at Figure 2, specifically the altitude information: you can see that the moon’s altitude is 4.0 and the geodetics altitude is 3.7. What this means is that the moon has risen far enough in the sky above our secondary pin so that we can see it – and photograph it. Much earlier, say 6:45, the moon’s altitude would have been lower, and not visible. TPE recognizes this by displaying a dashed line – once the line goes solid, it means we can view the moon.
Location, Location, Location
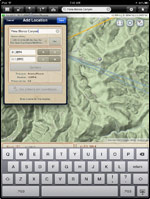
Since I was happy with the TPE information for my upcoming photo shoot it was time to store it for later. The 3rd icon across the top menu bar from left to right is the locations button. By default, TPE will use your current pin’s data; it also supports entering GPS coordinates to create an entirely new location.
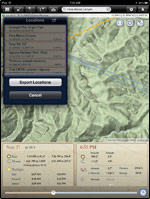
After you’ve saved a location you have the option to export this data and import it on another device where you run TPE – iPhone, desktop, etc. As long as you have email configured on your iPad, TPE automatically generates a message with your locations as an attached .kml file. Simply re-import the .kml file on your other device. Added bonus: integration with Google Earth is possible (.kml files are used by Google Earth).
The Result
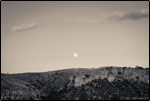
Here’s a picture from my July 21st adventure with TPE. I processed the image in Adobe in LR 5 using a split-tone effect. In my opinion, TPE is an invaluable tool for landscape photographers and well worth the $8.99. I’m looking forward to using it again soon!
For more information on TPE visit http://photoephemeris.com.
|
 Fred Weymouth recently moved to Tucson, Arizona after living in Maine for 15 years. He works as a Systems Engineer and Information Technology Consultant while pursuing his passion for travel, photography, and writing in his free time. For more information visit his website www.FredWeymouth.com.