Multiple Exposure with Digital
Copyright Tim Grey - All rights reserved.
Taking pictures never seems to lose its appeal, but every now and then you need to change things up a bit. I don’t mean find a hobby other than photography, but rather finding a new way to express your creativity through photography. Many photographers have used multiple exposure techniques to provide just that creative twist to their images. Did you know you can create multiple exposure images with digital capture?
Of course, most of the digital cameras out there don’t offer the ability to capture multiple exposure images. The only digital SLR cameras I know of that include this feature are the Fujifilm FinePix S1 Pro and S2 Pro. Fortunately, you don’t need to have one of these cameras to produce multiple exposures. By adjusting your exposures and using a simple trick in Photoshop, you can create incredible multiple exposure images with any digital camera.
Exposure Compensation
The first step in creating multiple exposure images is to capture multiple images with appropriate exposure compensation. The actual formula for calculating the exposure compensation is straightforward, but not simple to explain. Instead, I’ll provide you with compensation factors for multiple exposure images comprised of varying numbers of individual images.
Use the chart below to determine the number of stops to under expose each image by to achieve proper multiple exposure images. If you are capturing the number of exposures indicated in the left column, under expose each image by the number of stops indicated in the right column.
| Number of Exposures |
Compensation in Stops |
| 2 |
1 |
| 3 |
1.6 |
| 4 |
2 |
| 5 |
2.3 |
| 6 |
2.6 |
| 7 |
2.8 |
| 8 |
3 |
For the numbers that are fractional they are rounded to the nearest tenth. Cameras do not offer this precision in metering, so you may need to bracket your exposures to get the best results when the exposure compensation is not a round number.
Keep in mind that you don’t actually have to keep every exposure in a series of multiple exposure images at the same compensation. If you want a particular frame to have more emphasis, you can adjust the compensation accordingly. One way to think about this is to treat the exposure compensation as cumulative.
For example, if you are creating a multiple exposure image with two exposures, each should be under exposed by one stop (as outlined in the next section). You can think of this instead as a total of two stops of under exposure, even though that isn’t exactly accurate as far as what is happening with the exposures. So, if you want one to have more weight than the other, you can adjust your exposure compensation so that the total amount of under exposure used equals two stops in this example. You might, for instance, have one of the exposures set to a half stop of under exposure and the other set to 1.5 stops of under exposure.
Photoshop Technique
Once you have your images captured, you are ready to put them together in Photoshop. To begin, open all of the captures that represent the multiple exposures for a single composite image. Do not adjust the images at this stage or the exposure compensation will not remain accurate.

Image 1 |

Image 2 |

Image 3 |

Final Image |
Arrange the image windows so that you can see all of them. If you have too many exposures to make that possible, you can have most of them overlapping but you want to have one always visible. This one image will be the destination for all of the other images, so that they can be combined into a single image.
Repeat this process for each of the exposures you have captured. The result should be a single document that contains a separate layer for each of the frames of your multiple exposure. Note that it is not important to have the individual exposure layers in any particular order.
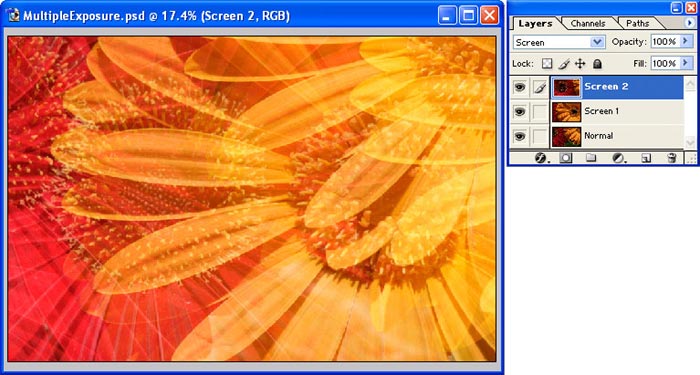
With the images arranged in multiple layers, change the blending mode for all but the bottom-most image in the Layers palette. The blending mode options are in a dropdown list at the top of the Layers palette, with the default value being “Normal”. Select each layer one at a time, except for the bottom-most layer, and set the blending mode to Screen.
The Screen blending mode causes Photoshop to blend each image with the one below it, calculating the inverse product of each pixel value. This complicated math results in a lighter pixel, although pure black and white will retain their values. The result very closely matches what would be obtained by capturing a multiple exposure image with film, or with a digital SLR that supports multiple exposures in the camera.
Experiment to Perfection
Photoshop allows you to create multiple exposure images that would otherwise not be possible with most digital cameras. The basic process is relatively straightforward, but the options are limitless. To get the best results, you’ll want to experiment with different subjects, different exposure compensation values, and possibly even fine-tuning the opacity of some of your layers in Photoshop to get the desired final result. Above all, experiment with this technique, and you can create some incredible images unlike any you have ever captured.
Tim Grey - NPN 019
Comments on NPN digital photography articles? Send them to the editor.
 About Tim Grey...
Tim enjoys sharing information about digital imaging as much as he enjoys learning it in the first place. Tim publishes an almost-daily Digital Darkroom Questions (DDQ) e-mail service that provides a forum for photographers to have their questions related to the digital darkroom answered. He is editor of The Digital Image, a quarterly journal published by George Lepp. He also teaches courses to help photographers master the digital darkroom at the Lepp Institute of Digital Imaging.
Tim can be contacted at tim@timgrey.com.


| 
