|
|
 Learning to Photograph the Landscape - Part I
Text and photography Copyright Guy Tal
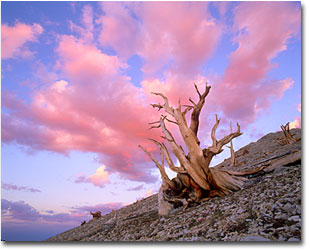
Ask most people who, in their opinion, is the greatest nature photographer in history and most will name Ansel Adams. Adams did not photograph wildlife, and very few of his images can be considered "macro". He never took a camera underwater or sat in a hide. He did not, in fact, practice most types of photography we associate with nature. Why then has his work made such a profound impression? Adams' greatness comes not from images relying on technique or subject, but rather on vision, on being able to portray a scene, to arrange its elements, and to present it in a way that evokes an emotional response and allows the viewer to experience not only a beautiful place, but also the awe-inspiring grandeur of Nature. To achieve such an effect, it is not enough to have an interesting subject, or to maintain sharp focus, or to calculate the perfect exposure - one must also be able to see a composition within a scene, to visualize it, as it would appear in the final print. One must be able to convey his or her own inspiration to the viewer. That is the essence of landscape photography - learning to see, training the eye to recognize elements in a scene that can combine to produce an emotional reaction, and then capturing your own vision in a photograph. In this article I will focus my discussion on seeing and visualizing, rather than technique and gear. I believe these are much more crucial to a successful landscape image. Elements and Attributes - the Anatomy of a Scene The more you look around at things, the more you see. The more you photograph, the more you realize what can be photographed and what can't be photographed. -Eliot Porter
Attributes are qualities of each element that will affect the element's prominence in the image. Let us examine some of these attributes:
Putting it All Together The best pictures differentiate themselves by nuances...a tiny relationship - either a harmony or a disharmony - that creates a picture. -Ernst Haas
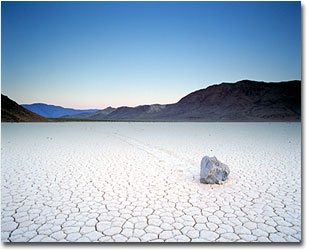
First let's inventory our elements:
Working with elements and attributes When I came upon this scene, what grabbed my eye first and inspired me most was the pattern in the water, caused by a strong wind, then the shape of the island in the distance. Note how I arranged my elements - the curvature in the snow is used to lead the viewer towards the water line to a point where the island and patterns on the water come together. The other elements in the scene are secondary and used to enhance the effect – thetexture and size of the foreground rocks help define the curvature of the snow. The tones in the sky and clouds help separate the island from the lake and draw attention to its brightness. Why Black and White? My last decision for the above image was regarding color - this scene was made of very muted colors. In fact some of them I found distracting - the dead flora was yellowish, the foreground rocks had varying degrees of color that would have drawn attention to them. I decided to eliminate these distractions by using black and white film. There is no hard and fast rule when to use color vs. black and white. The trick is to be able to visualize a scene in black and white before making the final selection (by final selection I don't mean one cannot take the same image in both types of film, but the one that will work better as a print). If you notice in my analysis of the image above, I was drawn to patterns, shapes, curvature, etc. Color is not what attracted me to the scene. But, obviously, I was initially seeing the scene in color. The trick to "seeing" in black and white is to recognize tones, or densities, of colors in a scene. Similar tones will be rendered the same regardless of the actual color. This can be used to eliminate distractions caused by the combination of different colors or by colors that are unattractive to the eye (as was the case with this scene). Another important fact, albeit of a technical nature, to keep in mind is that black and white film has a much wider latitude than color film, thus allowing a much wider range of tones to be captured. In scenes where such subtleties are important, black and white will often produce more impressive images. Planning and Preparation Chance favors the prepared mind. - Louis Pasteur
Very rarely can we predict a scene with any kind of certainty, but the more we know about an area, the greater the chances we'll be able to portray it at a decisive moment. Several things can improve your odds of success:
While there's no denying that some amazing images are the result of pure chance, the only way to ensure consistently good results is to take the time, prepare, and plan. Visit the same area a number of times, at different times of the day, possibly even at different seasons. The better you know it, the more successful you will be. Don't be afraid to leave empty handed if things don't look quite right. Try again another time. Beyond the Scene - You Cannot Capture What You Do Not Have I see magic in the quiet light of dusk. I feel quiet, yet intense energy in the natural elements of our habitat. A sense of magic prevails, a sense of mystery. It is a time for contemplation, for listening - a time for making photographs. -John Sexton
Landscape photography is an art - think like an artist, not like a photographer. Make your goal the expression of yourself, rather than the capturing of a scene. Bring yourself to the same point a painter or a poet would - be excited, moved, inspired, then proceed to use photography as a means of expression. Put your own interpretation, your own decisions, and your own feelings, into each image. Do not rely on subject or technique alone. Those are important skills, but much like in writing - knowing the language and how to use a keyboard are not sufficient to produce a great novel or a poem. Much like painting - knowing how to mount a canvas and work with paint and brushes is not enough to create a masterpiece. Editor's Note - Guy Tal resides in Salt Lake City, Utah with his wife Sarah. They produce and sell fine art photographic images of nature. Visit their web site at www.spyra.com. Guy Tal - NPN 440 Comments on NPN landscape photography articles? Send them to the editor. |
 Landscape photography is the supreme test of the photographer - and often the supreme disappointment. -Ansel Adams
 Elements are all the things that make up a scene. Elements can be objects, lines, people, and wildlife. Learning to see these elements is the first step to creating a good landscape image. Once you make a mental inventory of elements available to you, your next step will be to arrange them - to find a composition in which they come together, enhancing or contrasting each other, complementing each other to create the desired effect.
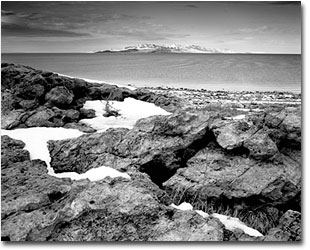 Let's go through an exercise of analyzing the image on the right.
 A photograph freezes a moment in time. Beautiful and inspiring phenomena happen every day in many places at many times. Most of these moments pass unrecorded. How can you increase your chances of witnessing such a moment and successfully capturing it on film? The old boy scout credo stands true - be prepared.
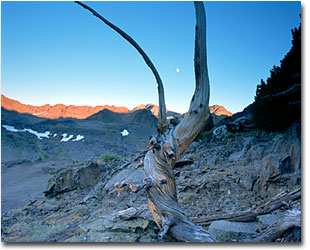 A salesperson can convince you of something he does not believe in himself. An artist cannot compromise his honesty and integrity and still create inspiration. You must be inspired to inspire others. You must be excited about a scene to induce such excitement in the viewer. I can remember many times, witnessing a beautiful scene, but not capturing it on film because I did not feel up to it - I was distracted by other people, by lack of time, or any number of other reasons. I knew from experience that the image would not turn out well. I also knew that when I view it myself at a later time, I would be reminded of the foul mood I was in.
|
|