|
|
|
Nature and outdoor photographers are always challenged with light. Sometimes it is perfect and other times not so much. You might have sun when you want the softness of overcast, or it might be overcast when the grand landscape calls for light sweeping across the land. While there is not a solution to turn bad light into good light, one tool that can benefit many close-in subjects is the flash.
Flash is a very powerful tool for outdoor photographers and while you can have little effect on the light sweeping across the landscape, it is quite useful with subjects closer in like macro, close-up nature, and the adventure image.
Today’s state-of-the-art flash units are very sophisticated electronic devices. Having taught flash photography online for the last 8 years, one of the comments I heard more than any other form new students was something similar to: “I hate my flash, help!” My reply was the same: by the end of the first week you will have a grasp the fundamentals of flash and once you do you will find flash fairly easy to use.
Two Light Sources
The first concept I teach is that flash and ambient light are two separate light sources and each are controlled for the most part, by separating the settings both on-camera and on the flash. As you know when using your camera to take a photograph you can use your aperture or shutter speed to adjust exposure and brighten or darken the picture. With flash use, it is common to divide those tools when controlling either the flash or ambient exposure.
First, shutter speed has no control over flash exposure. When the shutter opens and exposure begins, the flash fires quickly and the shutter remains open until it has completed the ambient light exposure. It makes no difference whether the shutter is open for 1/100th or 10 seconds, the flash fired when the shutter opened and has completed its light burst before the shutter closes. So changing shutter speed really does not change the flash exposure because flash output is pretty much the same length of time each flash. Technical note: Flash duration changes with the power level it is set at but it is most of the time faster than the shutters open time.
Second, the aperture or f-stop does control flash exposure just like it changes ambient by the amount of light allowed through the lens. What is important for this concept is the use of flash in a manual flash mode. Usually flash in manual mode is used when consistent output is desired. Then increasing your aperture or decreasing your aperture affects flash exposure because it either allows more light through the lens or less light.
It is important to understand as well that if you prefer to shoot in manual shooting mode on your camera that if you use your aperture to lighten or darken your flash exposure you need to make an equal adjustment on your shutter speed to maintain the same ambient light exposure. That means if you metered your scene and came up with f/16 @ 1/60 and you want to brighten your flash exposure while using manual flash by changing it to f/11, you now need to adjust your shutter speed to 1/125 to keep the same ambient exposure.
Using TTL
The wonderful thing about digital cameras and flash units is their versatility. While I have just mentioned theory and practice and controlling flash and ambient exposure with a manual approach, another and probably more popular strategy is using flash and all its automated features. Here you can shoot in manual shooting mode or aperture priority mode with the flash in TTL (the automatic metering mode).
Many outdoor photographers work this way and one reason is because it’s fast. If you are photographing flowers you are probably working at an unhurried pace, taking your time to get it right so manual flash works fine. But if you are shooting a moving subject like wildlife you don’t have time to test, evaluate, and adjust each exposure or you would miss the action. By allowing the camera and flash metering to establish correct flash exposure you are free to concentrate on the subject and the metering will adjust based on flash-to-subject distance. So here are some examples using flash.
Fill Flash
We all know by now that natural light does not always work for every subject and one of those problems is the contrast that the sun can create on subjects that would be better off in soft light. Fortunately on-camera flash a great option for dealing with that contrast.
It can be applied in a manner where it does not create its own shadows and highlights which then compete with the highlights and shadows created by the sun. Instead the light from a flash can just supplement the existing natural light by filling in and lightening shadows. While we have little control over the conditions of natural light, we can have full control over supplemental light created by a flash and how it is applied.
Here are some examples:
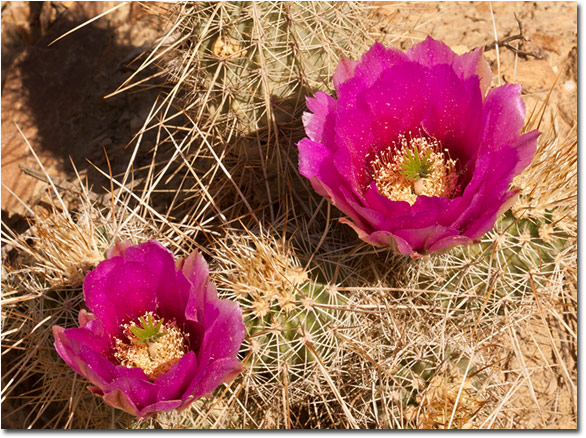
In the image above from Arizona’s cactus bloom from this past spring you can see the sun is lighting the cactus but is not benefitting from the contrast of that harsh sunlight. The shadows are pretty obvious. So to lighten up those shadows and lower the contrast, I placed my flash in the hot shoe and proceeded to fill in the shadows at a power setting that was subtle to avoid the ‘flashed’ look, yet lighten the shadows in a more pleasing, natural looking manner (see photo below). Flash lightened the shadows and brightened the flowers as well. 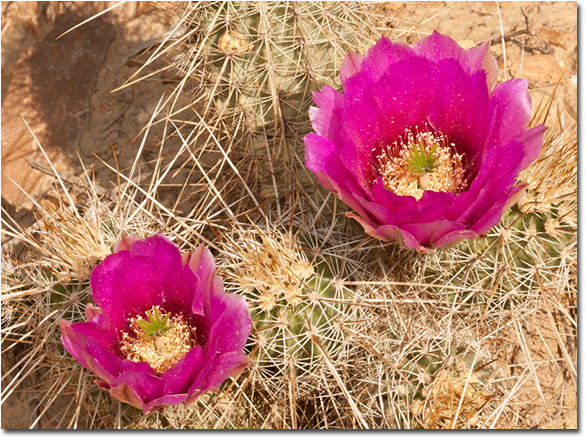
|
The on-camera approach places the flash essentially on the same axis as the lens thus preventing ‘cross lighting’ (where highlights and shadows are created by the flash that compete with the suns highlights and shadows due to the flash coming from a direction other than the lens axis).
Flash Key
While the previous examples were about lowering contrast using light from a flash, you can also increase contrast on a subject by adding flash to those subjects in flat light. In this case the flash no longer is the secondary light source like it was when used with the sun. Instead you make the flash the primary light source and natural light secondary.
This is easily done by setting the flash to be brighter and you can do it with the shutter speed. As an example, let’s say the camera suggests f/11 at 1/30th of a second and using TTL, the flash outputs the correct amount of light for f/11.

In the photo above, the light is all natural. While this image could be processed by adding contrast and saturation and look great for sure, it lacks lighting contrast. To add the lighting contrast to the photo below, I brought out the flash and placed it just left of camera so it added highlights and shadows for a more 3 dimensional look. With the flash on TTL I set the shutter speed at -1.66 from the meter reading. This reduced the influence of natural light which would have filled in the shadows and it created lighting contrast. 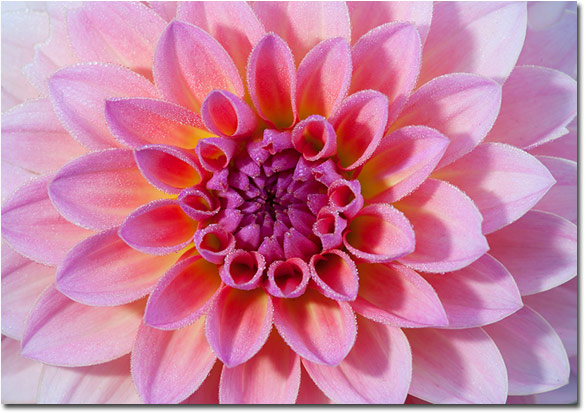
But it is too much for my taste because I like flowers to look soft, so for the photo below I returned my shutter speed to be halfway from where I started or now -2/3 instead of -1.66 as in the previous example. What is happening in this case is I am allowing more ambient light to fill in the shadows and while this softened the contrast overall the flash has added slight contrast on an otherwise flat original image. 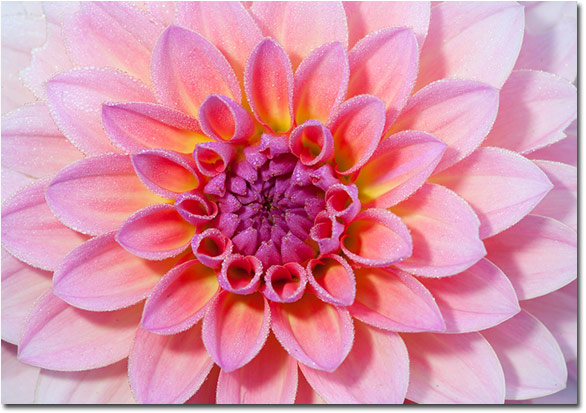
|
Faking Sunlight
When you think about adding flash as a key light source to add lighting contrast, you are essentially ‘faking sunlight’ by setting the flash to mimic sunlight. When you think about that further the possibilities really open up.
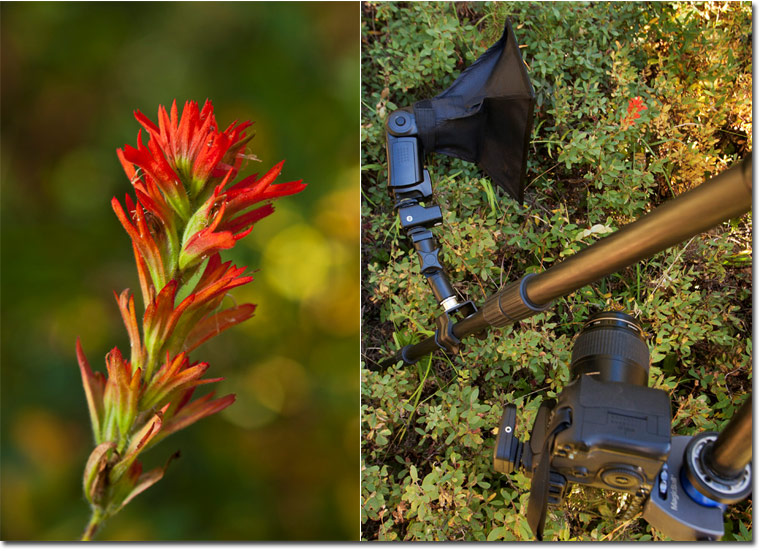
This image of paintbrush is another example. In the shade the natural light image had no pop to it due to the lack of lighting contrast. So I attached my flash to my tripod leg with a mini light box and lit the Paintbrush in a manner that appears to look like sunlight without too much contrast.
With my tripod column inverted I was able to get down on the level of the flower and use my tripod leg like a light stand. The flash is mounted to the tripod and a wireless triggering device fires the flash.
 |
Telling Stories with Light
Photographers are storytellers and they do it with images. They capture natural events as they happen in real time and when shared, the viewer’s get an idea of what nature looked like during that slice in time.
Since many outdoor photographers travel to photograph, the photographic adventure might include camping, backpacking, or other methods of staying outdoors where there are many more great opportunities to tell the story and using flash can help.
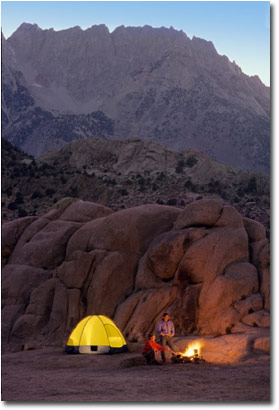
It can be beneficial for subjects that need light to brighten them up and reduce contrast and it could be hiking companions, your children, or fellow adventurers on a rafting trip for example. One of my favorites I call ‘Telling Stories With Light’ like these images. It can be as simple as placing the flash inside a dome tent while your companions sit around the campfire.
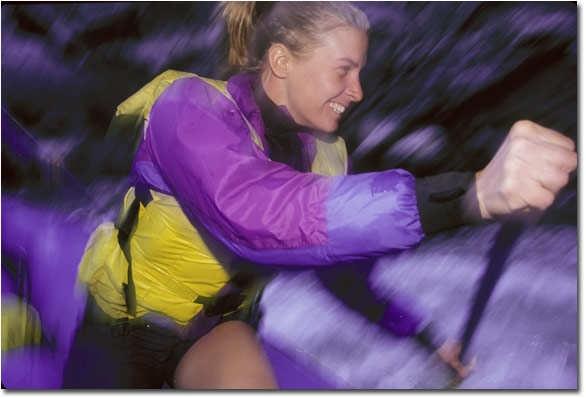
During a rafting trip that went late in the day, I added the flash using TTL and Aperture Priority. The low light created the need for long shutter speeds which caused a lot of blur. The flash however, freezes the subject against the blur and the story is the action or movement (see photo below).
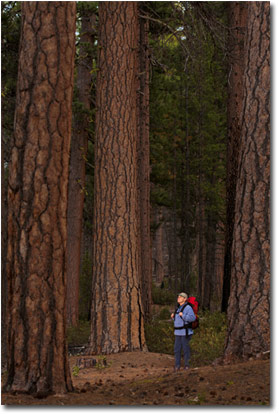 |
Another favorite approach I use is what I have coined: ‘stash-a-flash’ and the idea is to hide the flash in the scene somewhere, hidden from view, where the flash outputs light on the subject.
Here the flash is hidden behind the tree and uses a wireless trigger to light the hiker in the forest. The camera and flash settings were adjusted to create a subtle flash key look to the lighting and it was done by setting the shutter speed at -2/3 below the metered reading thus underexposing the ambient light slightly and making the subject pop out better.
Like everything in photography, your imagination is the limit and flash is very useful tool for nature photographers and with most any subject. It’s a great way to get a subject to separate from its surroundings just like depth of field does. You can light a subject to be brighter than the background and when you do this, the subject will pop stand out from the surroundings much better. Adding flash to subjects in contrasty light brightens shadows and lowers contrast for a more pleasing image. And you can light specific areas of the scene when you stash your flash in the scene and hidden from view.
Whether you have a new state-of-the-art flash or an off-brand model, all you really need is the ability to create light that benefits your subject by enhancing a static subject, freezes a moving subject, or lowers contrast.
Enjoy your photography!
Charlie Borland - NPN 1783
|
 Charlie Borland has been a professional photographer for over 30 years. Based in Oregon, he’s travelled extensively to photograph for stock and on assignment. His imagery has been used thousands of times worldwide, including: National Geographic Adventure and Traveler, Outside, Women's Sport and Fitness, Newsweek, TV Guide, CIO, Sports Illustrated for Women, Time, Backpacker, Sunset, American Photo, Outdoor Photographer, Eco Traveler, Southern Bell and many more.
He is co-author of Flash Photography with Bryan Peterson and author of Outdoor Flash Photography, available on his website www.borlandphoto.com. His online photography eCourses are available at www.greatphotographycourses.net and he writes about the business of photography at www.pronaturephotographer.com.