Available Light Close-Ups
Text and photography copyright © Heather Angel. All rights reserved.
The way in which a close-up is taken can range from a simple grabbed hand-held shot of a dew drop on a blade of grass to setting up the camera on a tripod and using a diffuser as well as a reflector to enhance the available light for a static subject.
I can still recall the thrill of focusing my first macro lens at close range and seeing details in a flower I had not noticed with the naked eye. From this moment I have always been on the lookout for striking close-ups. Even when I am going on a wildlife shoot, I never fail to pack a macro lens, because if the main target species fails to turn up, I can always find a macro shot worth-taking - whether it be backlit leaves, fallen seeds or textured rock.
Getting in Close
There are several ways of focusing at close range. Most simply, attaching a close-up lens to the front of a prime lens does the same job as reading glasses for a long-sighted person. Some short tele zoom lenses have a macro mode but this does not provide the flexibility and extensive magnification range available with a true macro lens. This is an essential tool for anyone who wants to concentrate on close-up subjects. Depending on the focal length (50 or 60mm, 90 or 105mm, and 200mm) a macro lens will provide a life-size or half-life-size image on film or a digital sensor. On D-SLR cameras the magnification remains the same, but the actual area of the image may be smaller compared to 35mm film if the sensor is smaller than full-frame.
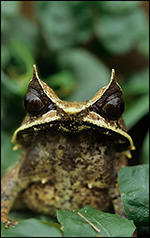
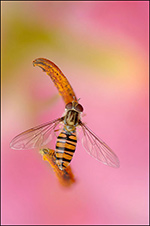
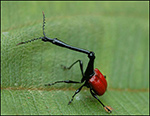
There is no question that a longer focal length such as 90mm or 105mm will be most useful. The greater working distance not only gives a higher success rate when stalking active subjects such as insects, frogs, or lizards before they fly, hop, or crawl out of the frame, but also provides more space for holding a reflector or a flash between the camera and the subject.
The 105mm micro-Nikkor is my favourite macro lens, but I also use the 70-180mm macro zoom lens - especially for precise framing of insects, amphibians, and reptiles without the risk of disturbing them by moving in closer.
Lighting
The success or failure of a landscape picture is dependent on weather conditions with some control via filtration of light; whereas with close-ups the lighting can be controlled and changed by the photographer to suit the subject. Indeed the structure of the subject should convey how to light it.
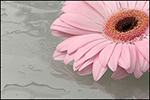
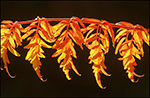
Translucent petals or leaves look great backlit, whereas a textured surface will be highlighted by extreme side- (known as grazed-) lighting. Natural light can be changed in various ways. For instance if a bright sun casts harsh shadows which do not enhance the composition, they can be softened by using a diffuser such as a Photoflex® Lite Disc™. On the other hand, on overcast days, dull light can be perked up using a Phototoflex® silver / gold reflector. Where rays of light pierce the canopy to spotlight a forest floor it is possible to deflect the sun onto a flower or fungus in the shade and thereby gain a stop more light.
The inside of flowers that naturally hang down such as some lilies and fritillaries, can never be lit directly by the sun, and are a prime case for pushing light inside by using a reflector. A useful makeshift reflector is a piece of aluminum cooking foil wrapped around a piece of cardboard. It is also possible to use both a diffuser (as a mini cloud to diffuse direct sunlight) held between the sun and the subject and a reflector below it to add a soft light. Even using the camera on a tripod, without a willing assistant to hold the diffuser or reflectors, a useful third arm is the flexible Wimberley Plamp (short for Plant Clamp) which can be clamped onto a tripod leg or a wooden pole pushed into soft ground.
Exposure
Even though it is now possible to check the exposure on a digital camera, this takes time and may mean a dramatic backlit shot is lost as the sun moves past a gap in an overhead canopy. It is far better to perfect the metering of tricky subjects with confidence.
If an automated matrix reading is taken of a flower growing amongst pale limestone rocks or on snow-covered ground it will give a false high reading which will underexpose the shot. Conversely, dark red flowers or black rocks metered this way will result in an overexposed shot. One solution is to use an incident light meter. However, I prefer to select either green grass or matte green (not shiny or grey / green) leaves as an average tone lit in the same way as a bright or dark subject to manually spot-meter using the camera.
In overcast, windy conditions, exposures for close-ups are often a compromise. A moving subject will require a fast shutter speed to freeze the movement, which will dictate a wide aperture with an ISO of 100-160. A slow shutter speed can, however, be an effective way of taking dripping water.
Poor light in calm weather or inside a forest is not a problem, providing a tripod is used. Even so, to ensure there is no risk of movement from camera shake, it is advisable to lock up the mirror and use a remote release.
Camera Angles
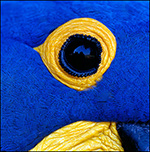
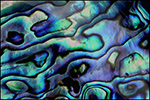
The choice of camera angle can help to make an arresting close-up. Dramatic close-ups can be taken using a low camera angle to get a worm's eye view. In this case, a right-angled viewfinder will save having to lie prone on the ground to reach the viewfinder. Overhead views can be taken of mosses amongst fallen leaves or plants that float on water. To maximize the depth of field, make sure the film or sensor plane is parallel with flat ground or the water surface. While a butterfly feeding head-on is dramatic, if you want the whole body in focus it is better to opt for a side view of the folded wings. Try head-on shots of animals with conspicuous eyes for impact or tight crops of animal skins to highlight texture, pattern or abstract forms.
Depth-of-Field control
To fully appreciate how the depth-of-field can be controlled and used to your advantage, it is preferable to abandon all automated programs and revert to setting both the shutter speed and aperture manually. If your camera has no manual setting, then use aperture priority.
Using a tripod, focus the camera on a three-dimensional flower. Simply for the purpose of visually appreciating how depth-of-field is controlled by the aperture size, select f/11 and stop down the lens using the depth-of-field preview function. Look through the lens, whilst maintaining the preview, slowly open up the aperture to f/8, then f/5.6 and f/4. As the aperture is opened more light passes through the iris diaphragm and so the subject is seen more clearly. At the same time, the extent to which the flower appears in focus becomes reduced. By changing the aperture settings back and forth a feel of the relationship between aperture size and depth-of-field will be gained.
Depth-of-field also decreases as magnification increases. Therefore, to gain maximum depth-of-field (for a three-dimensional ID shot) use a small aperture such as f/16 or even f/22 and focus behind the front of the flower (since the focus is increased on either side of the plane in which the lens is focused).
On the other hand, some shots may work better, or look more dramatic, by opening up the aperture to reduce the depth-of-field and thereby blurring the background so the subject ‘pops’.
The choice of how to take a close up is a matter of individual style and the way in which an image is to be used. Clearly, an ID shot needs to be as sharp as possible and the subject framed to include the essential characteristics, whereas a shot taken specifically for use as a greetings card or a fine-art print may have a more aesthetic appeal with minimal focus so that the colours blend together in a fluid kaleidoscope that is restful to the eye.
Useful accessories for available light close-ups:
- Reflectors to redirect and boost light
- Diffuser to soften direct sunlight
- Plamp to hold a reflector or diffuser
- Transparent umbrella to protect camera from rain without reducing light on subject
- Right angle viewfinder for low shots
- Remote release
- Shade that clips onto lens hood for contre jour shots
- String for tying back woody branches
- Gardener's knee pad for low level work
- Waterproof ground sheet for working on muddy / snowy ground.
|
HA-NPN 3070
Comments on NPN nature photography articles? Send them to the editor.
Heather Angel started her working life as a marine biologist, but gradually photography took over. She travels extensively in search of flowers and wildlife. In addition to managing the specialist image collection - Natural Visions - which has over 50 contributing photographers, she is a prolific writer with more than 50 books (her latest title in press is Macro through a Nikon Lens) and countless articles to her name. Always an enthusiastic communicator, Heather tutors workshops all over the world.
The British Council in Delhi commissioned her to document the biodiversity of the Himalayas - in one month! Her exhibition, Natural Visions, toured Britain from 2000 - 2004 and was also on show in Kuala Lumpur, Cairo and Beijing. Currently she is spending a lot of time in China photographing the endemic plants and wildlife for a book about China's wilderness areas as well as her third book on pandas.
www.naturalvisions.co.uk - main website
www.heatherangel.co.uk - Heather's personal website


|