|
|
 Introduction to Large Format
Text and photography Copyright Guy Tal What is Large Format? This has been the contentious topic of many lengthy and futile arguments on some discussion boards. For the purpose of this article I will use the term Large Format to describe photography performed using a View Camera. View Cameras are a distinct breed with characteristics setting them apart from other camera types, such as reflex cameras (SLRs, TLRs) or rangefinder cameras. View cameras usually have a simple construction – a front standard used to hold the lens, a rear standard used for viewing and to hold the film, a bellows connecting the two standards, and a focusing mechanism – either a monorail or a flatbed design, allowing back and forth movement of one or both standards. Why Large Format? Personal preferences aside, one can find advantages and disadvantages to any photographic format. View cameras offer little to no automation: the photographer performs every decision - from composition, through focusing to exposure. View Cameras require the use of a tripod and dictate a relatively slow setup and workflow process in practically every situation (some older models, like Graflex cameras, were actually designed to be used handheld by press photographers, but this mode of work will likely not work well in nature photography). View Cameras also require much longer lenses, compared to smaller formats, to cover a given angle of view. For example: a 600mm lens on a 4x5 camera will have similar coverage to a 200mm lens on a 35mm camera. These factors make the View Camera impractical for situations where the subject is very shy or likely to move at any moment (as in wildlife photography or candid images of people). The View Camera shines when the subject is static and the situation allows for a careful and calculated workflow. Here several of the format's advantages come into play:
The above points make the View Camera an extremely versatile tool for landscape and architectural photography where such precise control is required, where images are often printed at large sizes, and where the photographer can take the time to apply the more elaborate workflow. An Example
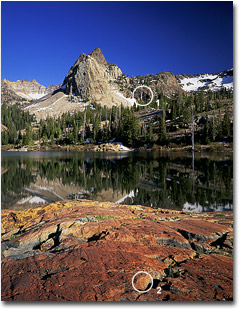
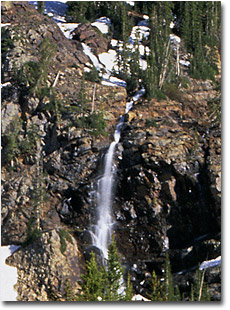
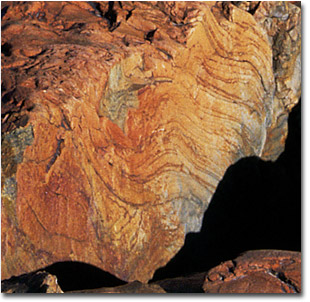
This photo of a mountain scene captured using a 4x5 View Camera and a 90mm wide-angle lens (roughly the equivalent of a 28mm lens in 35mm format). The foreground-to-background sharpness is a result of tilting the front standard, placing the focus plane diagonal to the film plane. The image was captured on Fujichrome Velvia. This film, like others in its category, can provide useful detail when scanned at resolutions upwards of 4,000dpi. For illustration purposes, I had this image scanned at about 1,450dpi (calculated to produce roughly a 100MB file). Even at this low resolution, examined at 100% magnification you can tell that the little white line to the right of the peak is actually a fairly tall waterfall, and that the foreground rock contains some fascinating patterns (see Detail Sections 1 and 2). Had I scanned it at 4,000dpi, I could produce a detailed fine art print (printed at 240dpi) that would measure about 67"x83" with no need for interpolation ("rezzing up") whatsoever. If you're a pixel counter – that would be about 320 megapixel. Movements I mentioned the control offered by the View Camera resulting from the ability to move each of the standards independently. This ability is sometimes referred to as "movements". Movements fall into two categories
Different cameras may or may not offer a given movement in either of the standards, and also differ in the range of motion they offer in each direction. The Process The process of working with the all-manual View Camera is significantly different from what you might use with other types of cameras (that generally offer at least some degree of automation). This process dictates a slow and thoughtful workflow yet it allows the photographer to take advantages of the high level of control offered by the medium. At the same time, it is also more prone to human error. For those not familiar with the process, it can be intimidating. For those just starting out it is often frustrating, but those who have gained some practice will often tell you it is one of the most critical factors in creating a well thought-out image. Many Large Format enthusiasts have found that the slow and manual process has helped improve the quality and composition of their images, and increased their success rate. In a nutshell, the process involves several steps:
Each of these steps is entirely manual: the photographer needs to open the lens for focusing, and close it when the film is loaded; compose using the ground glass screen (where the image is projected upside down and flipped left to right); exposure data should be manually metered and dialed into the shutter; focusing with movements requires a mini-workflow all by itself. While there are a number of opinions about the pros and cons of such a laborious process, in my opinion its main advantage is that it slows you down – the amount of work involved means you will likely not "snap a shot" of anything that looks somewhat interesting. You will likely be on the lookout for something truly worthy of setting up a camera for. You will then have time to study it as you set up, observe nuances in light and tone and identify the most favorable composition. By carefully metering and using your own brain to calculate the contrast range in the image and how you want the various elements exposed, you are more likely to notice things and you gain a more intimate understanding of your subject. You will likely not make as many exposures as you would with more automated systems, but if at the end of the day you end up with any number of "keepers", does it matter how many other exposures you made that you will likely never use? The Quality To some the experience of setting up a View Camera and studying a sublime composition in the field is a valuable experience all by itself. To others it is a necessary evil. One thing everyone who has ever seen a large format chrome or negative agrees on: it is a sight to behold. Whether on a light table, as a fine scan, or in a large print – the amount of detail, fine gradations in tone, and the feeling of looking through a window at a real scene are truly inspiring. No matter how often I do it, picking up a batch of chromes from the lab always thrills me. As I eagerly pick up the sheets and throw them on the light table in the waiting room, I am rarely disappointed. Even knowing exactly what I photographed and having all the confidence in the world that I exposed it correctly, seeing it in vivid 4x5 splendor puts a big smile on my face every time. Equipment - What Do I Need? Compared to the large systems carried by most serious 35mm photographers, a View Camera system is not too elaborate. To make an image all you need is:
My advice to anyone taking their first steps in Large Format would be to rent a complete system for a weekend and play with it before spending the money on buying these items. Renting a system will also give you a baseline for deciding what type of camera and meter work better for you, what focal lengths you are most likely to use, etc. Note that unlike 35mm and Medium Format systems, Large Format systems are a lot less proprietary. You can use a huge selection of lenses on any camera (the only limiting factor is whether or not a given lens covers your given format), and many accessories (namely backs, flash units, hoods etc.) are generally interchangeable between systems. Lenses are mounted to a lensboard, which is then mounted to the front standard. Some cameras share the same size boards, others have proprietary sizes, but the lenses themselves can be easily mounted to any lensboard drilled with the appropriate size hole to accommodate its shutter. How Much Does It Cost? The economics of Large Format are different from those of smaller formats – film costs are much more significant than equipment. Large Format cameras are not updated or enhanced as frequently as their electronic counterparts, and high quality work can be done even with old lenses (given the large film size, even a very poor lens will still produce results that often outperform the best in smaller formats). In this sense large format photography favors the low-volume fine art photographer as opposed to the stock shooter. Like other systems, camera costs vary quite a bit, although differences between the low and high end models are usually in terms of finish quality, type of controls (geared or friction based), and materials used. Capabilities don't vary much (with the variance usually being availability of a certain type of movement, style of backs, quality of ground glass etc.) With some research, one can still purchase a complete kit (camera, lens, holders, dark cloth etc.) for as low as $1,000-$1,500 new. Film and processing costs can vary and are usually between $3-$6 per sheet (4"x5") depending on the type of film and whether you load your own holders (less expensive), or use a Quickload or Readyload system. This is much more significant than roll film, but keep in mind you will likely make less exposures (thanks to the process) and will very likely have a much higher "keeper" rate once you master the slow and deliberate workflow. Can I Hike and Backpack With It? Absolutely! While some View Cameras are designed for studio environments (these offer very extensive movements, generous bellows, and very convenient controls, but are bulky and heavy), many systems are designed with the outdoor photographer in mind. Flatbed (aka "field") cameras fold into a neat package and are quick to set up,. and most of them weigh the same (or less) than high-end 35mm SLRs. Some monorail cameras have also been designed for easy packing. Where Can I Learn More? This article covers the basics and obviously there's a wealth of information that cannot be covered in this limited space. By far the best resource for further information is the Internet. Some web sites worth visiting are: There's also a number of informative books available. Among the most popular are Steve Simmons' "Using the View Camera", Leslie Stroebel's "View Camera Technique", and Jack Dykinga's "Large Format Nature Photography". Is It Right For Me? Ultimately you are the one to decide. If you enjoy fine art photography, are inspired by landscape images, and appreciate large and detailed prints – chances are you will fall in love with the View Camera. A basic View Camera system is far less expensive than high-end 35mm and will open a new world of possibilities for you. Learning the ropes will likely involve some mistakes and frustration, but I am certain every doubt you may have will melt away when you first view a beautiful image you created on a large sheet of film. Guy Tal - NPN 440 Comments on NPN landscape photography articles? Send them to the editor. |
|
|