Sharpening Photos for the Web: A Simple Introduction
Text and photography copyright © Jim DeWitt. All rights reserved.
The sharpening tools in Adobe Photoshop can’t save an out of focus shot, but they can improve a slightly soft photo. In this article, I’ll review some relatively straightforward techniques you can use to improve the on-screen appearance of your work. These techniques do not work as well for printed photos, where the pixel density is higher. But if your goal is to present well on NPN or on your own website, these techniques can help. This article will use Photoshop CS2 (Photoshop 9). Commands may vary slightly for earlier and later versions.
Of course, entire books have been written on Photoshop techniques. This article tries not to delve into too many side issues. In particular, I’m going to leave layers out entirely, despite their utility. I’ll take a “cookbook” approach; I try to stay focused (sorry) on the bits you need to understand to sharpen effectively.
Oddly, sharpening begins with getting the colors right. Why fuss with color in an article about sharpening? Because the sharpening tools look for changes in pixel value in order to define the edges that will be sharpened. You’ll get better results if you define those edges using the palette that will be used on the web. At the risk of being obvious, sharpening has to be among the last steps you take in adjusting your photo. If you adjust pixel values after sharpening, the sharpening effect will be compromised.
Convert to sRGB
From the Edit menu, select Convert to Profile. From the drop down menu, select sRGB. This is the mostly widely used color palette on the web. Otherwise, your results can be unpredictable. To my eye sRGB always appears a bit washed out. We’ll correct for that in a later step.
Set the White Point
For the same reason that you set the color palette, you also need to set the white point before sharpening. As Photoshop looks for edges, it gives weighted value to whites and blacks in its algorithms. From the Image menu, select Adjustments and then Levels from the submenu. Stay away from the Auto Levels item. You can do better by eye. In the Levels dialog, hold down the Alt/Option key and drag the upper right slider. Your brightest whites will appear first. This is a matter of fiddling, but generally you want the whites to appear but still be reddish orange; it they are white, they are going to be blown out, with loss of detail. Be sure you have the Preview box checked in the lower right corner.
Set the Black Point
Once you have the white point set, do the same exercise with the black point, using the upper left slider while holding down the Alt/Option key. Again, you want the blacks to be set at yellow-orange values. If blacks appear too bright while holding using this trick, the black will lose detail in your photo.
Set the Midtones
When you have the black and white points set, you need to set the midtones. You can use the upper middle slider if you want, but you’ll have much better control using the Curves tool: Image > Adjustments > Curves. While articles can and have been written on the Curves tool alone, for now, click on the straight line in about the middle and try adjustments slightly upwards and downwards. You can make fine adjustments to the last point you set with the arrow keys. You can set more than one adjustment point. Most of the time, a single adjustment point is adequate, but again this is a matter for fiddling. If there’s a single useful tip for the Curves tool it’s that subtle, small changes are usually sufficient.
Correcting for sRGB
You’ll recall that setting the color palette to sRGB left the photo a little washed out. I generally find that the sRGB profile tends to under saturate, so I will usually increase Saturation modestly (+5 to +10) at this point: Image > Adjustments > Hue/Saturation. If you want to adjust the Saturation or make other changes affecting the color values of pixels - perhaps increasing hue using the Saturation tool, or decreasing brightness or increasing contrast using the Brightness/Contrast tool - do so before moving to sharpening.
Sharpening
If you have your photo looking right, except for sharpening and sizing, then we are ready to start the sharpening process. Because the premise here is preparing a photo for the NPN site or display on the web, our longest dimension when we are done will be 720 pixels. The trick is to perform initial sharpening efforts at 1.66667 times the target size. That ratio takes the best advantage of Photoshop’s sharpening algorithms and mathematics of screen displays. Because we are targeting a final value of 720 pixels, we’ll perform our initial sharpening work at 1.6667 x 720 or 1200 pixels.
From the Image menu, select the Image Size option. In the dialog, make sure that you have selected the “Constrain Proportions” checkbox and selected “Bicubic” from the popup item for “Resample Image” and selected that checkbox. Then enter 1200 pixels in the long dimension of your photo.
Sharpen the image by applying simple sharpening using Filter > Sharpen > Sharpen. Do this twice. Your image will now appear oversharpened, but ignore that for the moment. Now resize the image again, this time to the target size of 720 pixels in the long dimension. From the Image menu, again select Image Size, and using the same settings as before change the long dimension to 720 pixels. You’ll notice at once that the resizing algorithm by itself corrects much of the earlier oversharpening.
Now tune the earlier sharpening using the Smart Sharpen tool (if you are using Photoshop CS or earlier, use Unsharp Mask instead). From the Filter menu, select Filter > Sharpen > Smart Sharpen. The dialog presents you with a number of options. Once again, the setting that works best will vary from photo to photo, but I generally start with an Amount of 30-50%, and a Radius of 0.2 pixels. If there is already slight noise present in the photo, increase the Radius. If the photo appears oversharpened, either decrease the amount in the Smart Sharpen dialog or back up to the 1200 pixel size and apply only one Sharpen to the photo, rather than two.
Finally, from the Edit menu select Fade Smart Sharpen. The Fade menu item is a “smart” menu and it affects your last command. Do not do anything else to the photo before taking this step, or the Fade menu item will change. In this dialog, select Luminosity from the popup mode menu. This last option will help minimize any oversharpening effects.
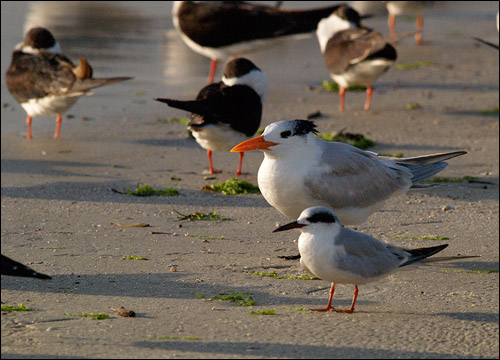
Below is an unmodified shot of a Royal and Forsters Tern.

The Royal Tern is slightly soft - look at the spots on the top of his head. The Forster’s is even softer.
Below is the same photo after the sharpening exercise I’ve described.
The Royal Tern looks quite a bit better. The Forsters is improved, but demonstrating my first point, still isn’t very good.
Look at your photo critically. Are there oversharpening effects? Is there a halo around portions of the image? Look at a sharp edge in your photo. Is the edge now over-emphasized? Have extensive areas developed coarseness or noise? Do portions of your image stand out in an artificial way or “lifted” off the rest of the photo? If so, you have oversharpened and need to go back to the initial sharpening and perhaps do one Filter > Sharpen instead of two, or increase the Radius or Decrease the amount in Filter > Smart Sharpen.
Is the image still soft? The softness may be beyond the limits of Photoshop’s powers. Remember, Photoshop cannot make a soft image sharp. It can allow you to make a mediocre focus crisper. It is never a substitute for sharp focus in the field.
Sharpening and cropping can be antagonistic. If you have cropped extensively, you will start to see “noise,” roughly analogous to grain in film. Photoshop will perceive noise as having “edges.” As a result, sharpening can magnify noise, making it appear worse. It is extremely difficult to perform extensive cropping and then successfully sharpen an image.
Finally, little adjustments can have a big impact in Photoshop. Avoid big changes, or if you make big changes, do it with Preview turned on for the tool you are adjusting, and bring the change back from the high point to find the right point.
Special thanks for help in developing this article to: Juza, and his terrific site; Nate Chappel, Avian Forum moderator; and Marc Adamus.
Comments on NPN digital photography articles? Send them to the editor.
Jim DeWitt lives in Alaska. He has camped, hiked, skied, fished and
photographed in the Pacific Northwest for 46 years.


| 
