It Ain’t What You Eat, It’s The Way How You Chew ItText and Photography Copyright Mark Hobson. All rights reserved.
OK, let me be blunt right out of the gate - I am not a devotee of Velvia. Those who have read my earlier article, Nice Comp Ansel...., on NPN, or have followed my image critiques probably already know that, and, truth be told, I must confess that I am not a fan of any film that can be identified from more than a Canon EF 1200 f5.6 + 2xII away by its exaggerated colors or saturation.
But, stay tuned. This is not a “trash Velvia” screed.
While we’re on the subject of film, you might as well also know that I only use transparency film of any kind for commercial work. Even then I’m not very particular (other than speed) about which transparency film I use since after a transparency passes through a typical prepress department, the resultant color/contrast/saturation on the printed page usually bears only a passing resemblance to the original film characteristics.
My preferred film of choice is color negative film. Again, other than film speed (slow), sharpness and fine grain, I’m not too particular as to brand, but I do end up shooting a lot of Kodak Gold 100 or Portra 160 NC simply because it’s readily available. If I’m getting low on film out on the road, Kodak Gold is available just about anywhere, and since it is an “amateur” film, it holds up well for an extended period of time with out refrigeration or special handling.
Once again, stay tuned. This is not a pro-color negative rant either.
Early on I gravitated to color negative film simply because, in my personal work, I always made (and still do) prints for exhibit and sale. In the pre-digital world (no desktop scanning or printing) the only method of getting to print from transparency film was via the internegative process, which left much to be desired. Dye transfer and cibachrome processes were available, but one was extremely expensive and the other extremely contrasty and “metallic.” And, since I always made my own prints and neither process was as easy or convenient to use as the venerable C print process (color coupler print as it is known in the art world), the color negative/C print process was just the thing for me.
In the ensuing years, I have come to appreciate two other characteristics of color negative film - its subtle/natural color rendition and its extended tonal range. My eye favors the former and my chestnuts have been pulled out of the fire many times by the latter.
Alright then. You’ve stayed tuned, so what is this article about?
Color, plain and simple.
Irrespective of your choice of film, format or medium (digital or film), nature photographers have been freed from the constraints and confines of manufacturer-mandated color palettes. Unless you actually enjoy slavishly reproducing in print the Velvia (or other) color palette dictated to you by Fuji, you are now enabled to present in print to the world a color palette of your own making.
I still enjoy shooting color negative materials even though, like many on NPN, I have made a commitment to digital photography for my most recent project. Either way, though, all my photography ends up in the digital darkroom that many of us know and love - Adobe Photoshop. I have been a power user of this program since the desktop digital stone age, version 2.0.
One of Photoshop's strengths since the beginning has been its ability with each successive version to mimic ever more traditional darkroom techniques - burning, dodging, contrast control, color control, masking techniques for a wide range of applications (blending, sharpening, etc.), spotting/retouching, to name just a few. Traditionalists in the darkroom, who have made the transition to the digital darkroom, have a tendency to feel right at home once they get the smell of chemicals out of their nose and brain.
I can imagine that Ansel Adams would have been nearly delirious with the contrast/tonal controls that would have been available to him in Photoshop. Jerry Uelsmann (uelsmann.net), whose superbly crafted surreal traditional photographic prints are in the permanent collections of prestigious museums worldwide, could’ve had a field day with Photoshop's Layers, although his love of the traditional darkroom process is obvious. Pete Turner, not a darkroom kind of guy but who nevertheless made a career out of his very personal, self-created and intense color palette (color saturated dupes of Kodachrome originals) is enjoying life in the digital darkroom extending and refining that palette.
If you don’t already realize it, the door has been opened to an entirely new world of color photography. In the past, your color palette choice was determined the moment you plunked down your hard-earned dollars for film. The scientists and manufacturing folks at Kodak, Fuji, Agfa, et al, had already determined what palette you could have. They offered plenty of interpretations, even within individual manufacturer film lines, but you were stuck with what they gave you.
There were few options for changing the palette, so most photographers were forced to make the choice of what film to use based on how a brand or specific film “saw” color - vivid greens, saturated reds, clean flesh tones, and so on depending upon what was important to the individual photographer. And every choice inevitably came with a compromise or two (or three). Pity the poor shooter who had to shoot a portrait (clean flesh tones) in the garden (vivid greens) in the shade (uv) with a subject dressed in red. Throw in a blue sky and his misery would be complete. Those were the “good old days.”
Today, in the digital darkroom, you are the color alchemist. Whether you start from film or digital based photography, you get to create the palette. Not only do you have global control over color/hue and saturation, you also have incredible levels of selective control, not only by specific individual color/hue and levels of saturation, but also by specific area of a photograph.
Need a specific color/hue that your choice of film or digital original didn’t (or can’t) capture, but that your printer is capable of reproducing? Create it. Happy with the greens in your original, but not with the blues? Isolate the blue and go to work. Got reds that have a nice level of saturation, but the yellows that are a little weak? Isolate and saturate. Maybe you love everything about Velvia, and, when it comes to color, think that they’ve got it 100% right. Ok, guaranteed you lost something in the scan, so get to work and find it.
Or (my favorite) maybe you just “see” things a little differently than the rest of us. Well, now’s the time to show us.
Back to the above Velvia comment. When I visit photographers’ websites that offer print sales, I often find the mysterious (to me, at least) claim that the prints are a perfect match to the original transparency. It never fails, each time that I encounter that claim of technical virtuosity, I don’t know whether to cry or wind my watch. Take it from me, Fuji’s got you snookered. I certainly understand the notion of falling in love with the look of a film (or print, I love the look of 8x10 color negative printed on type C matte paper), but your notion of color is far better than Fuji’s, especially when it helps you lay claim to your own personal vision. If you are proficient enough to match a print to the original transparency, you are smart enough to go it alone.
So, it’s time to get with The Program. Photoshop can be daunting to some, but whatever the effort required to learn it, the rewards are great. Don’t be intimidated. Start slowly and skim the “surface” of the program. Photoshop is certainly layers deep, but you don’t need to plumb the depths right away. Attend a workshop that includes a strong dose of Photoshop. If you can’t, get one of the ubiquitous how-to books.
You don’t need to have a thorough understanding of color theory to become a Photoshop color alchemist, but a little reading about photographic color helps. Again, there are plenty of non-technical books about photographic color. Kodak has a section on its website devoted to color presented on a layman’s level. Check it out. I haven’t kept up with Kodak’s how-to guides, but they used to have quite a few easy-to-read guides on a variety of photographic topics, including color.
Remember that we’re talking about the digital darkroom here. Play around and experiment. No need to make prints and use up time and expensive materials in order to see your experiments. Photoshop has multiple “undos” so you can experiment to your heart’s content (just don’t write over your original file). Any reasonably calibrated monitor (using just the gamma control on a Mac) will display pretty accurate results of your color experimenting on screen.
No need for monitor calibration hardware to start out. Once you have a feel for what you’re doing with color, you might want to consider something, but, once you really know what you’re doing, you probably won’t need it. It’s much more important to work in a very constant low-light environment with little or no light falling on the monitor screen. Trying to make consistent color judgments and adjustments in a room that is flooded with sunlight during the day and tungsten light at night is nearly impossible. Just keep the light level low and as consistent as possible.
So, there you have it. Digital or film, the world in color belongs to you, not Kodak or Fuji. Paint the world with your own colors using your own brush. Break out of the Velvia trap. It’s one more step on the road to creating your own personal vision.
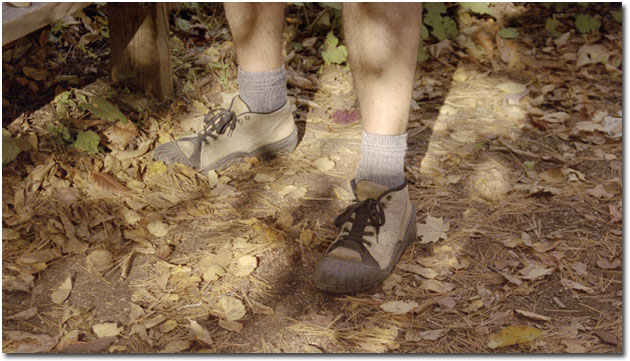 Photo 1 - Portrait of the Artist at Work by Jaci Kelleher (the long-suffering wife). She figured that, since I’m always looking down with the camera, so should she. Raw Vuescan scan from original negative - Kodak APS High Definition 200. Low contrast, but incredible shadow to highlight detail. Color is very muted.
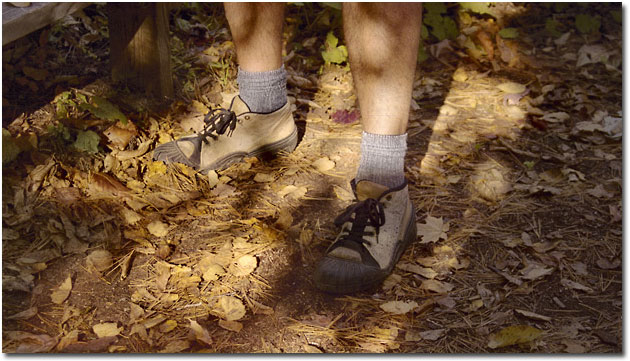 Photo 2 - Portrait of the Artist at Work in all his Photoshop assisted glory. Extensive Photoshop work has been done on this photograph - color corrections/adjustments (local and global, done in LAB and RGB color space), hue/saturation (local and global, including some desaturation, done in RGB), contrast adjustment (local and global, all done in LAB), highlight “burning” on lower leg and sock using curves (in LAB), sharpening.
The print from this finished file bears little resemblance, especially color-wise, to a conventional print (type C), even one made by a custom-color technician.
|
Mark Hobson’s Photo Workshops feature the Digital Darkroom. For more info click here.
Comments on NPN creative photography articles? Send them to the editor.
MH-NPN 1196
 MARK HOBSON is a family guy lucky enough to be living in his favorite place on earth, the Adirondacks. A former agency creative director and commercial photographer, Mark has brought his love of the wilderness and photography together to form Nessmuk & Stoddard Trekking.
Mark's photography has been used by Fortune 500s such as Kodak, Xerox, Heinz, PPG, and Bausch & Lomb. As a creative director he has produced campaigns for clients such as; I LOVE NY, Lake Placid, The Adirondacks, Cooperstown and the Finger Lakes.
His Adirondack photography has been exhibited in galleries in the NE. He has won recognition as a repeat finalist in the Carnegie International Nature Photo Competition. Mark has also been a judge for the Kodak International Snapshot Competition as well as the Kodak Camera Club.
Mark offers comprehensive written portfolio reviews for amateur and professional photographers. Contact him at photoworkshop@charter.net for details.
Be sure to visit Mark's website at www.adirondacklight.net.
Comments on NPN creative nature photography articles? Send them to the editor.


| 
