Composing With Light - Part 3 |
Editor's note: This is Part 3 of 4 installments. You are welcome to go back and read Part One and Part Two.
A painter works with color as the medium, a photographer works with light. - Carlotta M. Corpron
As we saw previously, in order to learn how to find good light and how to compose with natural light, one has to study light and become expert in the movement of the sun in the sky over the year. One also needs to study the tools available to us. However, there is another aspect of learning to compose with light, and that is learning as much as possible about weather events such as, in no particular order: clouds, haze lightning, rain, rainbows, snow and snowstorms, reflections, sun stars, star trails, halos, light shafts, rims of light, comets and other astronomical events as well as a myriad of other lighting conditions.
In this section I will show diverse examples of photographs taken in a variety of natural lighting conditions. My goal while doing so is not to cover each and every natural lighting situation possible. Instead, my goal is to show a selected number of specific natural lighting situations for which I can make the case that using a specific type of light helps create a successful photograph. Where possible I will show the same scene both under good light and under lighting conditions not propitious to the creation of successful photographs.
Natural Reflected Light

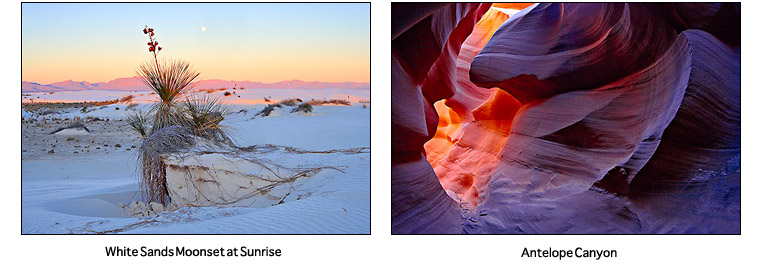
The first example consists of two photographs taken in a slot canyon in Northern Arizona. What is peculiar to these photographs is the type of light that was used: there is no direct light in these images, only reflected light. Reflected light is direct sunlight that bounces off a surface before striking the elements –in this instance the canyon walls—shown in the photograph. We talked about reflected light previously, when I discussed how to use a reflector. This is the same type of light, except that the reflector is the canyon wall, not a hand-held reflector. Reflected light is also called bounced light or diffused light.
Reflected light has several important qualities. First, it is very saturated and colorful because it takes on the color of the surface it is reflecting off. Since the surface here is red sandstone, the light becomes very red, and when it strikes another sandstone surface in the photograph, which is also red, the red color of the light is added to the red color of the canyon wall, doubling, or tripling the intensity of the red canyon wall.
In other words, the canyon wall is much redder when lit with reflected light than when lit with direct light. As it bounces off a red canyon wall onto another red canyon wall, the light becomes redder and redder and in turn the reds become more and more saturated. The more surfaces the light bounces off and onto, back and forth, the more the intensity of the reflected light diminishes. However, maximum saturation in reds is reached with medium-density reds. This means that the light needs to lose quite a bit of intensity for the reds to reach maximum saturation. In narrow canyons, you have to look in the lower areas of the canyon, or in the darker areas, to find maximum saturation reds. In some particularly striking situations, I have seen reflected light that reaches low in a canyon become a dark saturated red.
The second quality of reflected light is that when it is very intense, as in these images, it appears to glow. The glow comes from the light reflecting off a surface that is very close to the surface it bounces onto. In the photographs above, the reflective surface is only a few feet away from the surface that the light hits after being reflected, causing the reflected light to glow. This glow comes from the high brightness level of the reflected light.
The third quality of reflected light is softness. Even though the light is strong and colorful, it is still not so strong as to cast deep shadows and create a high contrast scene. There is contrast in these images, but that contrast is far lower than what it would be if these photographs had been taken in direct light instead of reflected light. In fact, I had to increase the contrast of these images slightly in order to make them more dramatic and colorful. Still, even with this increased contrast, there are details in both the highlights and shadows. With direct light I would have had to reduce the contrast and even then it is most likely that I would have lost detail in the highlights, the shadows, or both. Images taken in slot canyons with direct light almost always have burned highlights, blocked shadows, or both.
Air Light
Our second example shows a very unique type of light commonly called Air Light. The name Air Light comes from the source of this light, which is the open blue sky, the “air.”
Air light is found in a scene whenever the only source of light for the whole scene or for part of the scene is the open blue sky. Understandably, this is not very common since whenever the sky is blue and without clouds the sun is also shining upon the scene. Therefore we have to look for situations in which, for some reason, the sun is not lighting the scene or the sun is only lighting part of the scene. This happens on a number of occasions.
First, it happens at sunrise and sunset when the sun is either not above or below the horizon yet or when it has just come up or is just about to go down. At these times the scene is partially lit by sunlight and, if the sky is blue, partially lit by the blue sky hence creating air light.
This is the situation depicted in the first photograph above: White Sands Sunrise. In this scene the sun has been up for just a few minutes. The background, i.e. the mountains and the dunes in the distance, are lit by direct sunlight. The color of the rising sun is orange and pink, causing the mountains and the white dunes to be orange and pink. The areas that are not yet lit by sunrise light are blue because they are lit by the blue sky only, by air light.
A similar situation can happen at sunset if the sky is blue. It can also happen just before sunrise or just after sunset, if the sky is blue. At sunrise, for 5 to 10 minutes or so, as the landscape emerges from the darkness of the night, the sky gets lighter and lighter until it turns a dark shade of blue and then turns progressively lighter shades of blue until the sun rises. During the time that the sky gets brighter, the landscape becomes progressively bathed in pure air light, giving a blue color to the land. The process is the same, but in reverse order, at sunset, provided of course that the sky is blue and cloudless.
We also find air light in narrow canyons that are just a few feet wide. These canyons are commonly called slot canyons because from above they look like a slot in the earth. When you are inside one of the canyons you are, in effect, in a subterranean chamber in which light percolates rather than reach the bottom directly. Because these canyons twist and turn, and because they are often wider at the top than at the bottom, sunlight is blocked in certain areas while it is able to reach into the canyon in other areas.
If the sky is blue (the one requisite for the presence of air light) the areas where the sun does not reach all the way to the bottom of the canyon are good candidates for finding air light. I say candidates because there is another condition required besides not having direct sunlight. This other condition is that nothing blocks the light of the blue sky from reaching the bottom of the canyon. In other words, finding air light in tight canyons is not as easy as it may seem: first the sky must be blue. Second, you must find an area where direct sunlight is blocked. Third, in that area light from the blue sky must be able to reach all the way to the bottom of the canyon.
In other words, the walls of the canyon must block direct sunlight but not air light. Not a very common situation. Furthermore, you must be able to recognize air light, something that takes some training as well.
How do you recognize air light? To the naked eye, air light looks grey on canyon walls and on bare ground. This is because our eyes neutralize colorcasts. In other words, our eyes and brain do not see color in areas that we expect to be neutral in color. At White Sands National Monument, at dawn and dusk, if the sky is blue the dunes will be blue in color. This is because the white color of the dunes takes on the color of the sky 100%. It is like shining a blue light on a white piece of paper. However, when walking in the dunes, our eyes neutralize this blue color and we see the dunes as they are during daytime under sunlight, which is pure white.
This is essentially because the blue color is a pale tint. If the dunes were bathed in deep, oversaturated blue light then we would see it, probably not as blue as it really is, but blue nevertheless.
This fact creates another problem when you take a photograph of air light. The fact that the blue color is light and somewhat subdued means that it will not be visible on a normally exposed photograph. You have to underexpose the photograph to see the blue color of air light because when you underexpose you make the color richer and more saturated, thereby showing the blue better.
Finally, seeing air light on a photograph is also function of the color balance settings you are using on your camera and in your raw converter. Below are two versions of the same photograph. The photograph on the left was converted with tungsten color balance settings while the one on the right was converted with Shade color balance settings.

These two different color balance settings create two entirely different color palettes in the converted photographs. While the Tungsten color balanced image shows air light very clearly, the Shade color balanced image shows no air light whatsoever. This is because the Shade setting warms up the colors considerably and removes blues and purples, while the Tungsten setting gives a much cooler color palette to the image and retains blues and purples.
Also note, in the examples above, both in the White Sands and the Antelope Canyon photographs, that we have 2 different types of light in these scenes. One is air light, which is blue, and the other is reflected light, which is red and purple. The reflected light appears in the background of both examples while the air light is in the foreground. The inverse situation is possible as well. Finally, notice how this difference in the color of these two types of light disappears when the Shade color balance setting is applied to the Antelope Canyon photograph. Because the Shade color balance adds a lot of yellow to the image, it takes out the blue altogether. This is because blue and yellow are opposite colors, therefore when you add yellow you remove blue and vice versa.
Artificial Light at Night
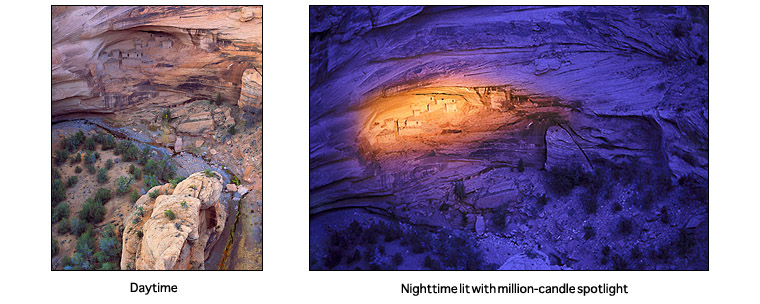
Partially similar results –i.e. having two opposite colors of light, blue and yellow in this instance-- can be achieved by lighting a night scene with artificial light. In the grand landscape this is best achieved by using a multi-million candle portable spotlight, such as the one shown above. There are many different models of this type of spotlight, with more or less lighting power. The one shown above is a 20 million candles portable spotlight.
This is what I used in the example above. At left, you can see the scene during daytime, in open shade, meaning without direct sunlight. While I like this daytime photograph, I wondered how the scene would look if photographed at night with artificial light added to it. I thought adding artificial light selectively would give a sense of mystery to the image as well as create an uncommon lighting situation.
The image above on the right is the result of this experiment. I used a multi-million candle portable flashlight that I powered off my car battery using the cigarette-lighter adaptor. I had to park my truck as close as possible to the overlook from where I took this photograph, because the extension cord for the flashlight was not very long. This created a somewhat hazardous situation because my truck was parked precariously close to the edge of the canyon and because there was nothing to stop it from falling into the canyon if the parking brake was to fail.
I worried about that the whole time, but I was able to complete the shoot successfully without seeing my worst fears become a reality. Most of what we fear never happens, and while this has little to do with light quality, it is worth keeping in mind because knowing this allows you to take a more objective look at risk versus rewards in many situations.
In the resulting image, the artificial light is orange while the shadows are blue. This is due in part to the color balance that I chose for this image and in part to the color of the light itself. The flashlight color was warm, and I did not have to do much to make it the color that you see in the photograph. The shadows were bluish, and I intensified the blue and cleaned up the color to make it what you see in the image. In short, the colors were there in the photograph, I simply made them stand out more.
This type of lighting can be used on a variety of subjects and in many different locations. A super-powerful spotlight is only necessary when you photograph distant or large subjects. In this instance, I was about a quarter mile from the ruin and I needed a very powerful light source to reach it. In fact, even with such a powerful spotlight, I still needed a 10 to 20 minutes exposure time. With smaller subjects, a less powerful spotlight would work and a shorter exposure time would most likely be adequate.
This image was created with film therefore I had to get the film developed before I could see if the shoot was successful or not. Today I would use a digital camera. The great thing with digital is that you can see the results immediately on the LCD screen and you can check if the exposure is optimal by looking at the histogram. This not only gives you instant feedback about whether or not you captured the image properly, it also speeds up learning time. In the days of film, we had to wait until the film came back from the lab to know all of this. This meant that if we had been unsuccessful, we had to schedule a new trip to the location, try a second time, and again wait for the film to be developed to know how we did. This could go on for a long time with challenging locations such as Antelope Canyon. Today, digital makes this learning process much faster because we can see the results immediately, literally in real time, and therefore make the necessary corrections while we are still at the location instead of having to schedule another trip.
From Dawn to Daylight - Navajoland Commuting
In the following five examples we will study how the light changes from night to dawn, to sunrise, to morning, to evening, to sunset and finally to dusk. These changes are the most significant light quality changes that take place during the day. Certainly, the light quality changes between morning and evening, but not as dramatically as it does at sunrise and sunset. Essentially, during daytime the sun changes position in the sky and this affects the direction and the size of shadows and lit areas. However, the color of the light stays relatively constant, while at sunrise and sunset the color of the sunlight changes dramatically.
The biggest changes in light quality take place during the hour before and after sunrise, and during the hour before and after sunset. This is also when the light is the most propitious for photography, when using direct sunlight. Of course, there are other types of light propitious to photography during daytime, and we will be looking at those later on. For now we are going to focus on what happens early and late in the day.
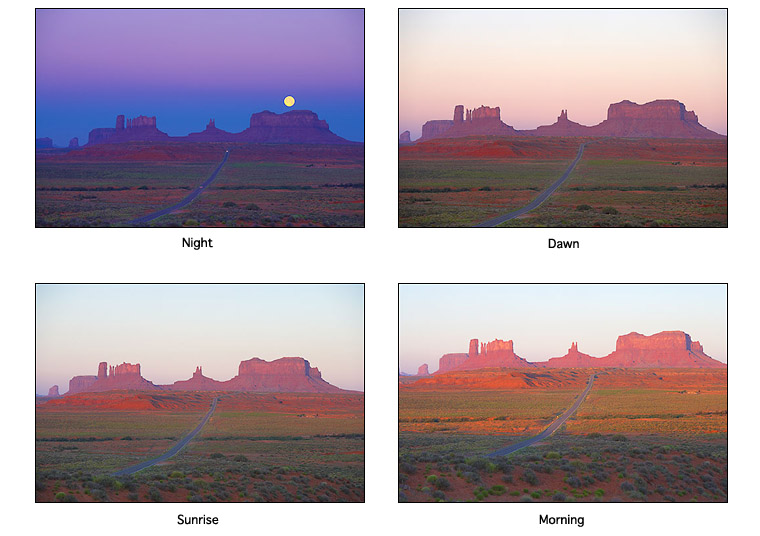
Night
In this first example we are looking at Monument Valley from an overlook on the North Side of the Valley. The mesa we are photographing is located South of the overlook. The first photograph shows night starting to turn to dawn. The sky is still dark, but the earth shadow (the band of bright blue along the horizon) is starting to be visible in the sky. The moon is setting over the mesa on the right side of the image. The colors on the mesa and on the ground exhibit a low saturation level. The moon and the sky along the horizon are the two most saturated colors. The colors for the most part are still quite dark and have a low saturation level. This is a night scene, with the mystery that comes from looking into shadows without having enough light to be able to reveal everything that we see.
Dawn
The next photograph was taken at dawn. At dawn, the sky, no longer dark, turns purple and pink. The mesa also gets a purple-pink glow. The greens and the reds in the land on the foreground are more saturated already. The entire scene is bathed in the soft, colorful light that characterizes dawn.
Sunrise
In the third photograph, the sun just came out and the first rays of sunlight are reaching the top of the mesa on the horizon. The purple color that this mesa had at dawn is giving way to a pink color that is quickly turning to red. In fact, the hill under the mesa is already deep red. The colors are still dark for the most part. The sky is now light blue at the top of the image and soft pink along the horizon, a significant change from the colors of the sky in the second photograph.
Morning
The fourth and last photograph in this series shows the scene bathed in morning light. Between the third and fourth photographs only a few minutes have elapsed, yet major changes have taken place. Now, direct sunlight bathes the entire scene except for the immediate foreground that is shaded by the hill from where I took this series of photographs. The sky is quickly turning blue but still shows a hint of pink color along the horizon. The light is still spectacular for photography, yet we know that in a few minutes time the best light will be gone and it will be time to leave.
Image Selection
When I show these four photographs I am often asked which image I would choose if I had to select a single image from this series. In other words, which one is my favorite? It is difficult to make a selection based on the light quality since all four images exhibit very nice light. Instead, I prefer to make a selection on the basis of the contents of the image.
While I was there, several cars drove down the road that bisects the photograph and that creates a leading line through the image. While it was still dark, their headlights created pinpoints of light in the image. As I was watching these cars go down this remote road, I realized that the drivers, though in the middle of a wilderness, were most likely commuting to work. Why else would they be on the road this early in the day? This was an unlikely commuting scene, one that contrasted sharply with our traditional, city-based view of commuters struck in early morning traffic on the freeways of large cities. To play up this contrast, I thought it would be fun to call this photograph Navajoland Commuting, thereby pointing out both the location and the metaphorical meaning of the image.
I selected this image as my first choice, then later converted and optimized the other three photographs. My selection remained the same after I converted these other photographs. It also remains the same today. Light quality in a great location is fantastic, however visual metaphors with great light in a fantastic location is an even better combination. Plus, this was the only photograph with the moon in it. By the time I took the three other photographs the moon had set, removing one of the main elements from the scene.
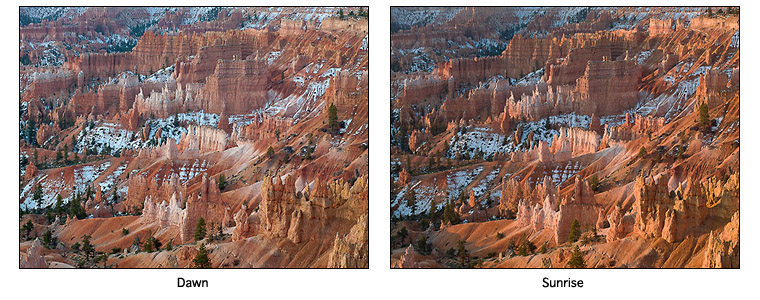
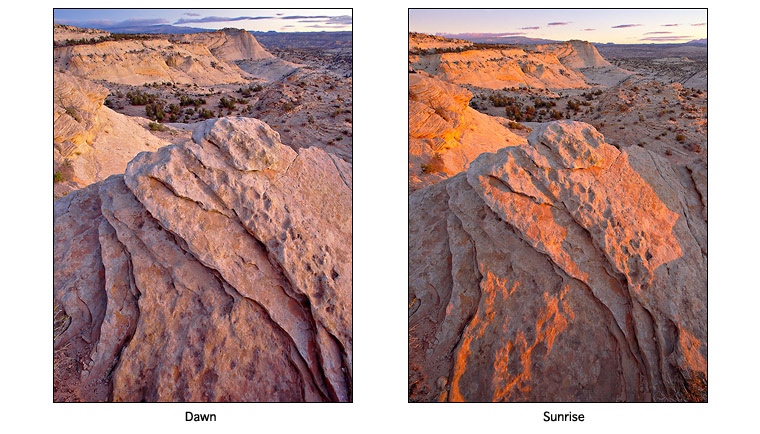
Dawn to Sunrise at Bryce Canyon
Dawn to Sunrise in the Escalante
Photographing a scene as the light changes from night to morning (or from evening to night) is not something I do every time I photograph at sunrise or at sunset. I did this in the example of Monument Valley above, essentially because the moon was setting while the sun was rising, and because the colors remained uncommonly vibrant after the sun had been up for some time.
Usually I find that there is not enough light to photograph before dawn arises. I also find that the most propitious light for dramatic photography is when the sun first breaks over the horizon at sunrise, or when the sun is just about to dip below the horizon at sunset.
In the two examples above, dawn and sunrise at Bryce Canyon and in the Escalante, this is exactly what happened. I photographed before sunrise, as dawn was starting, but while the colors in the dawn photographs are soft, colorful and attractive, it is the direct light contrasting with the shaded areas of the sunrise photographs that I find the most compulsive and dramatic. The direct light helps give both scenes a three dimensional quality. It also provides another level of visual interest by outlining details of the foreground rocks in the Bryce Canyon image and the shape of the hoodoos in the Bryce Canyon photograph.
In a sense, even though the shadows are not very dark, the contrast between lit and shaded areas create a chiaroscuro effect. I also like the warm colors of sunrise light better than the cooler colors of dawn. All these choices are, of course, personal preferences. One can achieve superb images at dawn, before the sun is up, just as well as after sunrise. In many ways, these choices inform your personal style more than the advantages of one type of light versus another. When we discuss personal style, I will explain how personal style is the result of many decisions made by you about what you like and dislike. As we will see, the type of light that you prefer is one of the cornerstones of your personal style.
Sunrise to Dusk at Monument Valley

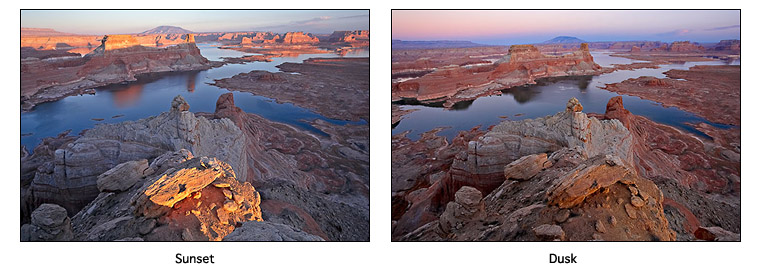
Sunset to Dusk at Lake Powell
Sometimes, when having to select between Sunrise and Sunset or between sunset and dusk, the choice of which image I like best is quick and straightforward. Often, a particular image clearly stands out as being more powerful and attractive than all the others. This specific photograph communicates how I feel about the scene more effectively than all the others. It is a no contest situation, and the matter is resolved nearly instantly.
At other times the choice is far more difficult because, as it so happens, I like several images equally, each for different reasons. This is what happened with the images above, taken respectively at Monument Valley and on top of a mesa overlooking Lake Powell. In each set of 2 photographs, I liked both images equally, each for a different reason.
In the first set of images, the one from Monument Valley, one image was taken at sunrise and the other after sunset. In a way these groupings of 2 images are similar to the groupings of photographs from Escalante and Bryce Canyon that we just discussed. However, the difference here is that I found making a selection far more difficult because I liked both images and because each one expressed a different portrait of the scene.
A landscape can have, metaphorically speaking, different appearances. In fact, all landscapes do, and this is something that makes returning to the same locations over and over again, in all different types of weather and season, fun and creatively motivating. However, selecting your favorite photograph among those taken during a shoot can be quite difficult.
In this instance the images taken at sunset, the ones with direct sunlight, were very attractive because of their bold and dynamic quality. The warm direct light contrasting against the shadowed areas gave these images a high level of visual energy. However, the images taken at sunrise and at dusk, the ones with the soft light and the saturated color were also very attractive. The photograph of Lake Powell at dusk was particularly compelling. At dusk, Lake Powell was bathed in soft, even, enveloping light that gave to the scene a peaceful and introspective quality that the images taken during sunset did not have.
The same remarks holds true for the two photographs of Monument Valley. While the sunset photograph is attractive because of the energy and dynamism that it expresses, the sunrise photograph features a peaceful quality that is just as compelling.
In the end the final choice must be made on the basis of which aspect of the scene you want to share with your audience. I will talk about audience later in this book, so for now I am only mentioning this in passing. When thinking about your audience, what you need to consider are the visual metaphors present in each image. Images taken at dusk metaphorically present both landscapes, Mt Valley and Lake Powell, as quiet and peaceful, as places where one can rest and meditate.
On the other hand, the images taken at sunset present each landscape as dynamic and energetic, as places where one may find renewed strength or engage in physically challenging activities. Who your audience is therefore comes into play significantly here, and so does whether you want to cater to a specific audience or share your own vision regardless of your audience, two positions that we will be discussing further when we consider the concept of audience specifically.
In the end I selected the Sunrise photograph from the Monument Valley pair and the dusk photograph from the Lake Powell pair. These final choices were based more on what I want to share with my audience than on the respective quality of these four images. In my mind, all four are strong images. However, the two I selected express something about the scene that is particularly appealing to me at this time, something that I want to share with my audience.
Dawn to Sunrise to Sunset at the Teepees
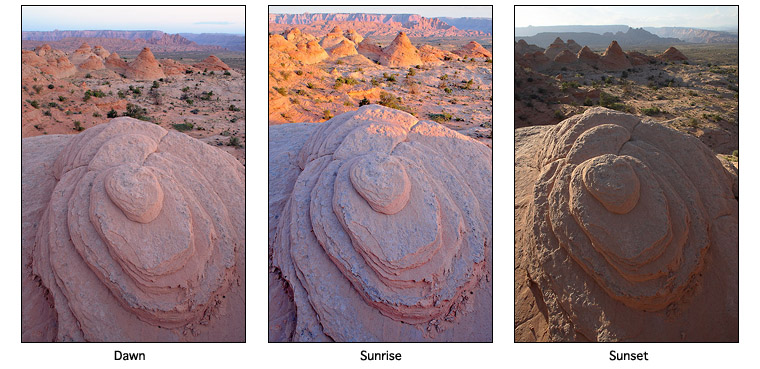
This example shows how a specific composition can be transformed by photographing the scene under different types of light. In this instance, I went to this location at dawn and photographed this scene with dawn and sunrise light (images at left and center above). I then returned at sunset and photographed it with sunset light (image at right above). None of these photographs were meant to be examples. They were all meant to be fine art photographs and they were created towards that goal. It is only in retrospect, while researching examples for this book, that I found these three images to be particularly interesting. I could have taken one more photograph, at dusk, after sunset, however, at the time doing so did not appeal to me. On the day I created these photographs dusk light was dull and colorless and I was not inspired to photograph past sunset.
These three images allow us to study the changes that a specific landscape goes through from dawn to sunrise to sunset. As we can expect, the light of dawn is soft and even. How bright the sky is at dawn depends on the direction you are looking at. Here, we are looking West, meaning that the sun is rising to the right and behind me and setting to the left and in front of me. In the Escalante example above, we were looking North, meaning the sun rose immediately to my right. The sky in the Escalante photograph was closer to the sun and hence was brighter. Here, the sky is further away from the sun and thus slightly darker.
The sunrise image is, to me, the most pleasing. The rocks in the foreground have not lost the soft pink hue they had at dawn, but the scene has now become far more three-dimensional due to the direct sunlight in the middle ground buttes. The mesa in the background is also in direct sunlight, however the light is still very soft and is not yet casting dark shadows. The contrast between the pastel pink foreground rock and the soft orange buttes in the background creates an inviting photograph with a dynamic quality.
The sunset photograph is the one with the highest level of contrast. Most of the scene is in deep shadow and some of the buttes in the background appear as silhouettes. The areas in direct sunlight do not have the colorful quality they had at sunrise. One of the reasons for this change is because the sun is setting behind the buttes and the mesa in the background, and that much of the sunlight is stopped by the buttes and mesas while at sunrise the sunlight was able to reach much more of the scene. Another reason for this change is that because of the height of the mesa in the background the sun is setting early, before it can take the subtle colors it had at sunrise. At sunrise the sun rose over a flat plain, and therefore reached the buttes while the sunlight color was still warm. The warm color of the sun disappears within minutes of the sun breaking over the horizon at sunrise, and starts just minutes before the sun dips below the horizon at sunset. Since the sun is setting earlier during sunset, it does not have the opportunity to take on the same warm colors it had at sunrise.
A final difference is that at sunset there was quite a bit of sand in the air, due to a sandstorm, and this sand further weakened the sunlight reaching the buttes. It also colored the light a brownish hue and removed the warm tones that the sun had at sunrise. As you can see, the factors affecting sunlight color and intensity are many and vary greatly from one location to the next. Sunrise and sunset, although they take place everyday, are hardly ever exactly the same from one day to the next.
One important thing to notice about this composition is that it is a near-far composition. The near element is the sandstone formation with the concentric circles, the middle ground elements are the teepee-shaped buttes, and the background element is the mesa at the top of the image as well as the sky.
Notice also the size of the foreground element. It is very large, or rather I made it look very large. In reality it is only 3 feet in diameter. However, when I took the photograph I used a wide-angle lens and positioned the camera close enough to the sandstone formation to make it extend from the right to the left side of the image, nearly touching the borders of the image on both sides. When composing a foreground-background image, you want to make sure that you make the foreground large enough. A large foreground is one of the key aspects of a successful foreground-background photograph. Many foreground-background compositions fail because the foreground is far too small and therefore not noticeable enough.
Star Trails
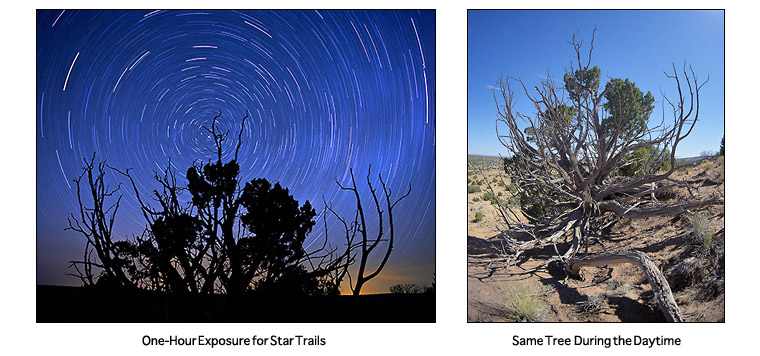
Night photography can literally transform a landscape. In the photographs above you can see the power of this transformation first hand. On the left is a one-hour exposure taken on a moonless night, while at right is the same exact scene photographed during daytime.
While the daytime photograph qualifies as a snapshot, the night photograph captures our attention. The image was composed so that Polaris is at the center of the frame, creating a pinwheel effect over the 1-hour exposure. The resulting circular star pattern becomes the most visually attractive element of this photograph, an element that could not be had during daytime.
In this image the trees are reduced to silhouettes. The tallest tree is at the center of the image, while the other trees and branches spread out to the left and right. I chose this tree after looking at many other trees along the ridge where this photograph was taken. I decided to use this particular tree because of its graphic quality. The dead branches work better for this photograph than a full canopy would, because at night dead branches have a far more graphic quality than leaves.
The color of the sky is equally important. Deciding on a color for the night sky is not easy because we see colors at night mostly in shades of grey. The low light level causes the cones in our eyes –the color sensors in our eyes-- to stop working, leaving the rods –the brightness sensors in our eyes—to function alone. The result is that we see mostly in black and white at night, something that becomes a challenge when it comes to deciding what color things should be in night photographs.
I could have just as easily made the sky yellowish, or grey. I decided on a dark deep blue, vignetted around the edges, first because to me this is the color of night and second because I love the rich, velvet feel of this color. Dark blue also works very well with black, another reason for using this color in a night photograph.
This photograph was captured over a one-hour exposure. During long exposures digital cameras create a dark frame after the exposure is complete. While not an absolute requirement (most cameras can be set to turn dark frame exposure on or off), this is a big plus in regards to image quality. What the camera does when it creates a dark frame is compare a pure black frame to the one hour exposure, looking for “hot pixels” which are pixels that are just noise instead of photographic information. The camera then removes these hot pixels, leaving areas of pure color (such as the blacks and blues in this image) free of white pixels. Without calculating the dark frame chances are that the image would have a number of hot pixels and that these would have to be removed manually with the cloning or healing brush. With the dark frame this is done automatically, and the resulting image is free of defects.
The important thing to keep in mind is that the dark frame takes as long to calculate as the exposure time set for the image. So, if you set the camera for a one-hour exposure like I did here, you have to plan for a two-hour exposure between taking the photograph and calculating the dark frame. What this means is that you have to have enough battery power to last for 2 hours. Otherwise, if the camera runs out of power, you will lose the photograph. In this case, 2 hours was the maximum time I could get out of the Canon 1DsMk2 battery, which is why I decided to do a 1 hour exposure.
The other thing that you need to use is a timing remote control. This is the only way to set the camera to such a long exposure. With this remote you can trigger the shutter and set it to close after one hour.
Finally, I used a wide opening on a wide-angle lens (f4 on a 17mm lens I believe) and set the ISO to 100. There was no need for a high ISO since I was not trying to shorten the exposure time. Over the course of an hour, all the areas that are lit will show detail in the image. The low ISO is therefore used to guarantee a noise-free photograph.
Backlight

Backlight, or backlighting, is one of the most dramatic types of natural light. If you want to create dynamic images, then you need to consider backlighting.
For backlight to work you have to have the sun in a low position. While it is possible to create a backlight effect with the sun high in the sky, most foreground objects are simply not tall enough to be backlit when the sun is high.
A low sun means photographing at sunrise or sunset. This means that you not only get backlight, you also get the color and drama of sunrise and sunset. As I said, if you want dynamic lighting, this is it.
Backlighting a subject basically means placing this subject right in front of the sun. The light therefore comes from behind the subject, highlighting the contours of the object or of the entire scene.
You can have the sun itself visible or not in a backlight situation. In the example at left above, Sunrise at Canyon de Chelly, the scene is backlit but the sun is not visible. The sun is located in the middle of the image and above the canyon, but was not included in the photograph. What we have is backlight without seeing the light source itself.
In the two other examples, in the middle and at right above, the light source –the sun—is shown in the photographs. We therefore have the backlit subject plus the light source, making for an image as dynamic as possible, especially when combined with a wide-angle view, since wide angles by nature create dynamic compositions.
The sun in these two examples shows up as a star. The star-effect is created by using a small f-stop such as f22 or smaller. What creates the star is the diffraction of the light onto the blades of the diaphragm in the lens. The diaphragm is the mechanical device located in the lens that controls the lens aperture, also called the f-stop. The design of the diaphragm, together with the number of blades in the diaphragm, has a direct effect on the shape and the visual quality of the star. Some lenses create better sun stars than others, so if you like this effect you may want to experiment with different lenses to find out which ones create the best sun stars in backlight photographs.
Open Shade
I often say that open shade is one of the best-kept secrets in photography. I say that because in terms of light quality, and in terms of how well open shade light works for photography, it certainly is. I also say that because, besides professional landscape photographers, not many people know how valuable open shade is when your goal is to take superb photographs.
Open shade is a type of lighting that occurs in one of two situations: on a cloudy day, when the sky is uniformly filled with clouds, and on a sunny day, when you photograph in the shade while being careful to not include any direct light in your photograph.
Because open shade does not have any direct light, there are no shadows in scenes lit by open shade. And, because there is no direct light and no shadows, contrast is reduced to a minimum. Therefore, open shade light is one of the lowest-contrast lights you can find in nature.
Open shade is called open shade because you photograph in the shade, either shade created by clouds or shade created by elements in the scene that block direct sunlight. Shade looks dark to our eyes, but when exposing the image you “open” the shade by overexposing the image. Our eyes perceive shadows and overcast days as “dark” because of the way our eyes and brain work. We perceive something as being “dark” by comparing it with something that we know as being “light.” Therefore, for us, shadows are dark in comparison to areas lit by direct sunlight, and cloudy days are dark in comparison to sunny days. However, cameras do not see things that way. For a camera, having a dark or a light photograph is relative to the amount of exposure given to this photograph. Take a “dark” shadow, or a “dark” cloudy day, overexpose it slightly, and you have a bright photograph, or a photograph that looks as if it had been taken on a bright day. On the other hand, take a bright sunny day, underexpose it, and you have a dark photograph.
Because open shade looks dark to the eye, many people do not think that it is good light for photography. They think that if the scene looks dark the photograph will be dark. As photographers we know better than that. We know that how something looks in reality and how something looks on a photograph can be totally different. It is this knowledge that enables us to use open shade for what it does best: create photographs with soft contrast and saturated colors.
Saturated colors? Yes, indeed. This is another quality of open shade besides its soft contrast and lack of shadows. Colors are saturated in open shade because they are not lit by direct sunlight. Direct sunlight, except at sunrise and at sunset, bleaches out colors. Because of its intensity and lack of color, direct sunlight desaturates colors in photographs just like bleach desaturates colors on clothes.
I am often met with incredulous looks when I present this information, so if you doubt the veracity of what you just read I recommend you do this simple test. Take your camera out on a sunny day, set it to raw capture, and photograph the same element –a flower, a rock, a patch of grass, etc.—in direct light and in open shade. Then, convert the photographs on your computer and compare the colors. You will have to add a little bit of saturation to both images because raw photographs are by nature desaturated, so make sure to add the same amount of saturation to both images to insure that the test is consistent.
You will find out that the colors in the open shade photograph are more saturated than the colors in the direct light photograph. The only time when this is not true is when you photograph at sunrise or sunset. At that time colors are far more saturated because the sunlight is filtered by the atmosphere. At sunrise and sunset the sun is low on the horizon and the light of the sun must go through all the layers of haze and dust that hover over the earth. These layers of haze and dust filter the light by removing most of the colors of the sunlight, leaving mostly yellows, pinks and reds. This is why sunrise and sunset light has such a warm color. At the same time, the intensity of the sunlight is also reduced by having to go through these layers of dust and haze, and as a result the light is softer. Softer and warmer light is great light for photography, which is why photographing at sunrise and sunset works so well for us.
As the sun rises in the sky, the amount of dust and haze the sunlight has to go through is reduced, until, when at the Zenith (the highest point the sun will be in the sky on any given day) the sun has to go through a minimum amount of dust and haze. As the sun rises, the intensity of the sunlight reaching Earth increases and the colors of the sunlight becomes more and more neutral. In other words, as it gets higher in the sky, the sun casts deeper and deeper shadows while the color of the sunlight becomes less colorful, less red.
Open shade removes all these variables. Since there is no direct light there are no shadows and saturation is higher.
Reflections
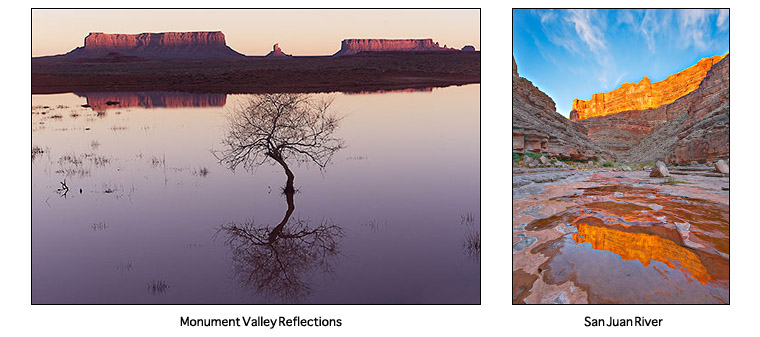
Reflections in nature need two things to occur: first, a body of water, small or large. Second, an element that is reflected in the water. This element can be as simple as clouds or as complex as a mountain range overlooking a body of water. Without water there can be no reflections in nature. And without an element to reflect in the water, there can be no reflections either.
Reflections are a purely visual phenomena, and for this reason they are extremely effective in photography. I often say, “Always photograph reflections.” You are working with a purely visual effect every time you do so and therefore there is a high probability that you will be creating interesting photographs.
I say that reflections are purely visual because not everything that we want to photograph is 100% visual. As I discussed in my essay The Eye and the Camera, much of what makes us want to photograph a natural scene is not visual. We may be attracted to a scene because of the way it feels rather than because of the way it looks. How something feels is invisible in a photograph. Only how something looks, provided it is photographed adequately, will be visible in the image. The warmth of a summer day, the call of a raven flying below the rim of a canyon, the smell of pinion pine sap, the feeling of solitude generated by being alone in a location far away from everything, none of that will be present in your photograph unless, somehow, you find a way to turn these other-than-visual feelings into a visual reality, into something that those who look at your photograph can see in the image.
Doing this is not necessary with reflections because reflections are 100% visual. They are not about sound, or smell, or feeling warm or cold, or experiencing solitude, or any other feelings. They are about an object reflecting its image into a body of water. Therefore, by not calling upon anything else than our sense of sight to be experienced, reflections are a photographer’s best friend! If you photograph reflections, there will be no bad surprises. However, there are a few things to keep in mind in order to create outstanding reflection photographs.
The first one is that reflections often need polarization to look their best. Together with rainbows, reflections are one of the main reasons why you should carry a polarizing filter with you. While the effect of polarization can be mimicked, to some extent, in Photoshop, it cannot be 100% duplicated. This is one instance in which using a filter in the field is still necessary. Using a polarizer will let you darken reflections. It will also help you make reflections stand out more by removing unwanted glare on the water or by darkening the water so that you no longer see what is below the water.
The second thing to keep in mind is that a reflection is always darker than the object it reflects. This is because water absorbs a certain amount of light. Therefore, the reflection of an object is always darker than the object itself. This means that during processing you will have to selectively brighten the reflection area of the photograph to make it match the density of the object reflected in the water. If you do not do that you will have a reflection that is darker than the reflected object. While this is ok if this is the effect you are after, it can be a problem if you are expecting the mirror image to mirror the density as well!
The third thing to keep in mind is that a reflection will often take on the color of the reflecting surface. Reflections in water are often bluish, because most bodies of water are bluish. However, when the water is green, then the reflection will be greenish. With shallow bodies of water on a sandy background, the reflection will take on the color of the sand, which is yellow, brown or red as the case might be. This is particularly true when the reflecting element has a neutral color, in which case the colorcast created by the background is particularly noticeable. Clouds may be the instance in which this is most noticeable. In Playa Reflections, the cover image of Mastering Landscape Photography, I had to remove a significant amount of yellow from the clouds reflected in the shallow waters of the Death Valley Playa. Without this modification, I would not have achieved a perfect balance of density, tone and color balance between the sky and the reflections. I also had to brighten the reflections because, as I mentioned, the reflections were darker than the clouds and the sky.
This was also the case with the example of Slickhorn Reflections, above at right. Plus, I was dealing with a high contrast scene. The top of the canyon was receiving direct light from the setting sun, while the bottom of the canyon, where the reflections were, was in deep shade. I had to combine several bracketed exposures to get details throughout the scene, in addition to brightening the reflections and removing the colorcast. In this instance, the shadows were bluish because they were lit by the blue sky (see the section on air light in this chapter) and I wanted them to have a warm tone so that they would be in harmony with the warm colors of sunset at the top of the canyon.
In the other example, Monument Valley Reflections, at left above, the problems were far fewer because only a small amount of sky was visible. Furthermore, the area of sky that was visible was not very bright. I therefore had hardly anything to do to correct this image besides brightening the reflections slightly and making sure that the color balance was correct. I did not have to worry about having a colorcast on the reflection since the object reflected in the water was pure black. The reflection was going to be pure black –colorless—no matter what. Sometimes things are hard, and sometimes things are easy. With these two photographs we have an example of each.
Comments on NPN landscape photography articles? Send them to the editor. NPN members may also log in and leave their comments below.
Alain Briot creates Fine Art Photographs, writes books, teaches workshops and publishes DVD tutorials on composition, printing and marketing photographs. You can find more information about Alain's work, writings and tutorials on his website at http://www.beautiful-landscape.com You can also subscribe to Alain's Free Monthly Newsletter. You will receive 40 free essays written by Alain when you subscribe.