Composing With Light - Part 2 |
This is Part 2 of 4. You can read part one at this link
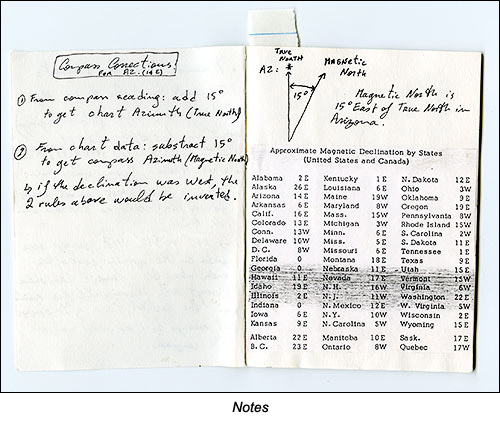
Magnetic declination table
When calculating a precise azimuth with a compass you have to take into account the magnetic declination for your location. This is because compasses point to the magnetic north while maps and charts indicate true North. In other words, the same chart can be used for any location if you adjust the azimuth on the chart for your location. You adjust the azimuth by adding or subtracting the magnetic declination value for each specific location.
So an azimuth chart is not normally calculated for a given location. Instead, it is calculated for given latitude. Latitude indicates the location of a place on earth North or South of the equator. Each specific latitude is parallel to the equator. On maps, latitude lines are shown as horizontal lines running around the earth.
Monument Valley, to continue with our example, is located at 37 degrees of latitude North, meaning it is 37 degrees North of the equator. However, many other locations around the Earth are also located at 37 degrees of Latitude North. Therefore, having a chart giving the azimuth for a given latitude is much simpler than having multiple charts giving azimuths for each location along a specific latitude. To find all of the locations along a given latitude, all you have to do is take a map and draw a line at 37 degrees of latitude north. A similar line can be drawn for all degrees of latitude. Latitude lines are called Parallels because they are parallel to each other.
If we were to draw a line along the vertical axis of the earth, running North and South instead of East and West, that line would indicate longitude. Longitude lines are called Meridians from the Latin meridies, meaning "midday" because the sun crosses a given meridian midway between the times of sunrise and sunset. The terms AM and PM mean Ante Meridian and Post Meridian and indicate whether the hour is before or after the sun crossed the meridian line for a specific time zone. The prime meridian, the one indicating a latitude of 0, passes through Greenwich, England, where the British Royal Observatory is located and where the prime meridian was established in 1851.
The Longitude of Monument Valley is 110 degrees West, meaning it is 110 degrees West of Greenwich. Together, the latitude and the longitude values allow you to find any location on earth precisely. A GPS works by giving you the latitude and longitude (also called the coordinates) for any location where you are or where you want to go.
The numbers I gave for Monument Valley were rounded to the closest digit. To be fully accurate the exact latitude and longitude of Monument Valley is 37 degrees, 0 minutes, 56 seconds of latitude North and 110 degrees, 11 minutes and 57 seconds of longitude West.
The terms North and West respectively indicate North of the equator and West of Greenwich.
So where can we find out the azimuth and the time where the sun will rise and set for a specific location and a specific time of year? Below I describe several ways that can help us find this information.
The Old Farmer’s Almanac
A source of reliable of information that I use extensively is the Old Farmers Almanac. I use this brand of almanac specifically, although there are several other almanacs available. I just find the Old Farmers Almanac to be the most comprehensive.
Almanacs are primarily written and intended for farmers, gardeners, hunters and other people who work outdoors tending fields, plants, animals, etc. Because their occupations are seasonal and because their lives are organized around the seasons and the weather, they need information about the seasons and the weather as well as predictions about how cold or warm the next year is going to be, when and where to expect frost or drought, and one million other things of this nature. And yes, they also need to know when and where the sun and the moon will rise and set. This is where their needs and ours coincide. Almanacs provide all this information in an accurate and practical manner. Furthermore, they are usually presented in a way that is reminiscent of past centuries. This slightly antiquated approach is refreshing in an age where information is provided to us through the latest technologies, and in a world where digital and wireless devices are the norm. Almanacs have a certain antiquated charm that I find refreshing, a certain je ne sais quoi if you will.
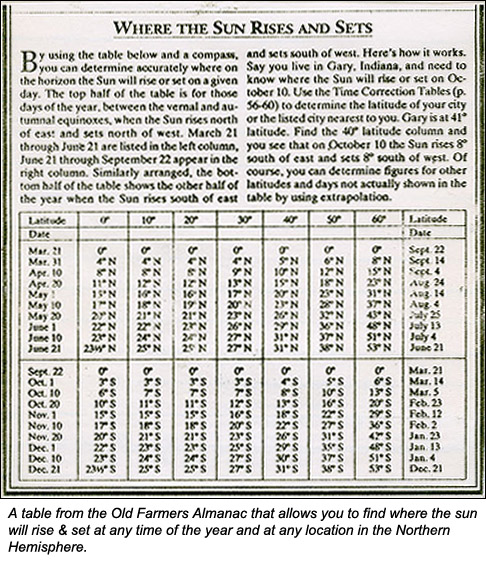
Below is a page scanned from the Old Farmer’s Almanac showing where the sun will rise and set from 0 to 60 degrees of latitude North, literally the whole of the northern hemisphere. To use this table, find out the date and the latitude at which you want to know when the sun will rise and set, then adjust each azimuth for your exact location by adding or subtracting the magnetic declination for your location using the table provided in my notes, above.
The Old Farmer’s Almanac also features charts showing when to expect the major meteor showers as well as a wealth of information, some more relevant than others, about the weather and the natural world. It also offers charts showing the phases of the moon, the place where the moon will rise and set, the moon’s age, the horoscope and much more. I consider it a must, both for its usefulness and for its refreshing and entertaining aspects.
GPS
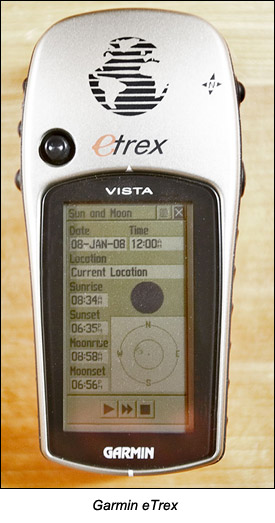
A GPS is another way to find out when the sun will rise and set. Below are the sunrise/sunset and moonrise/moonset information screens for the Garmin eTrex. A GPS offers a simple and convenient source of information. This information is readily available since a GPS is carried in your bag or in your car. If you do not have a GPS yet you should get one because they complement maps and in some instances are more practical than maps.
Having a GPS will also prevent you from getting lost when you photograph in remote locations or in locations where finding your way is challenging, such as in a forested area or in sand dunes. The simplest approach to avoid getting lost is to take your GPS with you when you photograph. Before leaving your vehicle, mark the location of your car on your GPS. You can save this location as a “favorite” by naming it “Car + your specific location + the date or the number of your hike.” Because GPS only allows you to use a few letters, you will have to use a shortened form of writing. A writing style inspired by custom license plates works well. For example, to indicate the location of my car at white sands on my 4th hike, I would use the sentence “Car White Sands 4” which would be entered as CARWHTSDS4.
At the end of my hike, if I need to know where my car is, all I have to do is set the GPS to “Go to CARWHTSDS4” and it will show me the way to my car. The photograph at right below shows the “Mark Waypoint” screen for the Garmin eTrex Vista. I blurred the location data since it would only be useful if you were parked exactly where I was. In the field, selecting “CARWHTSDS4” and clicking on the “GoTo” button at the bottom left of the screen will instruct the GPS to indicate the route back to this location.
You can also keep your GPS turned on during a hike to enter the locations that you photograph. Finally, you can set the GPS to mark your trail as you hike and then follow this trail backwards when you are ready to leave. I prefer the “Mark Waypoint” approach because it is the simplest and because it shows me the shortest route back to my car.
Whenever you take your GPS with you, make sure to take a set of new spare batteries with you as well. GPS are “battery hungry” and will go through a set of alkaline batteries in a couple of hours. Having a GPS with dead batteries and no spares won’t do you much good!
Compasses
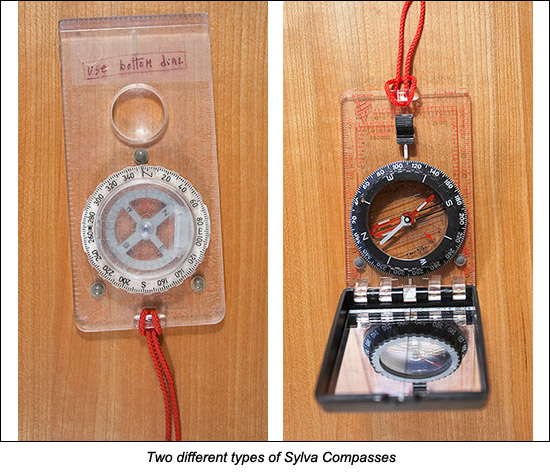
A compass is another very useful tool. Certainly, just about every handheld GPS unit comes with a digital compass, but I personally prefer using an analog compass. For one, I find that it gives me a more accurate reading when I need to find an exact azimuth because I can sight more accurately with a handheld compass. I also find it easier to dial-in the magnetic north correction. Eventually, this is more a matter of personal preference than anything else. What matters most is that you have a compass, digital or analog, to locate the azimuth on the horizon.
The thing to note here is that knowing how to find the azimuth, and knowing how to find where the sun rises and sets, also teaches you how to find where the moon rises and sets because the process is the same whether you are looking for the position of the moon or the sun.
The moon however has different astronomical characteristics than the sun in regards to photography. First, while the sun has a one-year cycle, the moon has a 29-year cycle. This means that the moon may rise or set at a specific location only once in 29 years, giving us more of a problem in regards to getting the moon in a precise location for a photograph.
If you want to get the moon rising or setting in a given position, say within an arch for example, the process of finding when and if this will happen is simple. As I mentioned above, this process is the same for the sun. First, go to the location and, using a compass, measure the azimuth where you would like the moon (or the sun) to rise and set. Second, using a chart or astronomical software (see below), run the numbers to see if and when the sun, or the moon, can rise at this azimuth.
Web sites
Websites are another very useful source of information. Given the nature of the Internet, the number of websites providing information about sunrise/sunset and moonrise/moonset is increasing exponentially each day, month and year. Since there is no way to track them all, all I can do is list some of the websites that I have used recently and mention what they have to offer.
aa.usno.navy.mil (http://aa.usno.navy.mil)
This is the website for the Astronomical Department of the US Naval Observatory. There you can find the Sun and Moon Data for any given day.
Of particular interest is the separate listing for astronomical, nautical, and civil twilight. Twilight refers to the time between dawn and sunrise and sunset and dusk. The three different types of twilight refer to the position of the sun below the horizon. Astronomical twilight is when the sun is more than 18 degrees below the horizon. Nautical twilight is when the sun is between 12 and 18 degrees below the horizon. Civil twilight is when the sun is less than 6 degrees below the horizon.
For photography, we only need to know the time of civil twilight. The other two twilights–astronomical and nautical-- occur when the sky is still too dark for regular photography. They are however useful when doing star photography because they tell you when the sky starts to get brighter. With star trail photographs you want to close the shutter before astronomical twilight because this is when the night sky starts to get brighter. Leaving your shutter open after that will cause your photographs to be overexposed.
www.locationworks.com (http://www.locationworks.com)
This site does what drawing a line around the globe for a specific latitude would do: it allows you to find all the main cities on a given latitude. It also gives you the times of sunrise and sunset for that latitude at any time of the year. Remember that sunrise and sunset times do not vary for a specific latitude regardless of where you are on earth. What changes is, first, the magnetic declination, which you have to adjust for your location when you use a compass, second, the specific time zone and third, the use of daylight saving time or not.
www.timeanddate.com (http://www.timeanddate.com)
This website gives you the time of sunrise and sunset for a given city and date, the azimuth for sunrise and sunset, and the length of the day. It also provides many other types of information about the sun, the moon and the planets.
www.sunrisesunset.com (http://www.sunrisesunset.com)
This website features a table with a selection of cities arranged by country. For each city it shows sunrise and sunset times for a specific date.Astronomical software
Astronomical software has its place in the photographer’s digital toolbox. For one, it allows you to calculate the times of sunrise/sunset and moonrise/moonset. It also makes it easy to find when the sun or the moon will be at a given azimuth.
If you do nighttime photography, especially star trails, astronomical software also facilitates finding where Polaris will be located on any given night. Finding where Polaris will be in the night sky is important because Polaris, also called the North Star, is the only star that does not move during the night. Polaris stays in the same place all night while all the other stars rotate around it. Centering your photograph on Polaris will create a pinwheel effect on the photograph. An example of this effect is provided in the Examples section of this chapter.
Astronomical software can be very simple, offering just the time and location of sunrise/sunset and moonrise/moonset, or very complex, offering the location of all the planets and stars in the universe. Below, I give examples for both types of software.
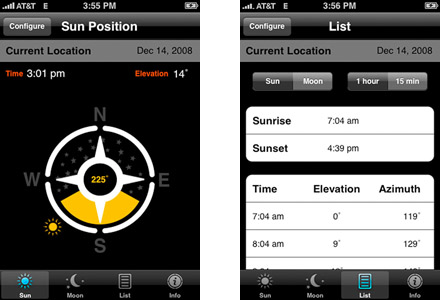
FocalWare
FocalWare is an iPhone application that calculates sunrise/sunset and moonrise/moonset times and position for any location in the world. Because the iPhone is a wireless portable device, iPhone applications are always available and easy to use in the field.
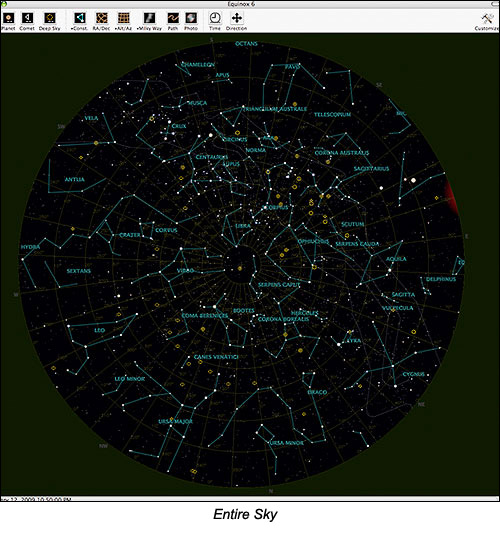
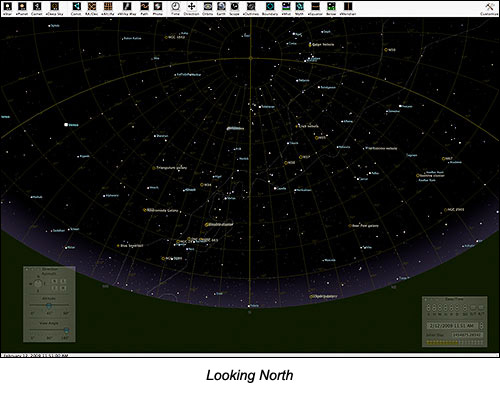
Equinox 6
Equinox 6 is a full-fledged astronomical software package. In a way, it offers far more than photographers need. However, I have always liked astronomical software for what it teaches about the planets, the stars and the universe. Eventually, studying sunrise/sunset and moonrise/moonset times and azimuths is studying astronomy. We don’t always think about it that way, but it is. The sun is a star and the moon is a natural satellite orbiting Earth. Furthermore, the sun and the moon, in their journey across the sky, follow the ecliptic, the same path that the other planets in the solar system follow.
All of these astronomical bodies are related, and even if we need information only about the moon and the sun, it doesn’t hurt to learn more about the entire solar system and about the universe, the stars, the galaxies, and so on. The sense of wonder that this knowledge gives you, when you realize how small and insignificant we really are is similar, for me, to the sense of wonder that I feel when I realize how vast the landscape is and how small we are. There is a symbiosis, a parallel understanding and a direct comparison between how I feel towards nature and how I feel about the universe.
Looking at the night sky while on a photographic trip to a remote location, far away from cities and without any light pollution, is an unforgettable experience. Next time you are out there on a moonless night, driving back from a shoot in a distant location, stop the car in the middle of nowhere, turn off the engine and the headlights, and look at the Milky Way. As your eyes adjust to the darkness, you will see more and more stars until the Milky Way looks like a bright band of white stars streaming across the sky. As you do this keep in mind that it takes time for your eyes to adjust to total darkness. If you have been looking at a bright light source, it can take up to 20 minutes. As your eyes adjust to the darkness you will see more and more stars until the night sky is filled with millions of stars all above you.
Below are a couple of screens shots from the display options offered Equinox 6:
Gossen & Pentax spotmeters
I am often asked if we still need a spot meter or light meter, now that we have digital cameras with built in histograms and sophisticated metering systems. The answer is that, if you use a digital camera with a built-in light meter and histogram, you don’t need a separate light meter. In fact, if you have just a histogram and no built in meter, as with some digital backs mounted on mechanical cameras with no built in light meters, you still don’t need a light meter. The histogram is all you need. To find the proper exposure, you start with your best guess (which can be pretty accurate with experience), take a photograph, look at the histogram of the resulting photograph, and make corrections if necessary. Increase the exposure if the image is too dark (histogram too far to the left) and decrease the exposure if the image is too light (histogram too far to the right). Usually 2 or 3 exposures using this approach will give you a perfectly exposed photograph.The reason why you would need a separate light meter, preferably a spot meter, when using a digital camera is to study the light. It is not to calculate the exposure (the histogram will give you more information in that regard), it is to learn about the luminance of the various objects and elements in the scene you are photographing.
Certainly, if your camera has a built-in spot meter you can use that. However, I find that a standalone spot meter is better. First, it is designed to measure the light and nothing else. Second, the best models feature several ways to compare readings from different areas of the scene. They can also store several readings and compare them in different ways.
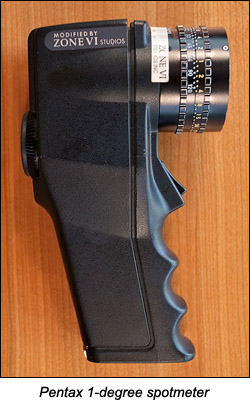
Below are photographs of several light meters I currently own. In all fairness, and because this question comes about frequently, my favorite is the Pentax 1 degree spot meter. Why? Because it is simple, gives extremely accurate readings, and is fast to use. I don’t like to fumble with my spot meter. I want it to tell me what I want to know and move on. What is important is capturing the image, not endlessly trying to locate the controls in order to calculate the exposure.
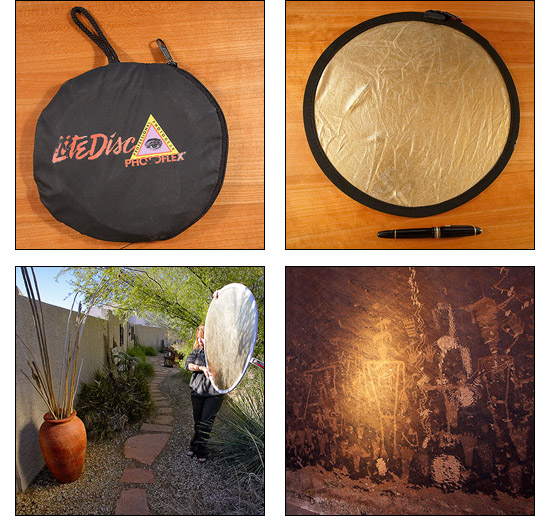
Reflectors: Creating artificial reflected light
Reflectors are the last type of tool I want to mention. A reflector consists of a shiny surface on which direct light is reflected. The most practical types of reflectors are folding reflectors. This makes them easier to carry because they are much more compact and thus take less space. You can find extremely small reflectors that, when folded, are no more than 5 or 10 inches in diameter, making them extremely easy to carry with you in the field in a regular camera bag.
Using a reflector is simple. All you need is direct sunlight. You have to have direct sunlight to reflect otherwise the reflector will not do you any good. To use the reflector simply point the reflective surface towards the sunlight. Then orient the reflector in such a way that the sunlight reflects off the reflector towards the area you want to light. The reflective surface of the reflector is powerful enough to make the reflected light look like direct light to the untrained eye, as you can see in the photographs below.
Reflectors come with reflecting surfaces of different colors, usually gold, silver or white. Because light takes on the color of the surface it is reflected off, you need to select the color of the reflector carefully. I like the gold surface because it gives a warm color to the light, not unlike the color of sunset light. However, you may prefer the colder light of the silver reflector or the more neutral color of the white reflector. Some reflectors are reversible and come with two different reflecting colors, such as gold and silver, one on each side of the reflector.
Adding reflected light to a scene is most effective when the subject is in the shade. By bouncing reflected light to a shaded area, you effectively add a highlight to this scene. An effective technique is to bounce reflected light onto part of the subject, not on the whole subject. This makes the area that receives reflected light stand out. It also makes it look more important by focusing the attention of the viewer to that one area.
Another technique is to use bounced light to show the texture of a subject. When used that way, the reflector is positioned so as to project the reflected light horizontally. This technique mimics the effect of sunrise and sunset light by creating horizontal light that grazes the surface of the object and makes the texture of that object stand out. It is particularly effective with objects that have an interesting texture. This technique is commonly used when photographing petroglyphs, designs carved on rock surfaces by prehistoric cultures. These carvings are often hard to see because the carvings are very shallow. By using the reflector in the manner I just described, it is possible to increase the contrast of the designs and make them stand out more. Of course this technique requires that direct sunlight be available nearby. Since this is not always the case, it is sometimes necessary to return to a location when the sun shines next to the petroglyphs.
For maximum light intensity, direct sunlight cannot be bounced from far away. The amount of light that reaches an object is reduced by four each time you double the distance between the light source and the subject, therefore it doesn’t take long until the light is too weak to light the subject. This rule is called the inverse square law and it is an important rule to keep in mind when working with reflected light. When working with direct sunlight this rule does not come into play since we cannot significantly increase or decrease the distance between the sun and us! However, you need to keep it in mind when working with flash or other artificial light sources since it is easy to change the distance between the light source and the subject. Again, this rule is simple: doubling or halving the distance between the subject and the light source, will reduce or increase the power of the light by a factor of 4
Comments on NPN landscape photography articles? Send them to the editor. NPN members may also log in and leave their comments below.
Alain Briot creates Fine Art Photographs, writes books, teaches workshops and publishes DVD tutorials on composition, printing and marketing photographs. You can find more information about Alain's work, writings and tutorials on his website at http://www.beautiful-landscape.com You can also subscribe to Alain's Free Monthly Newsletter. You will receive 40 free essays written by Alain when you subscribe.