Microtek M1 Pro
Text and photography copyright © Guy Tal. All rights reserved.
At long last, Microtek finally released the much-anticipated M1. If you have not been among the anticipators, well then you are likely not a large format photographer yearning for a sub-$1000 high-quality desktop scanner. Still, for the few of us who are, this announcement had been a long time coming.
As Microtek began shipping the first units, the large format community was abuzz with preliminary reviews. The reports were decidedly mixed. The usual "experts" quickly took to their high horses and well-worn soapboxes. Sample scans from operators who may or may not possess the requisite skills made the rounds on various web forums, and the potential buyers became hopelessly confused. In other words: business as usual on the Internet.
Of all the confusion, bitterness, and general white noise on the 'net, I did manage to distill a couple of interesting facts: 1) Many users experienced bugs related to the bundled SilverFast software, 2) SilverFast is reportedly working on a fix due out in a few days, and 3) When things do work, scan quality is very good.
So, I decided to have the scanner reviewed by one of few people I consider qualified to assess its performance in light of my own skill level and intended use: me.
Note that this review is my personal hands-on, real-world experience with this machine. It is not intended to replace the owner's manual, or to recite technical specs or the manufacturer's marketing material. These can be found in any number of other places. What I'll cover here is my current experience, living and working with this scanner, as a large format photographer in need of a home scanning solution.
A little bit of background
In recent years, several vendors added the ability to scan film to various flatbed scanner models. These devices, primarily intended to scan reflective material, usually include an additional overhead light source allowing the scanner's CCD to read light projected through the translucent emulsion. When implemented in a consumer model scanner, results are generally inferior to those of dedicated film scanners. Flatbed lenses and sensors are not usually optimized for the high resolution and precision required to capture the degree of detail and dynamic range film is capable of recording.
While dedicated film scanners at reasonable prices are widely available for 35mm and medium-format films, very few were ever made for 4x5 or larger formats. Of these few, practically all affordable models were since discontinued and many photographers found themselves searching for used/unsupported models or paying for expensive drum scans. To these users, affordable flatbed scanners were a bright ray of hope.
Manufacturers like Scitex/Creo and Heidelberg have shown that high-end flatbed scanners are capable of professional-grade results and can give drum scanners some stiff competition. Still, these creme-de-la-creme of flatbeds are often beyond the reach of casual photographers. This created a niche for affordable flatbeds of good quality; a niche where two manufacturers quickly emerged as the primary players: Microtek and Epson.
Fast forward
The M1 is Microtek's flagship flatbed photo-scanner, having discontinued the much-acclaimed 1800F and 2500F, to the chagrin of many photographers who appreciated their fine qualities. On the Epson side of the ring, the recent introduction of the V700 and V750 models raised the bar from the previously successful 4990 and 3200.
There are several differences between the M1 and V7x0, which I won't spend too much time on. On paper, specs rarely tell the whole story so for me this was more of an emotional choice than anything else: I have had good luck with Microtek scanners in the past.
Still, in particular, a couple of things stood out to me: Microtek's E.D.I.T technology, which scans the film directly rather than through the flatbed's glass platen, auto-focus which I find a critical feature in scanners, given the shallow depth-of-field of their lenses, and hefty film holders that despite their "plasticky" feel still seem superior to the flimsy ones I have seen from Epson.
One feature conspicuously absent on the M1 is ICE - a technology that uses infrared light to correct for dust and scratches. Strangely, Microtek has a similar scanner selling in Europe under the name F1, which does have this feature. One review I read claimed this has to do with licensing, though Microtek sells other scanners in the US, which do offer ICE, so I'm not entirely sure what the real reason is.
While there's no doubt that dust and scratches are a painful issue for film scanning, ICE's usefulness with Large Format scans is questionable. On other scanner models that offer it, it is not unheard-of for an ICE-enabled scan of 4x5 film to take upwards of two hours. I decided I could live without it.
First impressions
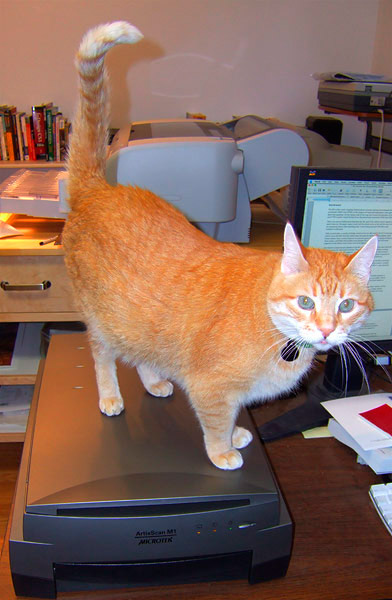
Figure 1: M1 dwarfed by rare Rocky Mountain Ringtail Tiger (captive)
The first thing you'll note as you take delivery of your new M1 is mild soreness in your arms and lower back. The box with all components weighs in at 42lbs. This it not your typical desktop scanner so make sure you have sufficient desk space to accommodate it.
Setup is pretty straightforward. There's an easy-to-follow "Start Here" guide, and for those attempting to install the scanner while intoxicated there are bright yellow numbered stickers on the machine to guide you through the unpacking and setup.
There are multiple pieces of software to install prior to connecting the scanner. These include Microtek's ScanWizard software and drivers, IT8 calibration profiles, and the bundled edition of SilverFast from LaserSoft Imaging. I opted for the pro model for the benefit of getting the full "Ai Studio" version of the software.
Calibration of both SilverFast and ScanWizard was pretty straightforward with the included IT8 targets and everything was up and ready to scan within 15-20 minutes or so.
SilverFast or ScanWizard?
ScanWizard is Microtek's own scanning software. It is full-featured and powerful and has a reasonably intuitive user interface. It is geared towards batch scanning but does very well for individual scans as well. A detailed user manual is included with the package.
SilverFast is a ubiquitous scanning package made by LaserSoft that's bundled with a wide variety of scanners, both consumer models and high-end. While it is packed with great features, its user interface is a bit quirky and takes some getting used to. SilverFast only has rudimentary documentation. Instead, there are little video clips explaining individual functions - very entertaining but not terribly useful or easy to follow. Fortunately (for me) I have had years of SilverFast play time and am reasonably adept at using it. A new user may require some trial and error and friendly advice to make the most of it, though.
At this point it is worth mentioning that the most severe issues reported with the M1 have to do with bugs in SilverFast. Also, my own past experience with the company's technical support, which had been less than favorable, have left me somewhat biased.
Still, as they say, the proof is in the pudding. After multiple attempts at scanning the same chrome with both packages I had to reluctantly admit that SilverFast produces visibly superior results. To me that's where the proverbial rubber meets the road and thus the choice was made: SilverFast, warts and all.

Figure 2: ScanWizard could not retain detail in extreme highlights
Bugs!
My first scan completed with deceptively little fuss and turned out exactly as I had hoped: very detailed, good dynamic range, and accurate color. "It can't be that easy," I thought. And, I was right. It would be a couple more hours before I got my next clean scan.
For my next scan I picked an image with deep shadows to test the scanner's dynamic range and the software's ability to use multiple readings. I set SilverFast to 4x multiscan and that's when the much-maligned banding bug reared its head.
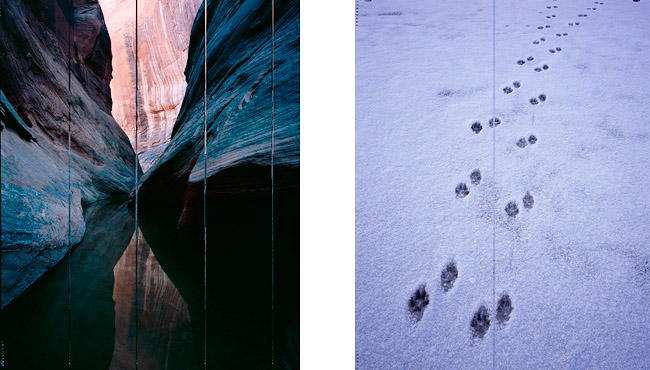
Figure 3: Irregular bands appear on some scans for no apparent reason
Worse yet, any scan from here on showed similar artifacts, even with the original settings restored. I had to close the application and restart it to resolve the issue.
Next, some scans showed pronounced banding. On some occasions, SilverFast would hang and required a force-quit, and when attempting to batch-scan, the second scan only completed partially before SilverFast stopped mid-scan.
After about 2 hours of this, in great frustration, I did what every Mac user dreads and rebooted the computer. Problems gone!
After the restart, scanning carefully one chrome at a time and only using the basic controls (histogram, contrast, brightness etc.) I was able to make multiple scans with no problem.
After several scans, the problems resurfaced, this time resolved again by a restart of the application.
All this leads me to believe that more than one bug is at play here, and that at least one is related to a memory leak and only manifests itself after the software had been running for a while.
So, how good is it?
When it's good, it's very good. That is, on the clean scans detail is excellent and dynamic range is very good, with the caveat that this is a consumer model. Some "difficult" images will always require the best hardware to scan and these will still look far better when scanned with an expensive professional machine, but for a large proportion of my work, this scanner delivers results good enough for very large prints.
Sharpness
At its default settings, SilverFast applies an "Autosharpen" filter. The results for the most part look excellent but in areas of extreme detail, some image information is lost. When sharpening is set to "None", more detail is captured:
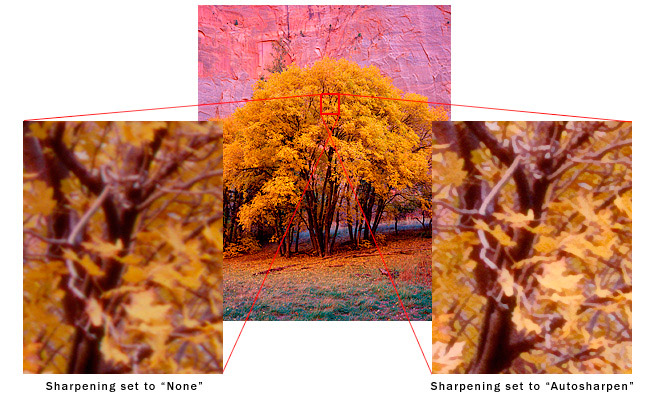
Figure 4: Sharpening setting differences
Shadow/highlight detail and noise
While I did not have the tools to measure the scanner's dynamic range, I did want to evaluate its performance on especially bright and dark images. Noise or over-exposure are common problems with consumer scanners. The M1 with SilverFast did remarkably well with extreme highlights:
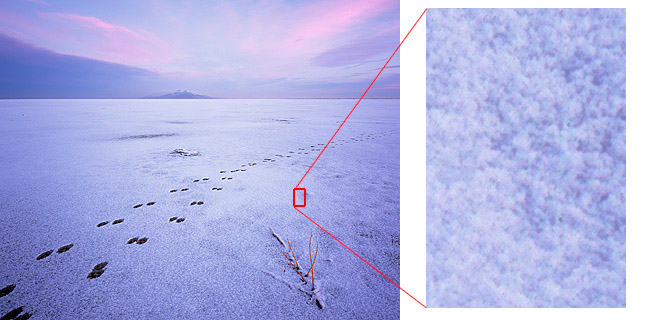
Figure 5: High Key Detail
Deep shadows did exhibit quite a bit of chroma noise. Chroma noise can be effectively cleaned up using various software packages. I used Noise Ninja from PictureCode with good results:
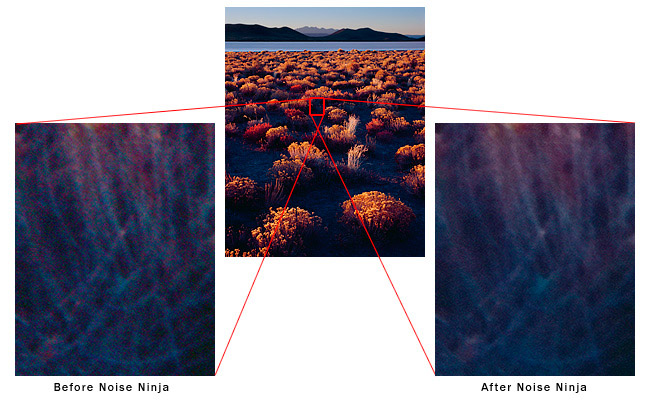
Figure 6: Shadow detail and noise
Scanning artifacts (banding, fringing)
On rare occasions I did come across some banding artifacts. This did not, however, seem to be a recurring issue and a repeat scan eliminated the problem. In some areas of high contrast, minor fringing (chromatic aberration) artifacts could be found. Fringing is fairly easily mitigated using a variety of software tools (e.g. the Lens Correction filter in Photoshop, PTLens from ePaperPress, or LensFix CI from Kekus):
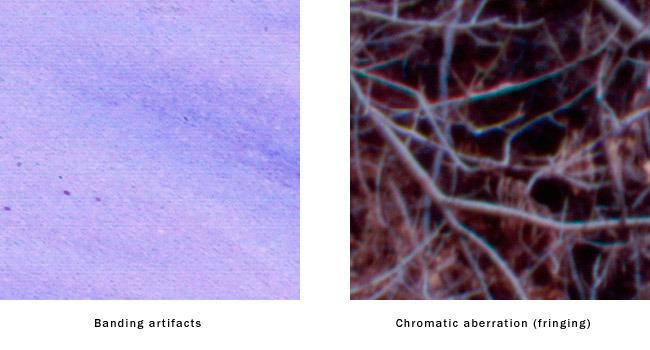
Figure 7: Scanning artifacts encountered in some images
Both artifacts were pretty subtle and, once identified, easy to correct.
Compared to drum scan
So, can a $700 flatbed scanner match the performance of a drum scanner? Well, no, and it would be foolish to think it will. In most cases, the M1 will produce very good scans capable of making very detailed prints. A drum scanner, however, will likely produce better detail and significantly better dynamic range. The real question is, will these advantages come into play in the final print? In many cases no, but in some - absolutely.
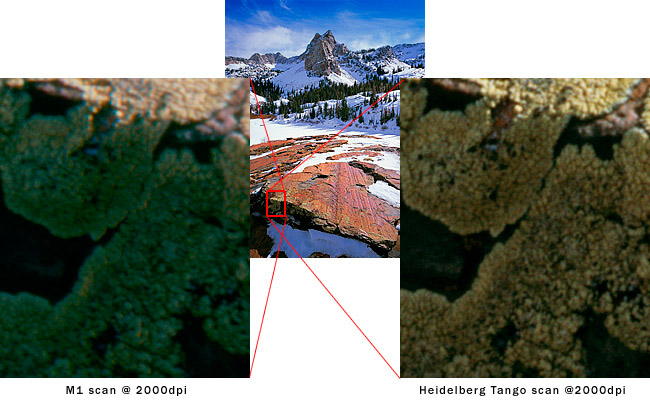
Figure 8: Shadow detail comparison: M1 vs. drum scan
Black and white
Most scanners, and particularly consumer models, are optimized to scan color work. While grayscale is supported, it is often of lesser quality compared to color scans.
SilverFast offers a unique feature called NegaFix, which optimizes the scanning algorithm to a variety or film profiles. I decided to put it to the test and to compare against a common scanning trick: scan the B&W negative as a color positive, then invert the scan in Photoshop.
While my test had not been exhaustive, I did try to get the best possible scan using a home-developed Kodak T-Max neg. My testing showed better results with the inverted color scan compared to NegaFix.
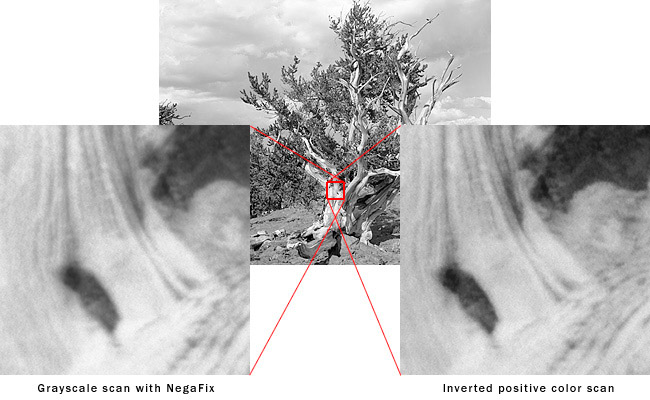
Figure 9: B&W scans using grayscale and color methods
4800dpi: truth or fiction?
Many modern scanners list eye-popping resolutions on their spec sheets, and the M1 is no different. The manufacturer claims a resolution of 4800x9600dpi.
It would serve one to keep in mind that film has its own characteristics that limit just how much detail it can record. Even the finest films will likely not yield additional image detail beyond 3000-4000dpi so any number above that is academic at best.
Further, film grain begins to show at around 2000dpi, even with the finest slide film, so anything above that is a compromise: more image detail at the cost of more visible grain.
Thankfully, with 4x5 originals, there is sufficient film area for very large prints even when scanned at 2000-2400dpi, which allows for good clean scans without distracting grain. Normally I would not go much above that, but for the sake of this review I tried the scanner at its rated optical resolution of 4800dpi.
At this resolution, 16-bit scanning is not an option since the resulting file is larger than the TIFF format limitation of 2GB.
Below is a comparison of a 16-bit scan at 2400dpi, upsampled to 4800dpi, and an 8-bit scan at 4800dpi. It is quite evident that the higher setting does not actually resolve more detail and in fact the 2400dpi high-bit scan shows significantly more detail.
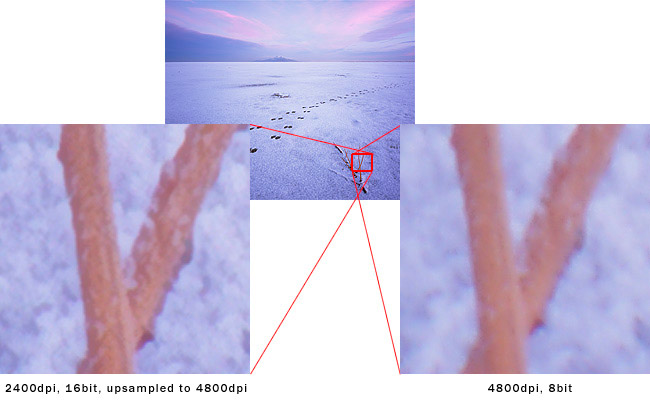
Figure 10: Scanning resolution comparison
To keep or not to keep?
After spending a long day scanning, working through issues, at times frustrated, at times impressed, I had to make up my mind whether to send the scanner back or keep it. After much thought I decided on the latter.
Someone on a web forum forwarded a message from LaserSoft promising a fix for SilverFast in the next few days. If the new version indeed solves the problems above, most if not all of my frustrations will be gone.
Even if some issues still persist, it is clear that the hardware is capable of excellent results, and even with some SilverFast features not working properly, I can still use it for a lot of my work. Considering the $700 price tag and comparing to the cost of drum scans, this is a no-brainer. If it will save me as little as 10-15 drum scans, it will have paid for itself.
Admittedly I was tempted to give the Epson V750 a whirl as well, but finally decided against it for the reasons listed above, which led me to purchase the M1 rather than the Epson in the first place.
Lessons learned, and recommendations
So, to summarize: if you purchased your M1 today you will get a flawed product and you are likely to run into frustrating bugs. Still, the hardware is very capable and it is my hope that the software bugs will be ironed out in the near future.
On the other hand, when used carefully, it produces excellent scans. Don't expect it to rival a drum scan in every case, but in many cases it will provide you with more than acceptable results that are sharp, detailed, and have sufficient quality for gallery prints.
Until the software issues are resolved, a few recommendations for early adopters:
- Don’t use SilverFast's "power features" (HDR, multiscan etc.)
- Carefully examine each individual scan. Once the issues occur, they persist, so if you're not checking each scan you may find out too late that a whole series is impacted.
- Avoid batch scanning until software fix is available
- For Large Format scanning, stick with resolutions of 2400dpi or less. Higher settings result in larger files but not necessarily in more image detail.
- If issues persist in multiple scans, "go Microsoft" and reboot your computer, even if you're on a Mac. I had to do this a couple of times to get rid of recurring problems.
Update: SilverFast fix
Shortly after completing the above review, LaserSoft Imaging released a fixed version of SilverFast to address the issues above, which were widely reported online. The new version (6.5.5r4a, as confusingly distinct from the previous 6.5.5r4) does indeed seem to solve some, if not all, the issues.
I tested the new version by activating the multisampling feature, which earlier produced banding artifacts. The results are clean and impressively low-noise:
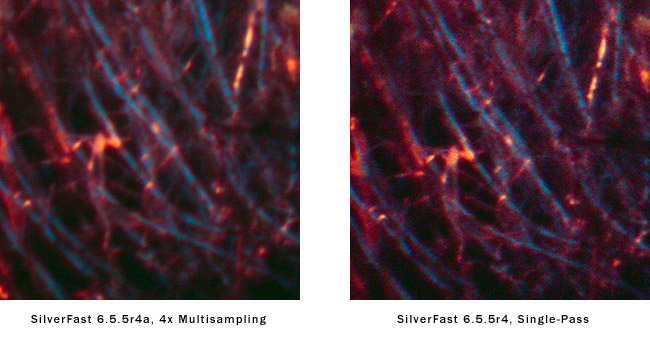
Figure 11: Scan quality improvement with 4x multisampling
Further, it seems the memory leak issue had been resolved too. I left SilverFast running overnight and made another multi-pass scan the following day. It, too, completed successfully. This is indeed excellent news.
So, my final piece of advice: if you purchase your scanner today, chances are it comes with an older version of the software (mine came with 6.5.5r1). Make sure you upgrade to the latest before you begin scanning.
Comments on NPN nature photography articles? Send them to the editor.
Guy Tal lives and works in the scenic state of Utah. His love for the canyons of the Colorado Plateau, and the high peaks of the Wasatch and Uinta ranges is expressed through his catalog of landscape photographs and nature writing. Guy offers fine-art prints, as well as photographic workshops in his home state. Guy's photographs and workshop offerings are available at his web site: http://guytal.com.


| 
