|
|

All rights reserved. Digital photography is advancing in leaps and bounds. It seems new and better technology is constantly being introduced and in some areas, particularly processing and printing, digital technology is quickly establishing itself as equal and sometimes superior to the traditional darkroom. While many photographers chose to align themselves with one side or the other of the digital vs. analog debate, some are successfully combining both – capturing images on film, processing and printing them digitally. I decided to take things a step further and examine the two technologies objectively to see how I can leverage the best of each in my photographic work. This effort resulted in a much-improved workflow and higher success rate than I have experienced before. The virtues of the digital darkroom (i.e. post-exposure) are widely discussed and I will not go into them. In this article I examine the use of digital tools in the initial capture process. The Plain Truth Taking a close look at each step of the process, it became clear that each approach has its obvious strengths and weaknesses in different areas, as well as a few gray areas where picking a winner will likely be a matter of personal choice. Digital cameras offer a treasure trove of photographic tools in the field that traditional film cameras do not – it was these tools that prompted me to look into this matter in the first place. Some of the smallest digital cameras offer such features as advanced metering, histograms, and multiple white-balance settings. Captured images can be analyzed in the field to determine any adjustments that may be required. Digital cameras fail, however, when large fine-art prints are the objective. Medium and large format film cameras still capture a far greater amount of information and are capable of producing larger prints of finer detail and richer tones. Digital cameras (with the exception of very expensive digital backs) also do not accommodate the flexibility of view cameras in controlling perspective and depth of focus. Given the above it was clear to me, as a Large Format photographer that I will continue to capture my subjects on film for the foreseeable future. Still, I also wanted to make use of the multitude of useful tools available in digital cameras. The answer came in the form of a small digital point-and-shoot. Equipment Used For my experiment, I used my trusty Wista VX45 view camera to capture the final images on 4x5 sheet film. Three films were used – Fuji Velvia is a highly saturated and contrasty film, Agfa RSX-II is a low-contrast, neutral-color film, and Kodak Tmax-100 is a black-and-white film providing fine grain and a rich tonal range. This selection was used to match the film’s dynamic range to that of the digital camera. Lenses used included a 90mm wide-angle, 150mm normal, and 240mm telephoto. These focal lengths are close in coverage to the digital camera’s zoom range. The digital camera used is an out-of-the-box Canon G2. I chose the Canon due to its zoom range, it’s ability to display histograms, its advanced metering, multiple white-balance settings, and selection of ISO settings. In the Field
As a Large Format photographer, I have pretty much resigned myself to carrying heavy and bulky camera gear into the field. The Canon’s 14.9oz (425g) was barely noticed. Also, as the Canon offered much in the way of metering, I was able to leave my Gossen Luna-Pro behind. I did carry a Pentax spot meter to corroborate the Canon’s exposure reading. While hiking, the Canon hung around my neck and was not much of a distraction. Scouting and Visualizing One of the most challenging aspects of outdoor photography is the ability to see compositions within a scene – a technique often referred to as “visualizing”. Often, even when a pleasing composition is found, conditions (most notably the quality of light) are not ideal at that specific point in time. I found the digital camera to be of great help on both counts. While exploring the terrain, using the zoom lens and little LCD screen, I was able to judge compositions on the spot. I often found myself taking several low-resolution images of interesting subjects, then retiring to a shaded area and studying them one by one at leisure. On a couple of occasions I found pleasing compositions in bad light or under uninteresting skies, and kept a low-resolution image, accompanied by notes about location and time so I can better plan my next visit. This ability to log pre-visualized scenes for later capture has proven very valuable. The Histogram Those familiar with various photo editing software know and appreciate the histogram. In essence the histogram is a graph showing the amount of pixels in the image on a scale ranging from pure white to pure black. The histogram makes it easy to judge over/under exposure by the concentration of pixels close to either end. It also enables one to judge the image’s tonal range based on distribution of pixels along the scale. In a “digital darkroom”, the histogram is a useful color and exposure correction tool. In the field – it is an invaluable aid in determining exposure. Once a pleasing composition is found, the digital camera can be used to quickly capture several bracketed frames. Switching to “playback” mode allows each version to be presented with its exposure data and the histogram. Effects of over/under exposure are immediately apparent. It is important to remember that the digital camera’s dynamic range is not identical to that of a given film. Film latitude may be wider or narrower than the digital camera’s so the histogram will not be 100% accurate. I found the following compensation table useful:
Filter Effects –Extreme Highlight/Shadow Clipping In scenes where the contrast range is too high to achieve an even exposure, split neutral-density filters are a common solution. These filters come in a variety of flavors – graduated, hard-edged, reversed, etc. Also, the density range varies, normally between 1-3 stops. The histogram can be used to select the right filter. Without a filter, a histogram will show extreme clipping of either highlights or shadows at any exposure value. This usually indicates the contrast range is too great to be captured on film. Assuming this is not a desired effect (as in the case of photographing silhouettes, for example), several exposures can be taken using available filters to determine which one yields the best effect. Traditionally, a spot meter can be used to measure the scene’s EV span, however further consideration needs to be taken to compensate for color. The histogram, however, analyses the final RGB image. Filter Effects – Color Correction Every type of film is balanced to provide neutral color at a given ambient color temperature. Low temperature indicates warmer (more yellow) light, while high color temperature indicates cool (more blue) light. Daylight-balanced films will achieve neutral color at about 5000°K, Tungsten-balanced films at about 3200°K, and so on. Ambient light, especially in the field, can have a great variance of temperatures. Most photographers will use color-correction filters to compensate for this variation. Filters in the 81 series can be used to add yellow to a high-temperature scene, while filters in the 82 series can be used to add blue to a low-temperature one. Digital cameras can compensate for variance in color temperature by shifting their white point. This is referred to as “white balance”, and most mid-level cameras allow the user to select between multiple preset values for daylight, tungsten, fluorescent etc. This feature is also valuable for the photographer in the field when determining whether color-correction is needed. By flipping through the camera’s white balance settings and closely examining the LCD screen, blue/yellow color casts can be seen, indicating whether correction is required for the film camera. Note that this is a very rough estimation, especially given the limitation of the small LCD screen. More precise evaluation can be done if the camera can be plugged into a laptop computer with a calibrated screen. While carrying one into the field may not be a viable solution, if a vehicle is close by - it may still be an option. Thus – if the LCD image looks neutral when in “Cloudy” setting, a warming filter is required. If an image looks neutral in “Tungsten” setting, a cooling filter is required. Shutter Speed Effects Fast or slow shutter speed is a commonly used technique to create such things as motion effects in water, wind effects in brush, etc. It is difficult to judge which shutter speed will yield the most pleasing effect as it depends on things like the water’s flow speed. A digital camera makes this decision easier by allowing you to capture and view the effect on the LCD screen before committing the image to film. The Workflow After experimenting with a number of ideas, some more successful than other, I adopted the following workflow:
What Have We Gained? The workflow may appear elaborate, but a traditional view-camera workflow is no less complicated. By introducing the digital camera, we gained the following benefits:
Time saved on setting up the camera for experimentation can now be better used to review potential compositions on the digital camera’s LCD screen. The view camera does not leave the pack until most, if not all, of the visualization and composition process is complete. The Ultimate Test
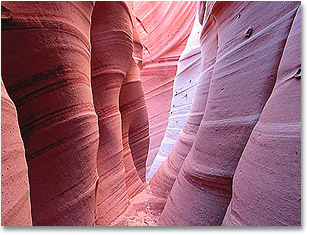
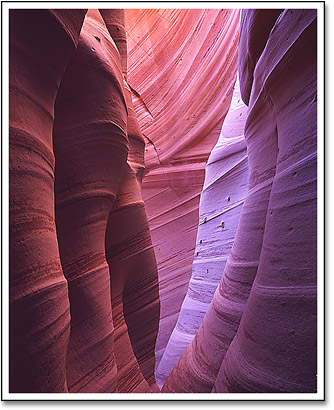
I initially put together my workflow based on theoretical assumptions and playing with the cameras in the comfort of my office. Now came time to see if it holds up in the “real world”. I picked a location that will challenge my new workflow to the max – southern Utah’s Grand Staircase-Escalante National Monument. On this trip I tested not only the handling and portability of gear while hiking through rough terrain, tackling loose sand, scrambling large boulders, squeezing through sandstone narrows, and wading in waist-deep water, but also the photographic challenges of harsh desert scenery, and deep slot canyons – with their extreme contrast, delicate textures, and wide tonal range. I was not disappointed. The images accompanying this article tell the story. Is It Really As Good As It Sounds? Yes, and no. I found the digital camera to be an extremely useful photographic tool. Still, some things about it are frustrating. For one - viewing images on the tiny LCD screen can hardly be compared to the large vibrant image seen through the ground glass. I cannot say that I was able to completely trust my composition to the digital screen. In some cases I still needed to dive under the dark cloth to fully explore the scene’s photographic potential. Still, the LCD was invaluable at determining whether a composition was there to begin with and the best way to frame it. For B&W work, I found the Canon inadequate. This model will not display a grayscale image on the LCD, making it difficult to judge the effects of commonly used filters in B&W photography. On the up side – every sheet of film used on this trip was perfectly exposed. I found the ability to review multiple compositions before deciding on the final version to be invaluable. Time normally spent in frustration setting up and moving the camera around could now be spent reviewing framing and perspective variations. At the end of the day I found myself a lot more confident in the images I have made, and the results from the lab matched my expectations perfectly. Guy Tal - NPN 440 Comments on NPN digital photography articles? Send them to the editor. |
|
|