|
|

All rights reserved. There are a number of cameras on the market that take beautiful panoramic images. Unfortunately, they can be very expensive and tend to be specialized tools rather than general-purpose cameras, putting them out of reach for many. The two most popular panorama cameras are the Fuji 617 medium format camera and the Hasselblad X-pan, which uses the width of two 35mm film frames to form one image. Fortunately, you do not have to invest thousands of dollars in these specialized cameras and their dedicated lenses to take great panoramic images – you can do so with the 35mm or digital camera you already own. This can be done by either cropping a 35mm frame into a panoramic format or taking multiple images and then stitching them together on your computer. This article focuses on the process of taking a multiple-image panoramic photograph, as this technique gives you the capability of making much higher resolution images than cropping a single 35mm frame can. 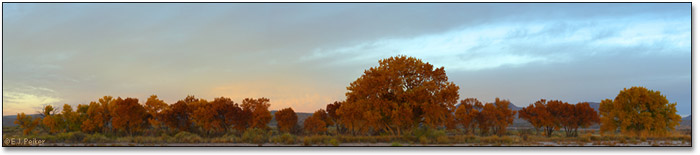
The secret to getting good panoramas is to set up your equipment meticulously prior to taking the first frame. A perfect set-up prior to shooting will make the stitching significantly easier later. Here are some simple steps to follow to get great panoramas:
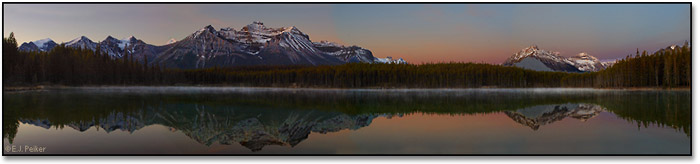
Most people that create panoramic images in this way take multiple horizontal images. While this is effective, it can lead to very narrow panoramas with little vertical detail. An alternate method is to take the photos in vertical mode. This has two major advantages. First, there is 1.5 times as much vertical information and therefore resolution. Second, longer focal length lenses can be used that induce less perspective distortion. If possible, I advise staying away from focal lengths smaller than about 35mm if you are shooting in vertical mode or 28mm if you are shooting in horizontal mode because any tilt in the vertical axis (up and down) will result in significant perspective distortion which makes the stitching process very difficult. Another tip! Do not use a polarizer on days with a blue sky. The polarizer darkens the sky most when at a 90 degree angle to the sun. Since you will be doing a panorama that usually takes up a significant arc of the sky, unnatural looking dark areas can occur where the camera passed through a 90 degree angle to the sun. If you want to darken the sky, use a split neutral density filter instead. 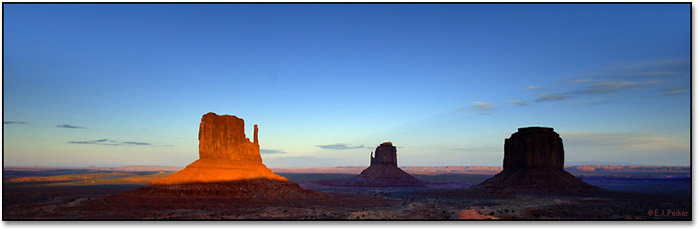
After processing of the slides and scanning them or recovery of the images from your digital storage medium, it is time to stitch them together. There are many ways to do this but by far the most convenient and accurate way to do it is using a program by ArcSoft called Panorama Maker 3 ($40 - www.arcsoft.com). This software automates many of the stitching functions including finding the optimal stitching points and exposure correction between individual frames. Sometimes, in low contrast/detail situations, you have to help it find the best stitching points but it still makes the process much simpler than any other method. Another advantage of Panorama Maker 3 is that it is not limited to vertical line linear stitches. The software will produce a seamless stitch even if the most optimal transition is a curve, a zigzag or any other shape. You can also override the stitch points that the program has selected. The program will output a TIFF file that can then be loaded in any of the popular image editing programs such as Photoshop and can then be edited normally. Alternately, you can use your image editing software to manually stitch the images together but this is significantly more work. This is done by bringing each image into a single document as a separate layer. You can then adjust their overlap until you get the result that you want. Using guide lines can help this process. It does take some image editing expertise and familiarity with your program to do this well. If the images that comprise the panorama had to be taken with significant up or down tilt and a wide angle lens, perspective distortion may result in stitching difficulties. For example, if your 24mm lens was tilted up slightly when you took the images, the correct stitch is an arc like a smiley face due to the perspective distortion. In this case it will be necessary to fix the perspective of each of the individual frames in your image editing software prior to stitching (In Photoshop: Edit > Transform > Perspective). This makes the process much more difficult to get the images to register well to each other. You are better off pointing the camera straight in this situation to prevent perspective distortion and then later cropping the image for compositional purposes. With meticulous care and precise set-up, excellent panoramic images can be made with the camera equipment you already own. Before trying this in those fleeting moments of perfect light, give it a try at home. You can set up your camera in your front yard and take a panoramic image of your neighborhood to practice. Go out and give it a try so that you will be ready to capture that magnificent scene when you are out in the field! EJP-NPN 016 Comments on NPN nature photography articles? Send them to the editor. |
|
|