Just between you and me, exposure had always been the most intimidating and problematic part of photography for me; especially when I first got started. I still feel less than a pro at setting for exposure, but I certainly understand it more now than I used to. At least now I know when I approach a scene that I can get pretty close on the exposure; I know basically what my camera is going to do. What made the difference for me?
Good teachers – I have read much here at NPN, asked many questions, and looked at lots of images. I also watched John Shaw’s video on exposure. I don’t feel that I could not have used just one of these resources to progress; I have used all of them combined. I hope that these thoughts will help you out. Just remember that this method that I will describe here and the activity that we will go through is just one way of thinking. I am certainly not a pro, but I hope that maybe my perspective can help a little bit.
Guy Tal recently stated in a thread in the NPN Nature photography discussion forum on photography definitions “Exposure is simply the amount of light hitting the film/sensor. Shutter speed and aperture are a means of controlling exposure but do not make up exposure, light does”. Guy went on “Film speed is a way of quantifying the film’s sensitivity to light. A faster film will need less exposure in a given situation than a slower film. Film speed needs to be taken into account when deciding on the appropriate exposure…” The illustration below shows how a film will interpret a given scene. Slide film has a five-stop latitude. Areas that are too dark (to the far left of the illustration) will appear blocked up where areas that are to light (to the far right) will be blown out. This is why it is important to know how to determine the exposure. In most scenes there will be some area that is outside of the latitude of the film.
My following comments will assume that the film speed or ISO sensitivity has been set in your camera or meter. This will leave us basically two unknowns of the shutter speed and lens aperture to set to decide upon our exposure settings.
Let’s try a little bit of an activity to illustrate exposure settings and how your camera meter works. Print this article and sit down somewhere with your camera. I found it easy to sit on the couch in my living room since the light was easily controlled and the range of light was not very drastic. Once sitting down, take your camera and set your meter to ‘spot’ metering and the mode to ‘manual’. (You may also want to do this without film in your camera, unless you want some pictures of your entertainment center.) I also find it helpful to set the aperture and to leave that constant for this exercise.
Once you are comfortable and you have your camera’s mode, metering, and aperture set; start pointing your camera at different things as you look through the viewfinder. Your camera’s spot meter should take whatever is in the center of the lens and meter it. On my Nikon, I have a visual indicator of this meter in the lower right of the viewfinder; I would bet that most manufacturers would have something similar in your make and model. To illustrate the principle of a mid-tone, point the lens at something and turn the dial to set the shutter speed. Turn this dial until the meter shows the indicator in the middle of the meter. The tone of the item now being metered will be made mid-toned. Mid-toned is 18% on a gray scale, or the equivalent mid-tone of the color that is being metered. All other tones in the image in the viewfinder will be rendered based on this reading. Now point the lens at something lighter or darker and notice that the meter indicator shows to the right or the left of center. Changing the shutter speed on one of these other tonal values, until the visual indicator of the meter shows in the center, indicates that this current tone will be rendered mid-toned at this shutter speed. Is this beginning to make more sense? Let’s talk in terms of a specific image.
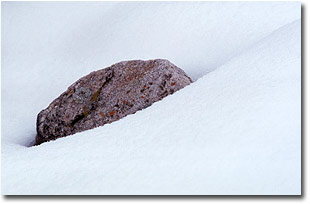 In this photo of a rock and snow, I used my camera’s manual settings and spot metering to decide on an exposure value. I knew that if I metered the snow and shot at what my camera told me to shoot the scene the snow would come out gray. I decided to meter the rock in this scene to decide upon my exposure – the rock is mid-toned, or at least close. I pointed the lens center at the rock and set the shutter speed until the meter indicator was in the center of the meter. When pointing my meter at the snow, I noticed that the indicator showed more bars on the left, indicating that I was going to overexpose that area of the scene, based on a mid-tone. Since this was snow, and I wanted it to come out white, this is correct in terms of the exposure. It is important to remember that I only need to point the center of the lens at the rock when determining the exposure, I can recompose the shot with the manual settings locked in to the meter once I have determined the exposure.
Let’s get back to your living room, and talk for a moment in terms of stops. Put in a simple way, each stop is figured by doubling or halving at least one of the values. An exposure at f/11 and 1/125 is one stop away from f/11 and /250 or f/11 and 1/60. Thinking in stops requires some practice and some thought at first, but it will soon become second nature if used often enough.
Point the meter at the white wall (or a light surface). With your aperture set at f/8, say that the shutter speed shows as 1/1000 of a second (with the indicator in the middle). Now point the camera at something middle-toned. Change the shutter speed until the visual indicator shows in the center; let’s assume that the exposure shows as f/8 and 1/250 of a second. What we have here is a two-stop difference from the previous exposure. Now point the lens at something VERY dark. Once the shutter speed is set, let’s assume that the exposure shows as f/8 and 1/60 of a second. Again this setting is two stops different than the previous exposure. Now conveniently here we have a five-stop exposure range. Going back to the second exposure value will render all three color values in the range that we metered them a second ago.
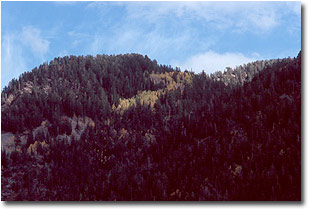 Setting your camera for exposure in the outdoors rarely come as perfectly as those in your front room. Earlier this fall I made a mistake in metering for clouds and not realizing that my fore ground was going to be thrown into deep shadow since the exposure latitude of the scene was too great, as seen in the photo to the right. What should I have done? Metered the clouds and opened up about two stops for the lightest area, the metered the darkest area and closed down two stops. If the range is greater than 5 stops (when shooting slide film) then either one area has to be blown out, or another has to be blocked up. Another method would be to meter a mid-toned value within the scene and then bracket some exposures around that value so that multiple images could be combined digitally.
How can you remember which way to adjust your exposure settings (opening up or closing down)? John Shaw suggests that when metering a light colored item, if shot at the meter reading then the item will be too dark. When a room is too dark we open the shades; thus we open up the exposure to make the item lighter. The same is true for a dark item. If shot at the meter reading then the item will appear lighter in the picture. Therefore, to darken the item as we would darken a room we would close the shades; or close down the exposure somewhat (John Shaw, Understanding Exposure).
I will admit that exposures still seem somewhat intimidating to me. I will also admit that many times the light on a scene seems just too complicated to me and I set my mode back to Aperture priority and matrix metering, just so that I do not have to decide on the exposure settings myself. When do I learn the most about exposure? When I use these methods and keep good notes about why I made the decisions that I did.
Good shooting to you. Try the camera set on manual next time out!
NB-NPN 1118
Comments on NPN nature photography instruction articles? Send them to the editor.