Though bright, sunny conditions are usually the least desirable for wildlife photography, often times we find subjects in our viewfinders under this kind of light. Therefore itĺs important to understand how the direction from which the subject is illuminated will effect on our results.
The direction of light can be classified as follows;
- Frontal Lighting - Light source (the sun) is directly behind the camera and the photographerĺs shadow is pointing directly towards the subject.
- Side Lighting - Light source is 90-degrees off-axis to the lens, from either the right or left.
- Back or Rim Lighting - Light source is directly in front of the camera and the subjectĺs shadow is pointing directly toward the photographer.
The Set Up
|
In order to illustrate the effect of the direction of light on wildlife photography, we needed a cooperative yet highly detailed subject. For this purpose, we used a mounted Wood Duck. The mounted duck was placed on top of a 4-foot step ladder with a piece of neutral toned cardboard between the mount and the ladder. Care was taken to frame the subject in a consistent manner, as well as to keep the backgrounds as consistent as possible.
The camera equipment used included a Canon 10D, a Canon EF 300/4L lens, and a Bogen 3221 tripod with a Kirk BH-1 ball head. All images were shot wide open at f/4 in evaluative metering mode with the 2-second timer and mirror lock-up engaged. Shutter speed was set so that the histogram showed little or no clipping of the highlights. The RAW files were imported into Photoshop CS where shadow/highlight adjustments were made and the images sharpened.
The Photos
Note - Thumbnails are links to larger images presented in slide show format.
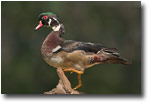
Photo 1 shows our results using frontal lighting. As expected, frontal lighting on our mounted avian subject produced a pleasing photo. However, as is common with direct frontal lighting, the subject appears flat and "two-dimensional." This is the main disadvantage of frontal lighting for wildlife photography.
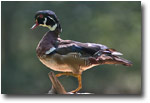
Photo 2 shows our results with side lighting, with the sun to the right of our subject. Once adjustments were made in Photoshop, the resulting photo imparts a more 3-dimensional look to the subject, something that our frontal lighting shot lacked. Notice how the texture of the feathers is better revealed, and how the curvature of the breast is now apparent. This is one of the most notable characteristics of side lighting - it reveals the subject's form and texture far better than frontal lighting. In fact, landscape photographers often seek out scenes with side lighting for this very reason.
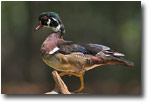
Photo 3 shows our results with back or "rim" lighting. Though this is the most difficult light to deal with, it can render some very pleasing results. Though not as much feather detail was revealed, back lighting did reveal the form of the duck better than frontal lighting, and made the subject stand out from the background better than either side or frontal lighting.
A final note on these three photos - each one required over 1-stop of minus compensation to prevent the highlights from clipping on the histogram, resulting in dark images. However, the new shadow/highlight adjustment feature in Photoshop CS brought the detail back in the shadow areas, all while keeping the highlights from burning out.
Conclusion
By understanding the effect of direction of light on wildlife subjects, we can better take advantage of every photo opportunity. Each "type" of light will reveal the subject in a different way. There is no one "correct" direction of light for wildlife photography, though some photographers may develop a personal preference for one over the other.
Finally, powerful new image editing tools, such as the shadow/highlight adjustment feature in Photoshop CS, will no doubt enable wildlife photographers to make the most of their photos - regardless of which way their shadow was pointing when they tripped the shutter!
Comments on NPN nature photography instructional articles? Send them to the editor.