Cameras record the light falling on a subject in a mechanical and objective manner. Humans, on the other hand, ‘see’ objects with a subjective bias. Indeed, our survival is hinged on our emotional reaction to the objects in our environment. When we stumble upon a grizzly bear at close range we don’t immediately notice the sun highlighting the silver-tipped fur on its back. We don’t register the sparkling of the wet drool moistening its left upper canine. Indeed, we don’t even notice that our white tee shirt has created a wonderfully bright sheen to the bear’s shaded eyes. These are the things that an experienced photographer might marvel at even while racing back to the safety of his/her car. To develop as a strong photographer you must learn to see things less as ‘subjects’ and more as objects that reflect light.
|
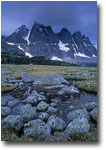
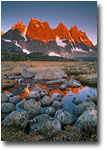

Learning to see is about understanding light, and how light affects the look of an object. The same object photographed under different kinds of light can take on hugely different looks (see Photos 1a and 1b for an example). Talented photographers use their understanding of light to enhance the viewer’s emotional response to a subject. In portraiture, for example, men are often photographed with strong, direct side lighting that enhances facial surface texture. Wrinkles, whiskers, chin clefts, and jaw lines become more pronounced with direct side lighting which amplifies facial features that most of us associate with rugged masculinity. In contrast, when your subject is a woman you may want to portray her as ‘soft’ and feminine. This is accomplished by using diffuse, front lighting that tends to flatten and hide skin imperfections and also emphasizes colour and tone so that the women’s eyes and lips are enhanced.
Nature photographers can use the same lighting techniques that famous portrait photographers such as Karsh used create his emotion filled photos. Whereas portrait artists can move and vary their lights to suit the subject, the nature photographer must wait until the ‘right’ light comes along. Let’s take a closer look at the language of light and how it affects the look of the natural environment.
The Language of Light
There are the three main categories of light on any landscape;
- Light Quality – Is the light soft (e.g. overcast), or harsh (e.g. midday sunshine)?
- Light Direction – Where is the light coming from? Is it coming from the side of the subject, the front, or the back of the subject?
- Light Temperature – What is the colour (or temperature) of the light. Is it yellow (‘warm’) sunrise light, blue (‘cool’) light at dusk, or the ‘neutral’ light of mid-day?
Light Quality
Light quality can be divided into two categories; diffused and specular light.
On overcast days, the light from the sun is diffused through the clouds. This produces a broad light source that wraps around objects and eliminates shadows. Diffused light occurs at other times as well; at dawn and dusk before the sun lights the landscape, in the shade on sunny days, or in fog.
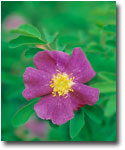
Digital sensors and film love diffused light because it is low contrast (the range of brightness between light tones and dark tones is compressed) and all tones can be easily recorded. Many photographers prefer diffused light because subjects are evenly lit, and are easy to expose properly. Intimate nature scenes, macro photography subjects, wildlife portraits, flowers, waterfalls, people portraits, and forest scenes often look their best when photographed under diffused light (Photos 2 and 4).
Specular light is produced from a bright, point source of light (in nature that is the sun) that results in high contrast. Shadows are strongly defined and the range of brightness between light and dark tones in the scene is extreme, often beyond what film or digital sensors can accurately record. The skilled photographer must understand how the camera records specular light. In doing so, the photographer learns to use high contrast light and the limited tonal reproduction of film and digital sensors to his or her advantage, to create scenes that are stark and graphic, or they learn to manipulate the light in a scene to reduce the contrast to levels that film and sensors can record.
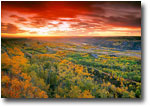
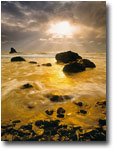
Although specular light is the most difficult to work with and to expose properly, it is also the light with the most drama, the light that gives power to the grand vista. Tame the wild beast that is specular light and you will have a potent tool for dramatic expression (Photo 3).
Light Direction
Understanding the direction of the light (from in front of, from behind, or from the side of the subject) may seem elementary and intuitive but what many novices do not understand is that light direction has a powerful affect on how the subject looks.
Front Light
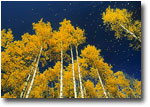
When you shoot with the sun behind you that is called front lighting. Use it whenever the scene has strong tone or colour. For example, a pink flower in a green field would look great lit from the front as would yellow aspen leaves against a blue sky. Generally, front lighting works well whenever the subject has are varied tones and color (see Photos 4 and 5).
Side light
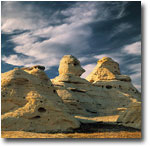
Side lighting emphasizes texture. Any subject that has strong texture will look better when photographed in sidelight. Mountains, for example, with their plunging crevasses, hanging glaciers, rocky pinnacles, and boulder strewn avalanche slopes are strongly textured landscapes and they frequently look best when thrown into three-dimensional relief through the use of side lighting. If you want to know where the strongest sidelight is in a scene, face the sun, and then turn 90 degrees away from it. Chances are any strongly textured scene (mountains, sand dunes, a rocky lakeshore) that you see in front of you will look pretty nice if you photograph it from this angle. If you want to reduce haze in the scene, darken the blue sky, or saturate the colours, try using a polarizing filter. Polarizers work best when the light source is at a 90-degree angle to the subject; perfect for side-lit scenics (Photo 6).
Back Light
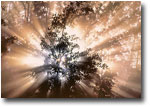
Backlighting emphasizes shape and form. The most extreme form of backlighting is a silhouette in which the subject shows no colour, detail, or texture, just shape. Backlit objects that are translucent (leaves, clouds, feathers, fur, ice) will appear almost mystical, emanating their own luminosity. For me, backlighting has the greatest mood and magic of all light directions because it is so abstract and dramatic. But, and this is an important but, backlit scenes are by far the most difficult to properly expose. Even so, when you succeed the images can be powerful (Photos 7 and 8).
Light Temperature
Over the course of a day the colour of light changes dramatically. At sunrise and sunset, the light has a strong orange-yellow colour while at dusk it is blue. Mid-day light appears ‘neutral’ and has no obvious colour cast.
Daylight film is designed to produce neutral colors in mid-day light. Often, however, the colour in a scene is far from neutral. In this case, our brains make adjustments for the light and ‘corrects’ the colour cast. Unfortunately, film does not. Most novice photographers are surprised to discover that shadows are blue, not gray, as our eyes perceive them. One of the skills required by photographers is the ability to see colour casts the same as film does and to use these colours to affect the mood of the photo.
With digital cameras there is "auto white balance," where the camera adjusts the white balance of the scene to neutral just the way our eyes do. This is useful if we want neutral colours (in portraits, or product shots for example) but nature is full of mood and colour is a key component in translating mood into our photos. For this reason, I recommend that digital cameras be set to "daylight" white balance to take advantage of the changing colour and mood of light.
Putting it all Together
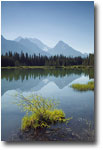
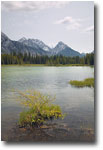
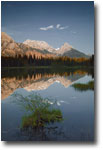
Our job as photographers is to recognize how light shapes our subjects and to use the language of light to communicate with our viewers. When confronted with a scene, our first reaction should not be to immediately pull out our camera. Instead we should first imagine how the scene in front of us might look under various types of light. For example, we discover a location in the mountains with a pristine alpine lake surrounded by soaring craggy peaks. How should we photograph this scene? We could come back when the sun is low on the horizon skimming the rugged peaks with strong warm sidelight and emphasizing texture. Or maybe, backlighting might be more appealing with the peaks silhouetted against a twilight sky and reflected in the calm of the lake. Or, how about using front light in which we could capture the first rays of the morning sun, painting the peaks orange to contrast with the deep blue colour of the shaded lake in the foreground. Photo 9a shows a mountain lake backlit by mid-morning sun. Photo 9b shows the same scene in mid-afternoon, and Photo 9c shows how the scene looks at sunset as the peaks are frontlit by the warm setting sun. Not only can we see how the lighting changes over the day, but also how the mood changes due to changes in light direction and colour.
The more understanding we have of the language of light, the more freedom we have to convey a specific subject in exactly the manner we want. We can use light to communicate our moods, our impressions, and our view of the subject at hand. We move from being documentary photographers, to expressionary image-makers (sounds impressive, eh?). Therein lies the power of photography as a vehicle of expression, not just a tool of documentation and to get there one must know the language of light.
DW-NPN 0343
About the author...
Darwin Wiggett and his wife Anita Dammer are the proprietors of Natural Moments Photography. Anita has 17 years experience as staff photographer for the Glenbow Museum in Calgary and is currently doing freelance stock photography and is the editor-in-chief of Photo Life magazine. Darwin has been shooting stock since 1990, and has two books published by Whitecap in Vancouver; Darwin Wiggett Photographs Canada and Seasons in the Rockies. Together they specialize in landscape, nature, animal, humor and kid photography and are represented by various stock agencies worldwide. Their primary stock agent is First Light in Toronto, Canada. You can view more of Darwin's work in his online portfolio.
Comments on NPN nature photography instructional articles? Send them to the editor.