How To Shoot "Bad" Light |
Brilliant sunrises and sunsets, back-lit fog, rainbows gracefully arcing through the sky, gleaming beams of light radiating from the heavens above: this is the stuff for which every nature photographer patiently waits. Every now and then, Mother Nature dishes out the top-shelf hooch by the bucketful. But what about the other 98% of the time when she’s being stingy? No worries! “Bad” light can lead to great photographs too—you’ve just got to give it a chance. In fact, some scenes reach their fullest potential in light that would be considered bad for most other landscapes.
"Liquid Light" - What makes light good or bad is often merely a matter of perspective.
Cloudy Skies
Everyone knows that cloudy skies are great for waterfalls and streams. The soft, overcast light that results is perfect for bringing out the colors of foliage and avoiding distracting hot spots on rocks and water. But don’t stop there: cloudy skies can be great for other types of scenes as well, including grand landscapes. Here’s the catch: if you include cloudy skies in your photographs, the clouds need to have some character and definition. Flat gray skies usually don’t look good at all, but clouds with texture can add mood and drama to a photograph. A splash of color in the scene can often create an important element of contrast that helps to spice up the picture.
For example, while recently photographing geothermal features in Yellowstone National Park, I came across this scene of Excelsior Geyser. At first I was disappointed about the gloomy skies, until I realized that gloom was exactly what I need for this image. The dreary clouds added eeriness to the scene, enhancing the spooky and preternatural mood of the resulting photograph. The overcast light also brought out the striking blues of the pool (the brilliant color is caused by extremophile bacteria that live in the boiling water), which would have been more subdued had I shot this image in “better” light.
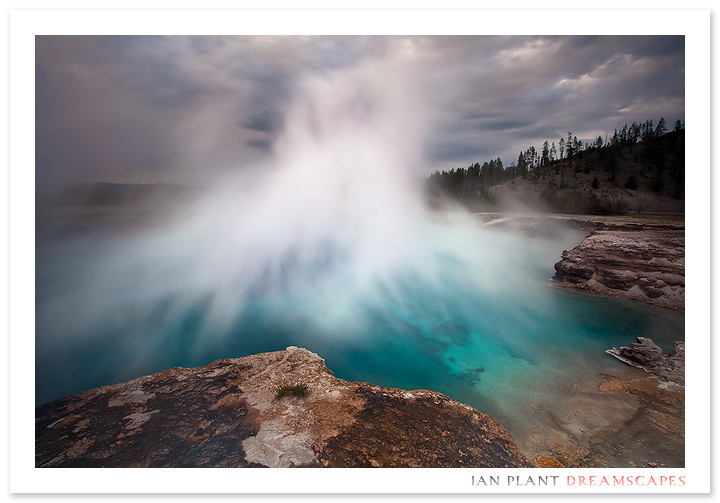
"Witches’ Brew" – Yellowstone National Park, Wyoming
Midday Light
It is axiomatic among nature photographers that harsh daylight is best avoided. Or is it? True, harsh daylight can cause excessive contrast, and the light during the middle of the day is colorless, leaving most scenes looking washed out. One the other hand, midday light can reveal certain colors in brilliant detail. And the high contrast can sometimes be used to create graphic and powerful studies of the interplay of light and shadow.
For the image below, the color of the bright orange bacterial mats below Black Pool in Yellowstone reaches its peak when the sun is high above, shining down in its full glory. Overcast light filters through too much blue, reducing the color intensity of the mats, whereas warm sunrise and sunset light makes the oranges appear to be a darker red. “Harsh” middle-of-the-day light is simply best for bringing out the full color of such scenes.
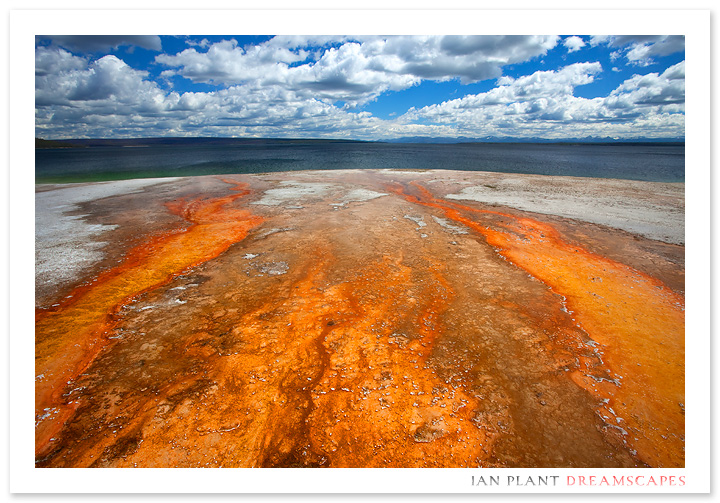
"The Firebird" – Yellowstone National Park, Wyoming
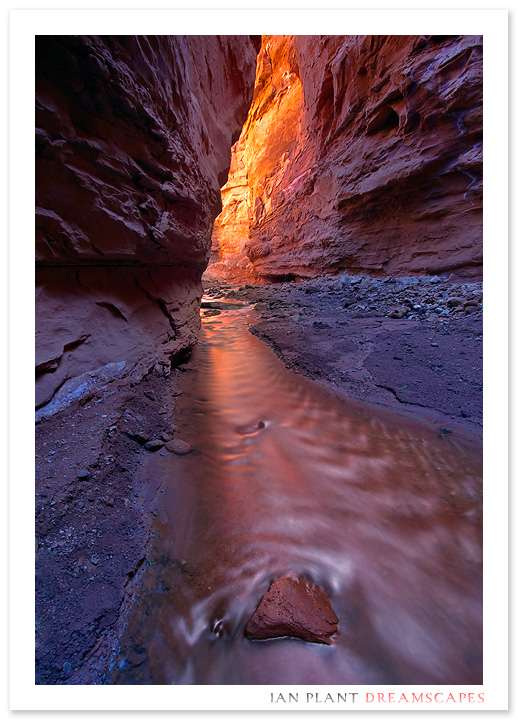
Bounce LIght
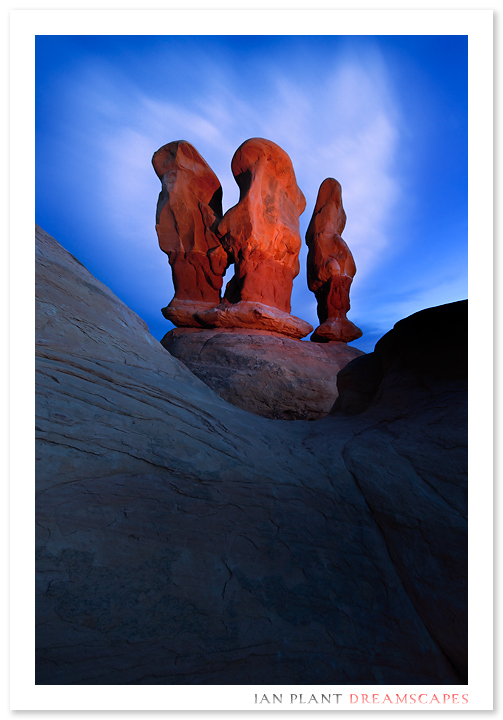
Sometimes, the best light isn’t the light falling directly on a scene. Sometimes, the best light is light that takes the scenic route, a little something known as “bounce light.” Slot canyons are a well known example of scenes that benefit from bounce light; the best colors occur when light from sunlit rocks and the blue sky above bounce down into the deep shadowed recesses of the canyon. But other scenes can benefit from bounce light as well. Particularly colorful sunrises and sunsets will often act as a giant reflector and bounce light down onto the landscape below, bathing it with colorful warm light. Reflections in water are another example of bounce light. Rocks, snow, ice, water, and other (more or less) reflective surfaces can all bounce light onto a portion of the overall scene, creating interesting photo opportunities.
For the image below, I had finished my sunrise shooting and was exploring a maze of sandstone hoodoos, scouting for potential sunset images. By the time I stumbled across this piece of bleached wood, harsh colorless daylight was illuminating almost everything around me, except for this intimate portion of the scene which was in shadow and bathed in light bouncing off of a sunlit hoodoo behind me. While everything lit by daylight appeared muted in color and washed out to the eye, the light bouncing off the red sandstone hoodoo was warm and colorful. The soft glow of the reflected light created rich and vivid colors that would not be apparent to the eye at other times of day.
"Desert Driftwood" – Vermillion Cliffs National Monument, Arizona
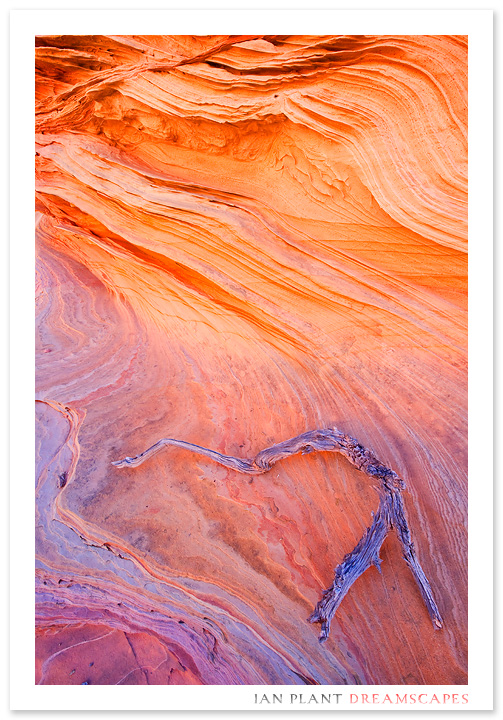
Make Your Own Light
No, I’m not talking about faking it in Photoshop. I’m talking about carrying your own portable mini-sun. I’m talking about flash. Sometimes, when the light just isn’t happening, flash can help dress things up a bit. When shooting wide-angle landscapes with small apertures, you might have to fire your flash multiple times during an exposure to illuminate even part of the scene, so fresh batteries and a fast-recycling flash are a must. Moving your flash off-camera is vital if you want to avoid flat front lighting. I often use filters over my flash to add a splash of color.
While photographing in the desert of Utah, I found myself with an interesting composition and compelling skies, but the last light of sunset was blocked by clouds on the western horizon. I really needed some warm light on the scene to bring everything together. My flash came to the rescue (actually, my flash’s capacitor exploded on the first pop, so I had to borrow a flash from a colleague— his flash came to the rescue). A few bursts with a peach-colored filter did the trick, adding some much needed color to the scene.
"Devil’s Twilight" – Grand Staircase-Escalante National Monument, Utah
Get Tonal
Remember, just because the light isn’t all that colorful, it doesn’t mean you should slap the lens cap back on and give up. A lot of scenes, while they may not work in color, make excellent black and white subjects. Black and white works best when there is a lot of texture and tonal contrast in a scene; basically, you need to create separation between the various tones and colors in an image, which will all be rendered as varying shades of white, black, and gray. So when everything in the scene looks great but the color is flat, don’t walk away—instead, shoot with black and white conversion in mind.
While photographing the Maine coast one evening, overcast skies blocked the golden hour light of sunset from breaking through. Realizing I wasn’t going to get the magic light I was after, I shifted gears and started thinking about rendering the scene in black and white. With that in mind, I realized that the wispy dark clouds would stand out from the lighter clouds in the sky, and would help complete the abstract zigzag pattern started by the waves breaking on the chaotic shore. The resulting image is less powerful than if it had been shot in “great” light, but instead it evokes a different reaction, becoming more moody and subtle in black and white.
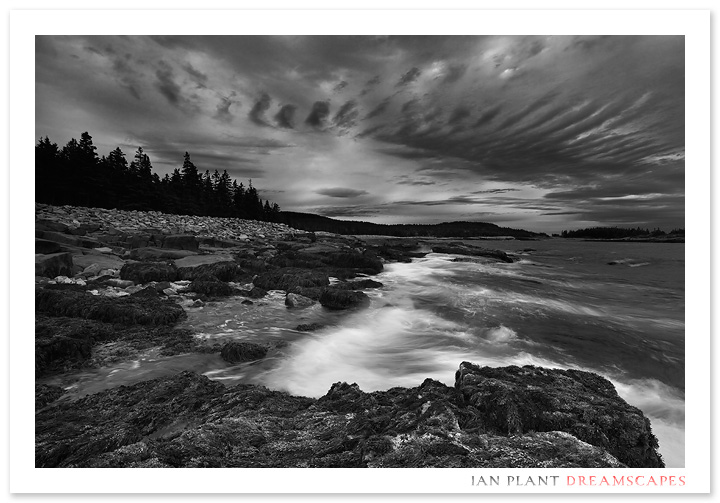
"Schoodic Storm" – Acadia National Park, Maine
Remember, the light is always great—one just needs to be flexible in their approach and work a little harder to match any given light with the right scene. Once you learn how to do that, you’ll find out just how good it can be to shoot bad light.
Comments on NPN nature photography articles? Send them to the editor. NPN members may also log in and leave their comments below.
 Ian Plant is a frequent contributor to Nature Photographers Online, Popular Photography, and Outdoor Photographer magazines, and writes a regular blog column for Outdoor Photographer magazine online called Off the Beaten Path. He is the author/photographer of eight print books, including the critically-acclaimed Chesapeake: Bay of Light (Mountain Trail Press, 2007), and a lead author and executive editor of The Ultimate Guide to Digital Nature Photography (Mountain Trail Press, 2009). His most recent book is a downloadable PDF eBook titled Chasing the Light: Essential Tips for Taking Great Landscape Photos. See more of his work online at Ian Plant Photography.